By default, the Defender Management Portal uses SQL Server Compact database. However, from Defender release 6.3.1 and above SQL Server Express database can be used as the Management Portal database. This tool can be used to switch the Defender database from SQL Compact to SQL Express.
To migrate the database
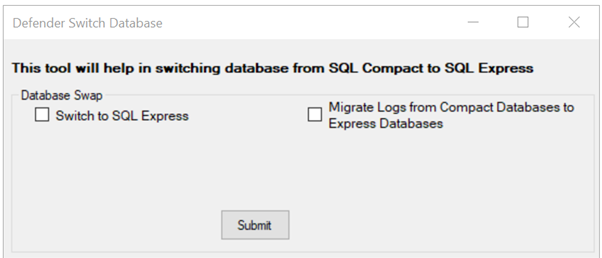
- On the Defender Management Portal computer, run DBSwap.exe located in the folder %ProgramFiles%\One Identity\Defender\Management Portal\Tools.
- Select the checkbox for “Switch to SQL Express”.
- Click on Submit button, database is switched to SQL Express successfully.
-
On the warning message displayed:
- If you are switching to SQL Express database for the first time:
-clicking on Yes will switch database to SQL Express successfully.
-clicking on No, you will have to switch back to Compact database.
- If you are already using the SQL Express database for Management portal, clicking Yes will overwrite the data on Express databases with data from the SQL Compact databases.
- Similarly, select checkbox for “Migrate logs from Compact Databases to Express Databases” and click on Submit button, logs will be migrated successfully.
Note: The data in the destination database will be overwritten after the migration. Hence it is recommended to use this option only while switching to SQL Express for the first time to avoid any data loss.
Each Defender Security Server generates logs, which are retrieved by the Log Receiver Service running on the Defender Management Portal computer. The retrieved logs are then used to do the following:
- Display authentication statistics on the Dashboard tab of the Defender Management Portal.
- Provide troubleshooting information on the Helpdesk tab of the Defender Management Portal.
- Display information on the Actions tab of the Defender Management Portal.
Defender Security Servers deployed in your environment automatically detect the Log Receiver Service and provide their logs to the service.
In situations where the connection between the Defender Security Server and the Log Receiver Service is interrupted, the logs to be sent to the service are cached in a .dat file on the Defender Security Server. After the connection is restored, the log data cached in the .dat file is sent to the Log Receiver Service.
If the Log Receiver Service is running and the connection between this service and the Defender Security Server is working properly, the .dat file should not grow in size.
On a Defender Security Server, you can find the .dat file in the following folder:
%ProgramFiles%\One Identity\Defender\Security Server\Logs
The name of the .dat file has the following format:
<ServerName>.LogQueue.dat
Where <ServerName> is the name of the computer on which the Defender Management Portal is installed.
The Log Receiver Service uses .sdf files to store logs received from Defender Security Servers. For each Defender Security Server, the Log Receiver Service creates a separate .sdf file.
These .sdf files are called the Log Receiver Service database and contain data used by the Defender Management Portal to display authentication log-related data, including the authentication statistics provided on the Dashboard tab of the portal.
On the Defender Management Portal computer, you can find these .sdf files in the following folder:
%ProgramFiles%\One Identity\Defender\Management Portal\WWW\App_Data
The name of each .sdf file has the following format: <DSS name>.<domain>.sdf
where
- <DSS name> is the name of the corresponding Defender Security Server.
- <domain> is the name of the Active Directory domain where the corresponding Defender Security Server resides.