To manage Defender Security Policy for a user
- On the computer where the Defender Administration Console is installed, open the Active Directory Users and Computers tool (dsa.msc).
- In the left pane (console tree), expand the appropriate domain node to select the container that contains the user for whom you want to manage Defender Security Policy (typically, this is the Users container).
- In the right pane, double-click the user object.
- In the dialog box that opens, click the Policy tab. This tab allows you to view the current or assign a new Defender Security Policy to the user. The tab has the following elements:
- Assigned Policy Shows the Defender Security Policy that is currently assigned to the user. When there is no Defender Security Policy assigned to the user, this option displays <undefined>.
- Select Allows you to select an existing Defender Security Policy to assign to the user.
- Clear Unassigns the current Defender Security Policy from the user.
- Effective Click this button to view the Defender Security Policy settings that will apply to the user for a particular Defender Security Server/Access Node combination. The window that opens looks similar to the following:
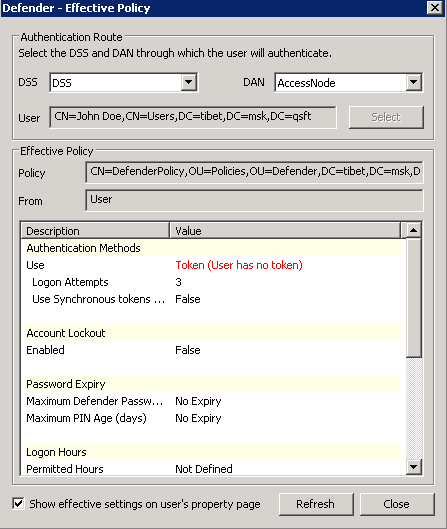
The DSS list shows the Defender Security Server that is currently selected for the user. If necessary, select any other Defender Security Server.
The DAN list shows the Access Node of which the user is a member. If necessary, select any other Access Node.
The User option displays the current user.
The Effective Policy area displays the Defender Security Policy details and authentication settings that will be effective when the user authenticates via Defender.
To manage RADIUS payload for a user
- On the computer where the Defender Administration Console is installed, open the Active Directory Users and Computers tool (dsa.msc).
- In the left pane (console tree), expand the appropriate domain node to select the container that contains the user for whom you want to manage RADIUS payload (typically, this is the Users container).
- In the right pane, double-click the user.
- In the dialog box that opens, click the RADIUS Payload tab. This tab allows you to view the current or assign a new RADIUS payload to the user. The tab has the following elements:
The DSS list shows the Defender Security Server that is currently selected for the user. If necessary, select any other Defender Security Server.
The DAN list shows the Access Node that is currently selected for the user. If necessary, select any other Access Node.
The User option displays the current user.
The Effective Payload area displays the details of the RADIUS payload that will be effective when the selected user authenticates via Defender.
In order to assign hardware tokens to users in your environment, you first need to import the corresponding hardware token objects into Active Directory.
To import hardware token objects, you need to have the file that contains the definitions of the token objects you want to import. Normally, this file is provided together with hardware tokens.
Note that the instructions in this section do not apply to hardware VIP credentials.
To import hardware token objects into Active Directory
- On the computer where the Defender Administration Console is installed, open the Active Directory Users and Computers tool (dsa.msc).
- In the left pane (console tree), expand the appropriate domain node, and click to select the Defender container.
- On the menu bar, select Defender | Import Tokens.
- Complete the wizard to import the token objects.
For more information about the wizard steps and options, see Import Wizard reference.

