Note: This topic assumes you have already performed the initial appliance installation and configuration steps in the One Identity Safeguard for Privileged Passwords Appliance Setup Guide provided in the box with your hardware equipment.
 (web client) To modify the appliance configuration settings
- Log in to the Safeguard for Privileged Passwords web client using the Appliance Administrator account.
- Click
 Settings to go to the Settings: Appliance page.
- Click Networking
 to configure the appliance. For more information, see Networking.
-
On the Appliance Configuration page, configure the following:
- Network (X0): Enter the DNS Server address information for your primary interface.
- Click Save.
- Click Time to enable and view information about the Network Time Protocol (NTP):
- Select Enable NTP.
- Set the primary and secondary NTP servers, if desired.
- The Last Sync Time is displayed. To view or hide details, click Show Last Sync Details or Hide Last Sync Details. For more information, see Time.
- Click Save.
 (desktop client) To modify the appliance configuration settings
- Log in using the Appliance Administrator account.
- Navigate to Administrative Tools | Settings | Appliance.
- Expand the Time pane to enable NTP and set the primary and secondary NTP servers. Click OK. For more information, see Time.
-
Expand the Appliance Information pane to change the appliance name.
- To change the appliance's name, click
 Edit next to the Appliance Name.
-
Expand the Networking pane to add or modify DSN suffixes. For more information, see Networking.
-
To change the DNS suffixes for your primary interface, click Edit next to the Network Interface X0 heading.
- Enter the DSN suffixes to be used.
- Click OK.
When making an RDP connection, you may encounter two different certificate messages.
-
Unsigned RDP file message
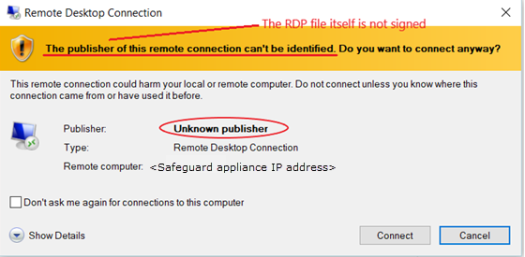
This message occurs when Remote Desktop Connection opens the RDP file that is downloaded when you click Play in the Safeguard for Privileged Passwords user interface.
We are currently working on a solution that will allow Safeguard for Privileged Passwords to sign this RDP file to avoid this message.
-
Untrusted server certification message
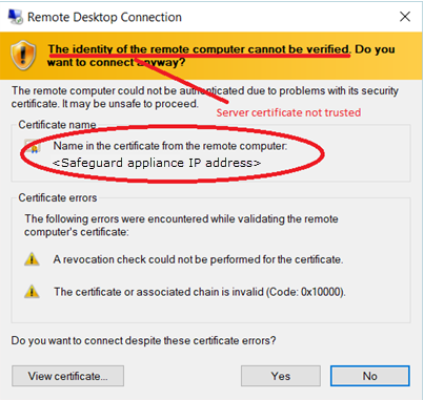
This message occurs when the workstation has not trusted the Safeguard for Privileged Passwords RDP Connection Signing Certificate.
NOTE: The IP address of the connecting server is that of the Safeguard appliance.
To avoid this message, you must trust the RDP Connection Signing Certificate and certificates in its chain of trust or replace the current certificate with an enterprise certificate and chain of trust that is trusted.
One Identity recommends that you replace the entire configuration with your own trusted enterprise PKI. This would result in a structure such as:
- Your Root CA
- Your Issuing CA
- Your RDP Signing Certificate (from Safeguard CSR)
- <Sessions module generated certificate>
The Root CA, Issuing CA, and RDP Signing Certificates can be distributed via Group Policy, Active Directory, or other distribution means.
Safeguard for Privileged Passwords (SPP) supports session access requests with mainframes using software terminal emulation including telnet and TN3270/TN5250 over telnet. Safeguard for Privileged Sessions (SPS) version 6.1 or higher is used for session recording.
Actions
- Security officers can record activities of administrators who maintain critical systems running on IBM iSeries and mainframe computers.
- Asset Administrators can:
- Customize the TN3270/TN5250 login screen field detection to work for the Safeguard custom login setup.
- Mark an asset as supporting telnet sessions and specify if the asset is available.
- Policy Administrators can create an entitlement with an access policy that includes session access using telnet and TN3270/TN5250 sessions over telnet.
- Requesters' log in experience follows the regular client telnet or TN3270/TN5250 interface even when the session is being recorded. Sessions are not launched from Safeguard for Privileged Passwords and all required log in information is available through Safeguard for Privileged Passwords.
Steps for sessions access requests using telnet and TN3270/TN5250 over telnet
IMPORTANT: Assistance with One Identity Professional Services is required for help with configurations and installation including available plug-ins, policy creation, pattern files, shortcuts, and best practices.
SPS set up steps
Complete the following set up steps in Safeguard for Privileged Sessions (SPS). For operation details, see the One Identity Safeguard for Privileged Sessions Administration Guide: One Identity Safeguard for Privileged Sessions Administration Guide.
- Import the necessary plug-in to supply authentication and authorization (AA) and credential store (credstore) information to authenticate with and pull the credentials from SPP. The plug-in file and instructions are available at the Safeguard Custom Platform Home wiki on GitHub.
- Create and assign Pattern Sets that use pattern files specific to the log in experience for each connection. A pattern file describes the log in experience for a specific system. The pattern file may include the on-screen location of the user name, password field location, login result, descriptions, states, and other required detail. Because log in experiences vary from mainframe to mainframe, custom pattern files must be created, uploaded, and referenced by the system-related connection policy. Template pattern files and instructions are available at the Safeguard Custom Platform Home wiki on GitHub.
|

|
CAUTION: Template pattern files are provided for information only. Customized telnet and TN3270/TN5250 pattern files need to be created. Updates, error checking, and testing are required before using them in production. |
- Specify each Authentication Policy and list the authentication methods that can be used in a connection.
- Create and configure each Connection Policy. Multiple connection policies are typically required because of the uniqueness of each system log on experience and related pattern file as well as the fact that inband destinations are not used for TN3270/TN5250 over telnet.
For example, telnet can be used for inband destinations. However, inband destinations are not used for TN3270/TN5250 over telnet. Instead, a fixed address including the port and server can be identified which results in the need for a different connection policy for each mainframe. A fixed address in SPS includes the port used; the SPP asset port is not used in the connection but is usually the same.
- Export a configuration file, if desired.
- Configure basic settings for the SSH server, cluster interface, and cluster management.
SPP set up steps
Complete the following set up steps in Safeguard for Privileged Passwords (SPP).
- The Asset Administrator adds the mainframe asset including the Telnet Session Port that is identified on the Administrative Tools | Asset | Management tab. For more information, see Adding an asset.
- The Policy Administrator sets the Access Type (Telnet) on the Administrative Tools | Entitlements | Access Request Policies tab.
SPP requester steps
In SPP after all configuration is complete, the requester proceeds based on the terminal service application in use.
- For a terminal service application that uses an inband connection string (like telnet), click
 Copy to copy the Hostname Connection string and check out the password. Then, paste the information in the log in screen.
- If the terminal service application requires more information for log in (for example, TN3270/TN5250 over telnet):
- Click
 Show to display values that may include Vault Address (the SPP address), a one-time Token, Username, Asset, and Sessions Module (the SPS address).
- Click Copy by any of the values to copy a single value. Or, you can click Copy at the right of all values to copy the entire the connection string, if that is required by your terminal service application.
- Paste the necessary information into your terminal service application.
- Click
 Check-In to complete the password checkout process. This makes the session request available to reviewers.
- Click
 Hide to conceal the information from view.
NOTE: The user would copy an entire connection string if, for example, you have a launcher to take the connection string and launch the profile of the terminal service application.
As a best practice, set an NTP server to eliminate possible time-related issues. For more information, see Time.
|
|
CAUTION: Changing appliance time can result in unintended consequences with processes running on the appliance. For example, there could be a disruption of password check and change profiles and audit log time stamps could be misleading. Do not set the system time before or after the validity period of the Safeguard internal certificates because the appliance will not function. |
To set the time on your appliance
- Use the appliance API to change the appliance time (SystemTime). For information about using the API, see How do I access the API.
