NOTE: Only one approval step can be defined with the CD approval procedure per approval level.
It is possible to determine who should be presented with the request for approval on the basis of a defined condition. For example, if the price of the request is below a defined limit, then the department manager can grant approval. If this limit is exceeded, the request has to be presented to the cost center manager. In another case, requests from members of department "XY" can be granted immediate approval as long as the request does not exceed the defined price limit. If the limit is exceeded or if the employee belongs to another department, the approval has to be granted by the department manager.
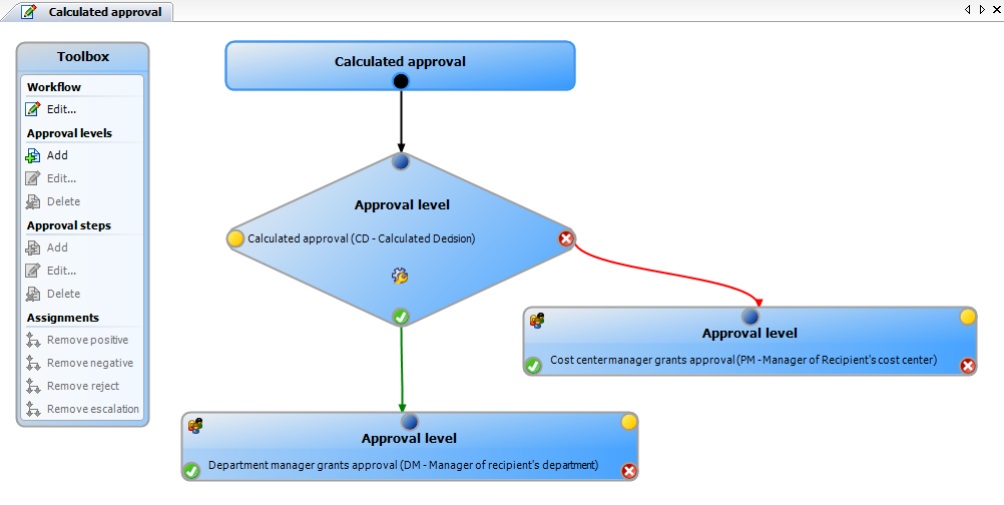
If approval should be calculated (CD approval procedure), enter a condition when you set up the approval step. If the condition returns a result, the approval step is approved through One Identity Manager. If the condition does not return a result, the approval step is denied by One Identity Manager. If there are no subsequent steps to be carried out, the request is finally granted or denied approval. The condition is defined as a valid where clause for database queries. You can enter the SQL query directly or with a wizard. The condition is always checked for the current request and requester.
Example for calculated approval
Requests with a price of under 1000 euros can be approved by the customer’s department manager. Requests over 1000 euros must be presented to the cost center manager.
Table 42: Approval step with calculated approval
|
Single step: |
Calculated approval |
|
Approval procedures: |
CD - Calculated approval |
|
Condition: |
EXISTS ( SELECT 1 FROM (SELECT UID_ITShopOrg FROM ITShopOrg WHERE EXISTS ( SELECT 1 FROM (SELECT UID_AccProduct FROM AccProduct WHERE round(PurchasePrice, 13) < round(1.000000E+003, 13)) as X WHERE X.UID_AccProduct = ITShopOrg.UID_AccProduct ) ) as X WHERE X.UID_ITShopOrg = PersonWantsOrg.UID_Org ) |
|
Number of approvers: |
1 |
Figure 7: Approval workflow showing calculated approval
Use external approvals (EX approval procedure) if a request needs to be approved once a defined event from outside One Identity Manager takes place. You can also use this procedure to allow users with no access to One Identity Manager to approve requests.
Specify an event in the approval step that triggers an external approval. The event triggers a process that initiates the external approval for the request and evaluates the result of the approval decision. The approval process waits for the external decision to be passed to One Identity Manager. Define the subsequent approval steps depending on the result of the external approval.
To use an approval procedure
-
Define your own processes that:
-
Triggers an external approval.
-
Analyzes the results of the external approval.
-
Grants or denies approval in the subsequent external approval step in One Identity Manager.
-
Defines an event that starts the process for external approval. Enter the result in Result in the approval step.
If the external event occurs, the approval step status in One Identity Manager must be changed. Use the CallMethod process task with the MakeDecision method for this. Pass the following parameters to the process task:
MethodName: Value = "MakeDecision"
ObjectType: Value = "PersonWantsOrg"
Param1: Value = "sa"
Param2: Value = <approval> ("true" = granted; "false" = denied)
Param3: Value = <reason for approval decision>
Param4: Value = <standard reason>
Param5: Value = <number approval steps> (PWODecisionStep.SubLevelNumber)
WhereClause: Value = "UID_PersonWantsOrg ='"& $UID_PersonWantsOrg$ &"'"
Use these parameters to specify which request is to be approved by external approval (WhereClause). Param1 specifies the approver. The approver is always the sa system user. Param2 passes down the approval decision. If the request was granted, a value of True must be returned. If the request was denied, a value of False must be returned. Use Param3 to pass a reason text for the approval decision; use Param4 to pass a predefined standard reason. If more than one external approval steps have been defined in an approval level, use Param5 to pass the approval step count. This ensures the approval is aligned with the correct approval step.
Use the Process Editor to define and edit processes.
Example
All approved requests should be entered into an external ticketing system and started. If a request is completed in an external ticketing system, it must also be completed in One Identity Manager. Use this approval procedure to make external approvals and define:
- A P1 process that creates a ticket with the information about the requested product in the external system and passes the ticket number to One Identity Manager in the request instance.
- An E1 event that starts the P1 event.
- A P2 process that checks whether the ticket status is "closed" and calls the CallMethod process task with the MakeDecision method in One Identity Manager.
- An E2 event that starts the P2 process.
- A schedule that starts the E2 event on a regular basis.
Enter E1 in the Event box as the trigger for the external decision.
Pass the product and customer data that the product is being requested for in the P1 process to the external ticket system. In another parameter, pass the ticket number from the external ticketing system to One Identity Manager.
Use the ticket number to check the ticket status in P2 process. If the ticket is closed, call the MakeDecision method and pass the ticket status from the external system to One Identity Manager in a parameter (Param2). In another parameter, specify the system user that changes the approval step status in One Identity Manager (Param1). Pass sa as the value for this parameter. Pass the reason for the approval decision in Param3.
For more information about defining processes, see One Identity Manager Configuration Guide.
Detailed information about this topic
Use the BS and BR approval procedures to return the approval to the requester or request recipient. The BS approval procedure finds the request requester and the BR approval procedure finds the request recipient. As a result, the requester and the request recipient can also influence the approval. Their approval can be viewed in the approval history. The approval workflow can be continued from any approval level.
The requesters are also found if the QER | ITShop | PersonInsertedNoDecide and QER | ITShop | PersonOrderedNoDecide configuration parameters are set. For more information, see Approving requests from an approver.
You can create your own approval procedures if the default approval procedures for finding the responsible approvers do not meet your requirements. The condition through which the approvers are determined is formulated as a database query. Several queries may be combined into one condition.
To set up an approval procedure
-
In the Manager, select the IT Shop > Basic configuration data > Approval procedures category.
-
Select an approval procedure in the result list and run the Change main data task.
- OR -
Click  in the result list.
-
Edit the approval procedure main data.
- Save the changes.
To edit the condition
-
In the Manager, select the IT Shop > Basic configuration data > Approval procedures category.
-
Select an approval procedure from the result list.
-
Select Change queries for approver selection.
Detailed information about this topic
