Configuring email settings
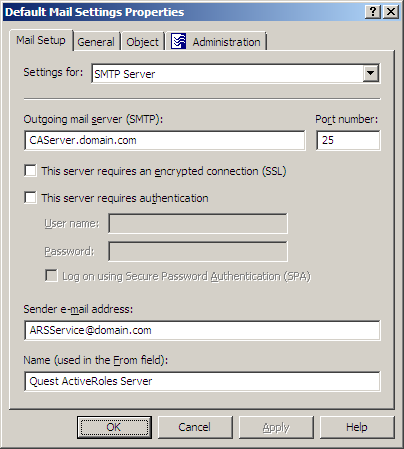
When you click Settings, the Console displays the Properties dialog for the selected email configuration, with the Mail Setup tab that looks like the following figure.
Figure 103: Mail Setup

On this tab, you can configure the following email settings:
-
Outgoing mail server (SMTP): Specify the fully qualified address of the SMTP server to use, such as smtp.mycompany.com.
-
Port number: Specify the port number to connect to on the SMTP server. Normally, the SMTP server has this port number set to 25.
-
This server requires an encrypted connection (SSL): Select this check box if the SMTP server requires that its clients use Secure Sockets Layer (SSL) when posting messages over the network.
-
This server requires authentication: Select this check box if the SMTP server is configured to use Basic Authentication or Integrated Windows Authentication. Then, type the user name and password in the boxes beneath this option. By default, the Outgoing mail server (SMTP) list includes a single entry. You can add more entries to the list using the Active Roles Console. In the Console tree, expand Configuration/Server Configuration, right-click Mail Configuration, select New > Mail Configuration, and then follow the instructions in the wizard. passes these credentials to the SMTP server when establishing a connection.
-
Log on using Secure Password Authentication (SPA): Select this check box if the SMTP server is configured to use Integrated Windows Authentication, in order not to transmit the actual user password across the network.
-
Sender email address: The default email address of the message sender. A valid email address must be specified. Normally, this is the email address of the service account used by the Administration Service.
-
Name (used in the From field): Specify the default name of the message sender, to be displayed in the From field of messages sent by using this email configuration.
When you are done configuring the email server-related settings, click OK to close the Properties dialog box the email configuration. Then, click Next and follow the instructions in the wizard to create the Policy Object.
Steps for configuring a Notification Distribution policy
To configure a Notification Distribution policy
-
On the Policy to Configure page, select Notification Distribution Policy, and then click Next.
-
On the Notification Recipients and Message page, do the following, and then click Next:
-
Click the button next to Notification recipients, and select one or more email recipients.
-
In Message Subject, type the subject of the message that the specified recipients will receive upon a request to perform a deprovisioning operation.
-
Under Message Body, type any information regarding the deprovisioning operation.
-
On the Outgoing Mail Server page, select the email configuration you want the policy to use. In the Outgoing mail server (SMTP) list, click the appropriate mail settings.
-
If you want to view or modify the selected mail settings, click Settings, and use the Mail Setup tab. For more information, see Configuring email settings.
-
Click Next.
-
On the Enforce Policy page, you can specify objects to which this Policy Object is to be applied:
-
Click Next, and then click Finish.
Scenario: Sending deprovisioning notification
This scenario describes how to configure a policy so that the administrator is notified of deprovisioning objects in any domain registered with Active Roles (managed domain).
To implement this scenario, you must perform the following actions:
- Create the appropriate e-mail configuration.
- Create, configure, and apply the Policy Object that defines the appropriate policy.
As a result, upon a request to deprovision an object such as a user or group in any managed domain, the administrator receives an e-mail message informing of the deprovisioning request. The message includes the name of the object to deprovision.
The following two sections elaborate on the steps to implement this scenario.
Step 1: Creating the email configuration
This scenario assumes that your SMTP server:
-
Runs on the server smtp.mycompany.com.
-
Uses the default port number (25).
-
Allows anonymous access.
-
Allows non-encrypted connections.
Additionally, the service account of the Administration Service is assumed to have a mailbox with the email address of ARSService@mycompany.com.
Create the email configuration by using the Active Roles Console:
-
In the Console tree, expand Configuration > Server Configuration, right-click Mail Configuration, and then select New > Mail Configuration to start the New Mail Configuration Wizard.
-
Click Next.
-
In Name, type Deprovisioning Notification Distribution.
-
Click Next.
-
In Outgoing mail server (SMTP), type smtp.mycompany.com.
-
In Sender e-mail address, type the email address of the service account: ARSService@mycompany.com.
-
In Name (used in the From field), type Active Roles.
-
Click Next, and then click Finish.

