
Using inband destination selection and gateway authentication with OpenSSH
One Identity Safeguard for Privileged Sessions (SPS) can authenticate users attempting to establish an SSH connection against a gateway (see Configuring gateway authentication for more details). The following steps explain how you can provide the gateway login credentials:
-
Enter the following command:
# ssh gu=<gatewayusername>@<username>@<server>@<scb>
...where <gatewayusername> is the gateway username, <username> is the username on the target server, <server> is the target server's hostname (or IP address), and <scb> is the hostname (or IP address) of SPS.
If you do not specify the username or the address in nontransparent SSH and Telnet connections, One Identity Safeguard for Privileged Sessions (SPS) displays an interactive prompt where you can enter the username and the server address.
Example
Assuming the following values:
-
The gateway username is training1
-
The username on the target server is root
-
The target server is 192.168.60.100
-
The SPS server is scb
You can enter the following command:
# ssh gu=training1@root@192.168.60.100@scb
-
-
Alternative approach:
-
Enter only the hostname (or IP address, depending on your configuration) of SPS with the following command:
# ssh <scb>
-
At the login prompt, provide the username on the target server, and the target server's hostname (or IP address) using the <username>@<server> format.
-
When prompted, provide the gateway username.
-
SSH usermapping and keymapping in AD with public key
A customer wants to be able to disable password authentication in SSH for admin users on the UNIX servers. However, the customer uses Active Directory, and would not like to enter the username/password at gateway authentication for every login over and over again. Therefore, the customer needs a quasi SSO-like system, with only one group logging in as root and another group as XY user.
To perform SSH usermapping and keymapping in AD with public key
-
Create an LDAP authentication policy. For details on creating a new authentication policy, see Authentication Policies. In this scenario, only a few important details will be highlighted.
-
In the Authenticate the client to SPS using field, set the authentication method used on the client-side to LDAP. This will be the Active Directory where the gateway will get the public key from, for authentication. Enable Publickey only from the Allowed authentication methods and disable all other methods.
-
In the Relayed authentication methods field, enable Public key and select Agent. Disable all other methods.
-
-
Create a Credential Store that can return a private key for server-side authentication. It is local Credential Stores and external Credential Stores (with a suitable plugin) that can return a private key.
For detailed step-by-step instructions, see Configuring local Credential Stores. In this scenario, only a few important details will be highlighted.
-
Navigate to the bottom of the policy, and click
to add a new user.
-
Enter the username in the Username field (for example: root). Generate a Private key and upload its public counterpart to the server.
-
-
Set an LDAP server policy where you set up the Active Directory. For details on authenticating users to an LDAP server, see Authenticating users to an LDAP server.
Make sure that the Publickey attribute name field in this Active Directory LDAP policy is set to sshPublicKey.
-
By default, the Active Directory does not have any attribute that could store the SSH public key. To solve this, add an OpenSSH-LPK compatible schema to the Active Directory by doing any of the following:
-
Create an sshPublicKey attribute, and add that directly to one of the objectClasses of the user in question.
-
Create an sshPublicKey attribute and an ldapPublicKey auxiliary objectClass, and add the ldapPublicKey auxiliary objectClass to one of the objectClasses of the user in question.
The sshPublicKey attribute must be compliant with the OpenSSH-LPK schema and have the following properties:
-
Name: sshPublicKey
-
Object ID: 1.3.6.1.4.1.24552.500.1.1.1.13
-
Syntax: Octet String
-
Multi-Valued
The ldapPublicKey auxiliary objectClass must be compliant with the OpenSSH-LPK schema and have the following properties:
-
Name: ldapPublicKey
-
OID: 1.3.6.1.4.1.24552.500.1.1.2.0
The OpenSSH-LPK schema is available on the openssh-lpk Google Code page.
The following steps describe how to create an sshPublicKey attribute and an ldapPublicKey auxiliary objectClass, and then add the ldapPublicKey auxiliary objectClass to one of the objectClasses of the user.
-
Enable Schema updates using the registry:
-
Click Start, click Run, and then in the Open box, type: regedit. PressEnter.
-
Locate and click the following registry key: HKEY_LOCAL_MACHINE\SYSTEM\CurrentControlSet\Services\NTDS\Parameters.
-
On the Edit menu, click New, and then click DWORD Value.
-
Enter the value data when the following registry value is displayed:
Value Name: Schema Update Allowed
Data Type: REG_DWORD
Base: Binary
Value Data: 1
NOTE: Type 1 to enable this feature, or 0 (zero) to disable it.
-
Quit Registry Editor.
-
-
Install the Schema snap-in. For details, see the Microsoft Documentation. Note that you must have Administrator privileges to install the Schema snap-in.
-
Click Start, click Run, and then in the Open box, type: MMC. Press Enter.
-
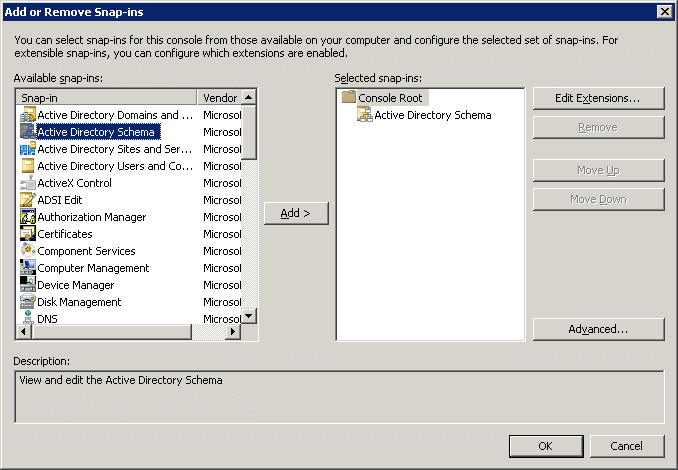
Navigate to File > Add or Remove Snap-in, select Active Directory Schema and click Add. Note that you must have Schema Administrator privileges to complete the following steps.
Figure 337: Add or Remove Snap-in
-
Expand the Active Directory schema and right-click Attributes.
-
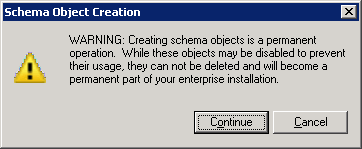
Click Create Attribute. If a warning appears, click Continue.
Figure 338: Creating Attribute - Warning
-
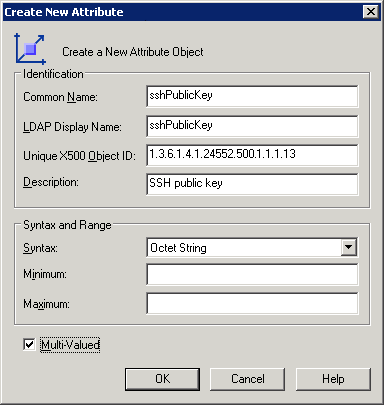
In Common Name and LDAP Display Name, enter sshPublicKey.
-
In Unique X500 Object ID, enter 1.3.6.1.4.1.24552.500.1.1.1.13.
-
For Syntax, select Octet String.
-
Enable Multi-Valued. Click OK.
Figure 339: Create New Attribute
-
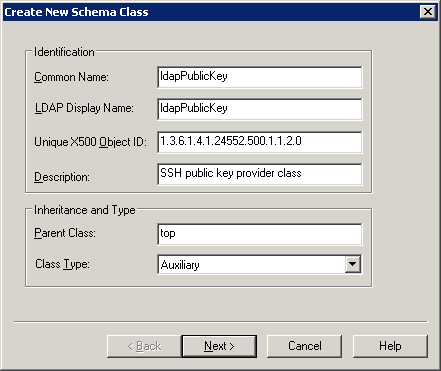
Right-click Classes and click Create class. If a warning appears, click Continue.
-
In Common Name and LDAP Display Name, enter ldapPublicKey.
-
In Unique X500 Object ID, enter 1.3.6.1.4.1.24552.500.1.1.2.0
-
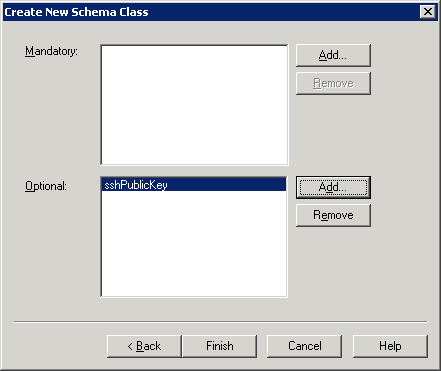
Create a new schema class.
In Parent Class, enter top, and in Class Type, select Auxiliary. Click Next.
Figure 340: Create New Schema Class — screen 2
Add sshPublicKey to the Optional field. Click Finish.
Figure 341: Create New Schema Class — screen 1
-
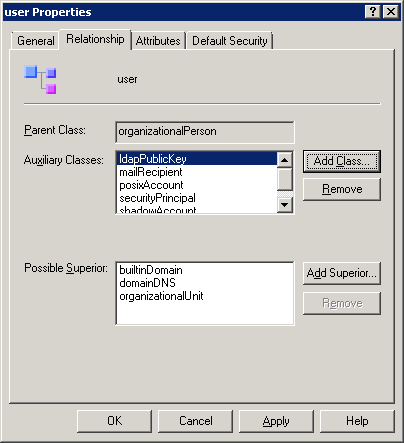
Expand Classes and select User. Right-click User and select Properties. Navigate to Relationship > Auxiliary Classes, click Add Class and add the ldapPublicKey class. Click Apply.
Figure 342: User Properties
-
-
The next step is to map the public keys to users. This is not possible in a user editor, use a low-level LDAP utility instead.
-
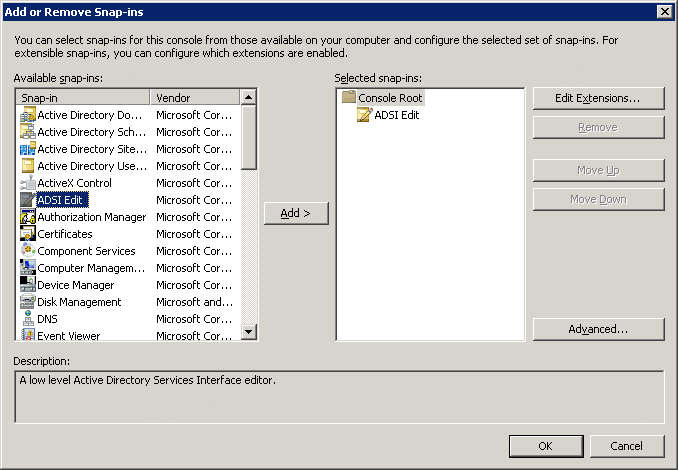
Add ADSI Edit as a snap-in to MMC.
Figure 343: Adding ADSI Edit
-
Right-click on the node and press Enter.
-
Search for the user in the tree, right-click on it and select Properties. All attributes can be edited there, so sshPublicKey too. Add the public keys to the Active Directory users.
NOTE: It may happen that sshPublicKey is not visible in ADSI Edit. To make sshPublicKey visible, complete the procedure described in section
Extending the Partial Attribute Set in https://blogs.technet.microsoft.com/scotts-it-blog/2015/02/28/ad-ds-global-catalogs-and-the-partial-attribute-set/.
-
-
Create a usermapping policy where you will set those groups from the Active Directory who can become root. For details on creating usermapping policies, see Configuring usermapping policies. In this scenario, only a few important details will be highlighted.
-
Set Username on the server to root and select the group you intend to give these rights to.
-
If you intend to allow other users in without usermapping, enable Allow other unmapped usernames.
-
-
Navigate to the relevant connection on the SSH Control > Connections page, and do the following:
-
In the Authentication policy field, add the LDAP authentication policy you created in Step 1.
-
In the LDAP Server field, add the LDAP server policy you created in Step 3.
-
In the Credential Store field, add the Credential Store you created in Step 2.
-
In the Usermapping Policy field, add the usermapping policy you created in Step 6.
-
Click
to save the change.
-
Troubleshooting One Identity Safeguard for Privileged Sessions (SPS)
This section describes the tools to detect networking problems, and also how to collect core dump files and view the system logs of One Identity Safeguard for Privileged Sessions (SPS).
If you need to find the SPS appliance in the server room, you can use IPMI to control the front panel identify light. On One Identity Safeguard for Privileged Sessions N10000, navigate to Basic Settings > System > Hardware information > Blink identification lights and click On to blink the LEDs of hard disk trays on the front of the SPS appliance in red.
Topics:
Gathering data about system problems
Viewing logs on One Identity Safeguard for Privileged Sessions (SPS)
Changing log verbosity level of One Identity Safeguard for Privileged Sessions (SPS)
Collecting logs and system information for error reporting
Collecting logs and system information of the boot process for error reporting
Troubleshooting a One Identity Safeguard for Privileged Sessions (SPS) cluster
Understanding One Identity Safeguard for Privileged Sessions (SPS) RAID status
Restoring One Identity Safeguard for Privileged Sessions (SPS) configuration and data
Configuring the IPMI from the BIOS after losing IPMI password
Network troubleshooting
The Basic Settings > Troubleshooting menu provides a number of diagnostic commands to resolve networking issues. Logfiles of One Identity Safeguard for Privileged Sessions (SPS) can also be displayed here — for details, see Viewing logs on One Identity Safeguard for Privileged Sessions (SPS).
Figure 344: Basic Settings > Troubleshooting — Network troubleshooting with SPS
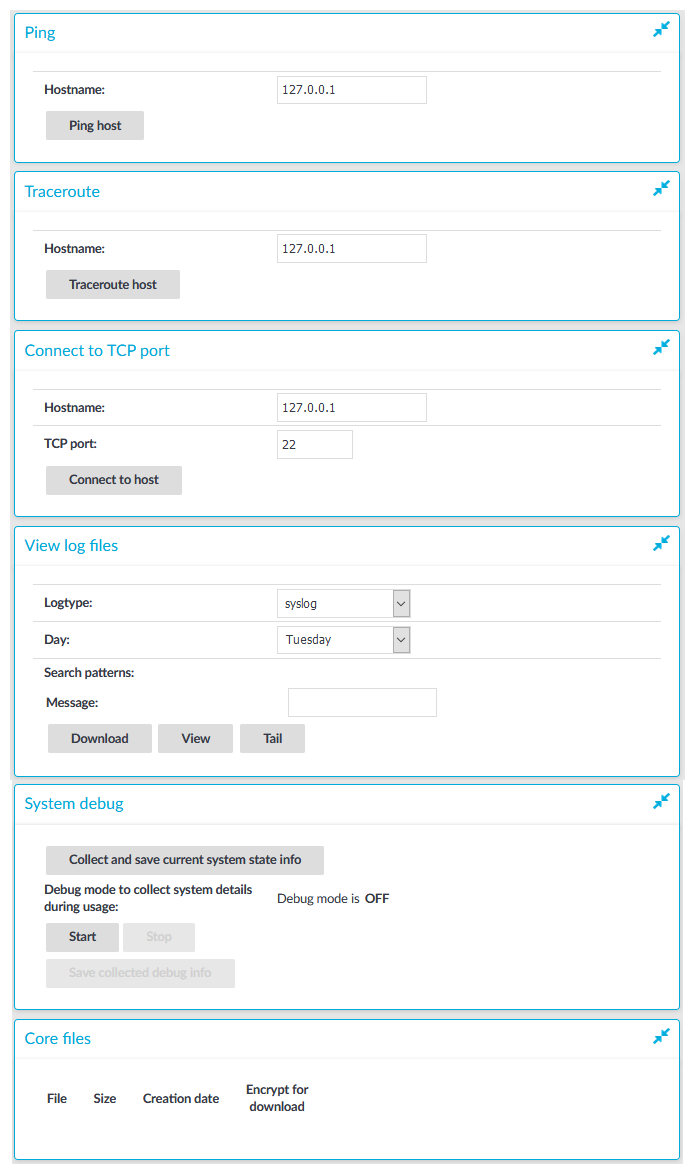
The following commands are available:
-
ping: Sends a simple message to the specified host to test network connectivity.
-
traceroute: Sends a simple message from SPS to the specified host and displays all hosts on the path of the message. It is used to trace the path the message travels between the hosts.
-
connect: Attempts to connect the specified host using the specified port. It is used to test the availability or status of an application on the target host.
To execute one of the above commands
-
Navigate to Basic Settings > Troubleshooting.
-
Enter the IP address or the hostname of the target host into the Hostname field of the respective command. For the Connect command, enter the target port into the TCP port field.
Use an IPv4 address.
-
Click the respective action button to execute the command.
-
Check the results in the pop-up window. Log files are displayed in a separate browser window.