Chat now with support
Chat with Support

One Identity Safeguard for Privileged Sessions 6.9.4 - Administration Guide

Preface Introduction The concepts of One Identity Safeguard for Privileged Sessions (SPS)
The philosophy of One Identity Safeguard for Privileged Sessions (SPS) Policies Credential Stores Plugin framework Indexing Supported protocols and client applications Modes of operation Connecting to a server through One Identity Safeguard for Privileged Sessions (SPS) Archive and backup concepts Maximizing the scope of auditing IPv6 in One Identity Safeguard for Privileged Sessions (SPS) SSH host keys Authenticating clients using public-key authentication in SSH The gateway authentication process Four-eyes authorization Network interfaces High Availability support in One Identity Safeguard for Privileged Sessions (SPS) Versions and releases of One Identity Safeguard for Privileged Sessions (SPS) Accessing and configuring One Identity Safeguard for Privileged Sessions (SPS)
The Welcome Wizard and the first login Basic settings
Supported web browsers and operating systems The structure of the web interface Network settings Configuring date and time System logging, SNMP and e-mail alerts Configuring system monitoring on SPS Data and configuration backups Archiving and cleanup Using plugins Forwarding data to third-party systems Starling integration
User management and access control Managing One Identity Safeguard for Privileged Sessions (SPS)
Controlling One Identity Safeguard for Privileged Sessions (SPS): reboot, shutdown Managing Safeguard for Privileged Sessions (SPS) clusters Managing a High Availability One Identity Safeguard for Privileged Sessions (SPS) cluster Upgrading One Identity Safeguard for Privileged Sessions (SPS) Managing the One Identity Safeguard for Privileged Sessions (SPS) license Accessing the One Identity Safeguard for Privileged Sessions (SPS) console Sealed mode Out-of-band management of One Identity Safeguard for Privileged Sessions (SPS) Managing the certificates used on One Identity Safeguard for Privileged Sessions (SPS)
General connection settings HTTP-specific settings ICA-specific settings MSSQL-specific settings RDP-specific settings SSH-specific settings Telnet-specific settings VMware Horizon View connections VNC-specific settings Indexing audit trails Using the Search interface Advanced authentication and authorization techniques Reports The One Identity Safeguard for Privileged Sessions (SPS) RPC API The One Identity Safeguard for Privileged Sessions (SPS) REST API One Identity Safeguard for Privileged Sessions (SPS) scenarios Troubleshooting One Identity Safeguard for Privileged Sessions (SPS) Using SPS with SPP Configuring external devices Using SCP with agent-forwarding Security checklist for configuring One Identity Safeguard for Privileged Sessions (SPS) Jumplists for in-product help Configuring SPS to use an LDAP backend Glossary

Creating a new HTTP authentication policy

An authentication policy is a list of authentication methods that can be used in a connection. Connection definitions refer to an authentication policy to determine how the client can authenticate to One Identity Safeguard for Privileged Sessions (SPS).

To create a new authentication policy

  1. Navigate to HTTP Control > Authentication Policies, and click .

    Figure 189: HTTP Control > Authentication Policies — Configuring HTTP authentication policies

  2. Enter a name for the policy into the Name field.

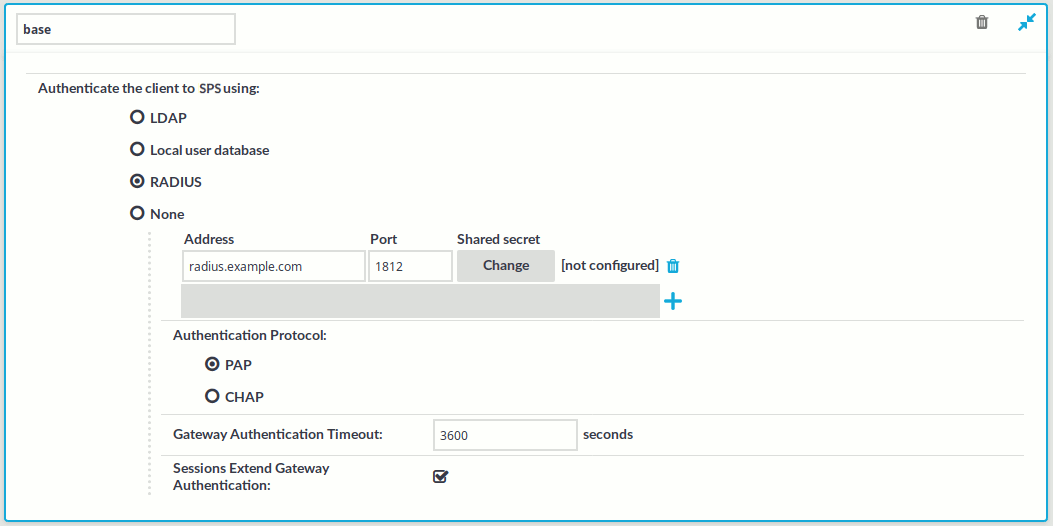
  3. Select the authentication method used on the client-side in the Authenticate the client to SPS using field. For the client-side connection, SPS can authenticate the client inband (within the HTTP protocol) using the following authentication methods:

    • LDAP: SPS will authenticate the client to the LDAP database set in the LDAP Server of the connection policy. To use LDAP authentication on the client side, select Authenticate the client to SPS using > LDAP.

      NOTE:SPS will authenticate the client-side connection to the LDAP server configured in the connection policy. This is not necessarily the same as the LDAP server used to authenticate the users accessing the SPS web interface.

    • Local user database: Authenticate the client locally on the SPS gateway using a Local user database. Select the database to use in the Local user database field. For details on creating a Local User Database, see Creating a Local User Database.

    • RADIUS: SPS will authenticate the client to the specified RADIUS server. Select Authenticate the client to SPS using > RADIUS, enter the IP address (use an IPv4 address) or hostname of the RADIUS server into the Address field, the port number of the RADIUS server into the Port field, and the shared secret of the RADIUS server into the Shared secret field. Only password-authentication is supported (including one-time passwords), challenge-response based authentication is not.

      To add more RADIUS servers, click and fill in the respective fields.

    • None: Do not perform client-side authentication, the client will authenticate only on the target server.

  4. Specify the time remaining until a successful gateway authentication times out into the Gateway Authentication Timeout field.

    To avoid interruptions for active HTTP sessions, select the Sessions Extend Gateway Authentication checkbox. When enabled, active HTTP sessions can extend the gateway authentication beyond the configured timeout.

  5. Click .

    NOTE: The client-side authentication settings apply for authenticating the user inband (that is, within the HTTP protocol) to the SPS gateway.

Setting up HTTP connections

This section focuses on describing the HTTP-specific details of connection configuration. For a detailed description on configuring connections, see General connection settings.

Topics:

Setting up a transparent HTTP connection

The following describes how to set up a transparent HTTP connection. To audit HTTP connections in non-transparent mode, see Enabling One Identity Safeguard for Privileged Sessions (SPS) to act as a HTTP proxy.

Figure 190: HTTP Control > Connections — Transparent HTTP connection

To set up a transparent HTTP connection

  1. In the Name field, enter the name of the connection that will identify the connection policy.

  2. In the From field, enter the IP address and prefix of the client that will be permitted to access the server.

    You can use an IPv4 or an IPv6 address. To limit the IP range to the specified address, set the prefix to 32 (IPv4) or 128 (IPv6).

  3. In the To field, enter the IP address and prefix that the clients will target.

    You can use an IPv4 or an IPv6 address. To limit the IP range to the specified address, set the prefix to 32 (IPv4) or 128 (IPv6).

  4. In the Target section, select Use original target address of the client.

  5. In the SNAT section, select Use the original IP address of One Identity Safeguard for Privileged Sessions (SPS).

  6. Since SPS cannot automatically decide whether the incoming sessions are encrypted or not, it is required to setup another identical connection policy for the same sessions, for HTTPS. As a result, HTTP and HTTPS sessions will be saved into separate trails.

    1. Setup a new connection policy with the same settings as above.

    2. Set the Port to 443.

    3. Enable TLS encryption. For details, see Enabling TLS encryption in HTTP.

Enabling One Identity Safeguard for Privileged Sessions (SPS) to act as a HTTP proxy

The following describes how to enable One Identity Safeguard for Privileged Sessions (SPS) to act as a HTTP proxy.

Figure 191: HTTP Control > Connections — Act as HTTP proxy

To enable SPS to act as a HTTP proxy

  1. Enable Act as HTTP proxy to configure the client to use SPS as a HTTP proxy.

    You can use SPS as a HTTP proxy through TLS. All traffic between the browser and SPS is tunneled through TLS.

    To use this feature, ensure that the client software can establish secure web proxy connections and supports client software configuration, such as, proxy auto-configuration files.

    For information about making browser specific settings for Chromium, see Secure Web Proxy.

  2. Select whether you want encrypted web proxy connection between the HTTP client and SPS.

    Since there is now a secure channel between the web browser and SPS, you can also enable proxy authentication. This makes it possible for the web browser to do an inband gateway authentication to SPS before being able to issue HTTP requests through SPS.

    • To disable encryption between the HTTP client and SPS, select Disabled.

      NOTE: Since the forwarded data may contain sensitive information, One Identity recommends using encryption between the HTTP client and SPS.

    • To use encryption between the HTTP client and SPS, select one of the following options:
      • To use a fix certificate, select Use the same certificate for each connection and copy or upload the certificate.
      • To generate a certificate on-the-fly, signed by a provided Signing CA, select Generate certificate on-the-fly. It uses the parameters of the signing CA, excluding the CN field, which is filled with the name of the target host name.

        NOTE: When Generate certificate on-the-fly is selected and the connection is in transparent setup, the CN field is filled in using Server Name Indication (SNI). If the client does not support SNI, the CN field will contain the target IP, which may cause certificate verification warning on the client browser.

  3. Select Inband destination selection as Target.

  4. To permit access to any HTTP servers, enter 0.0.0.0/0 into the Domain field. Alternatively, enter the IP address or subnet of the HTTP address you want permit access to. For IPv6 addresses, add ::/0 as well.

  5. To permit HTTP access to the destination servers on any port, leave the Domain > Port field empty. Otherwise, clients will be permitted only to access the specified port.

  6. Enter the port where SPS should accept HTTP connections into the To > Port field. The default port number when using the Act as HTTP proxy setting is 3128. This value should be the same as the proxy port setting on your clients.

  7. Ensure that you have set SPS as proxy on the clients.

    Caution:

    To perform gateway authentication on SPS, the client browsers must be configured to use a Proxy Auto-Configuration (PAC) script.

    To perform gateway authentication in a TLS-encrypted channel, the script must return an HTTPS address. Note that currently the Safari browsers do not support TLS-encryption in gateway authentication. For example:

    if (dnsDomainIs(host, "example-domain.com") || dnsDomainIs(host, "www.example-domain.com"))
    return "HTTPS 192.168.11.121:3128";

    The client browsers might require the certificate of SPS to contain the Subject Alternate Name field. Certificates generated on SPS using the Generate certificate on-the-fly option automatically contain this field. If you Use the same certificate for each connection, make sure this field is present and properly set.

Related Documents

The document was helpful.

Select Rating

I easily found the information I needed.

Select Rating