Example of cross-object value templates
If a value template references a value from another object, it can be accessed using the foreign key (FK) relation.
Figure 9: Effect of cross-object value templates
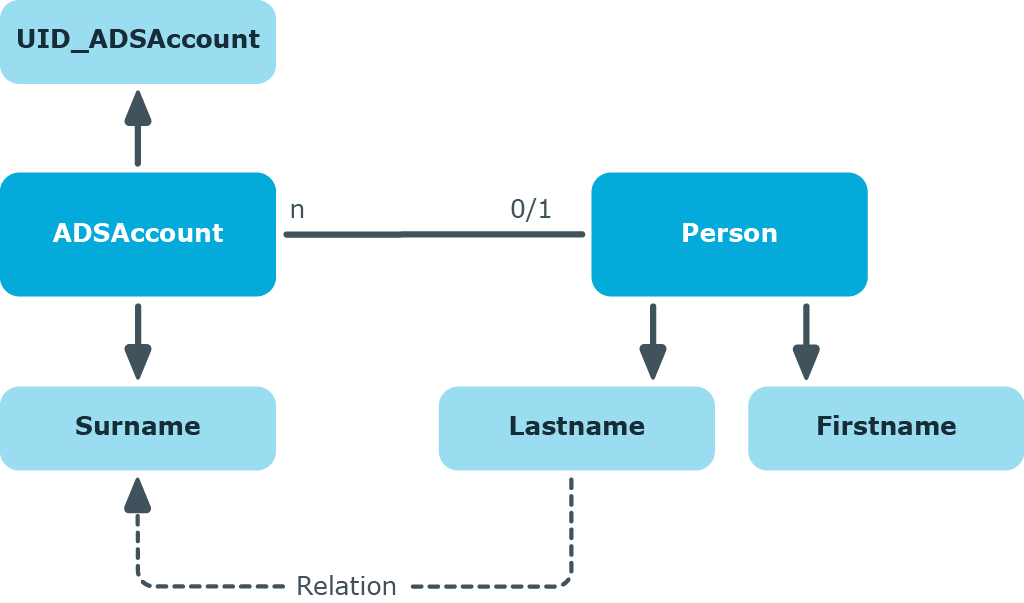
If, for example, the surname of an Active Directory user account (ADSAccount.Surname) is derived from the surname of an employee (Person.Lastname), enter the template for the ADSAccount.Surname column as follows:
Value = $FK(UID_Person),Person.Lastname$
If the employee’s surname changes, the last name of the Active Directory user changes, too. The Person.Lastname column is therefore the sender and the ADSAccount.Surname column is the receiver. The relation is mapped in the DialogNotification table as follows:
Person.Lastname --> ADSAccount.Surname
Limiting column length
You can use the column definition to control the length of the values to be entered. For example, the login name of an Active Directory user account is limited to a maximum of 20 characters. You can also use the column definition to define which columns are required.
To define the length of a column
- In the Designer, select the One Identity Manager Schema category.
- Select the table and start the Schema Editor with the Show table definition task.
- Select the column and then the Column properties view.
-
Select the Value calculation tab and edit the following properties.
- Max. length: Enter the maximum length of the column. If the value is equal to 0, the length is taken from the database schema.
- Min. length: Enter the minimum length of the column. Columns with a minimum length of 1 or greater are flagged as required fields in the front-ends.
Related topics
Defining decimal places for displaying values
In the user interface, you can define the number of decimal places for displaying values of columns with the .Net data types Double, Decimal, Int, Long or Short.
In columns with the .Net data types Int, Long or Short, the decimal point is shifted in the value display when the decimal places are specified. In columns with the .Net data types Double or Decimal, the value is displayed with the corresponding number of places after the decimal point. Take this behavior into account when calculating with different data types.
Examples
- Prices with the .Net data type Int are given with cent after the decimal point. In the front-end a price of $3.50 is displayed as 3.50 and saved in the database as 350.
- Quantities with the .Net data type double are, for example, specified with three places after the decimal point. In the front-end, a quantity of 100 pieces is displayed with the value 100,000, while the value 100 is saved in the database.
To define the number of decimal places
- In the Designer, select the One Identity Manager Schema category.
- Select the table and start the Schema Editor with the Show table definition task.
- Select the column and then the Column properties view.
- Select the Column tab and enter the number of decimal places to be used in the Number of decimal places input field.
Related topics
Using predefined formatting types
You can specify column formats based on predefined formatting types. By combining formatting types with each other, you can obtain the formatting you required.
To specify formatting types
- In the Designer, select the One Identity Manager schema category.
- Select the table and start the Schema Editor with the Show table definition task.
- Select the column and then the Column properties view.
- Select the Value calculation tab and define the formatting types in the Column format input field.
Table 27: Permitted formatting types
| 0 |
None |
No special formatting = default |
| 1 |
IP address |
IP address [0-9]³.[0-9]³. [0-9]³.[0-9]³ |
| 2 |
MAC-ID |
MACID [0-9,A-F]12 |
| 4 |
Drive letter |
Drive letter [A-Z]1: |
| 8 |
Number |
[0-9]+ |
| 16 |
Uppercase |
Uppercase |
| 32 |
Uppercase server dependent |
(only maintained for compatibility reasons) |
| 64 |
NT name |
All characters are permitted except for „!@/\:,“[];|=+*?<>“ |
| 128 |
Phone |
Phone [0123456789#/-+*]n |
| 256 |
Exchange name |
All characters are permitted except for „ÄÖÜäöüß“!§$%&\|/<>#*{}[] ²³~^,“ |
| 512 |
ASCII characters and numbers |
All characters from the 7-bit ASCII character set |
|
2048 |
Uri |
Uniform Resource Identifier |
|
4096 |
Email address |
Valid email address |
IMPORTANT: Compile the database to implement the formatting type.
Related topics
