A special input field is used for editing scripts. It has an advanced edit mode that provides additional actions.
To switch to advanced mode
- Press Ctrl + Alt + Enter or click the button at the bottom right.
Figure 31: Directly entering a database query
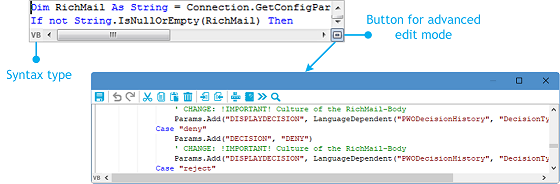
Table 137: Meaning of icon in advanced edit mode
|

|
Quits advanced edit mode. |
|

|
Undoes last change. |
|

|
Redoes last change. |
|

|
Cuts selected code. |
|

|
Copies selected code into clipboard. |
|

|
Inserts code from clipboard. |
|

|
Deletes selected code. |
|

|
Decreases insert. |
|

|
Increases insert. |
|

|
Automatic text formatting. |
|

|
Shows/hides line numbers. |
|

|
Inserts code snippet. |
|

|
Word wraps automatically. |
|

|
Searches within code. |
Additional input aids are provided for creating script code.
Syntax highlighting
The input fields support syntax highlighting depending on the syntax type.
Auto-completion
Auto-completion can be used when creating script code. The amount of scripted code to enter is reduced by displaying the names of properties or functions that can be used. To use auto-completion, use the shortcut Ctrl + SPACE in the relevant positions within the input fields. The contents of the list is determined by the key words in the code.
Entering code snippets
Input fields that required data in VB.Net syntax support code snippets. In the Visual Basic category, general code snippets are provided. The Object Layer category contains special code snippets for the One Identity Manager object layer.
You can insert code snippets using the following options:
- Using the icon
- Select the icon.
- Select the Object Layer or Visual Basic category.
- Select the code snippet.
- Using a shortcut
- Press F2.
- Select the Object Layer or Visual Basic category.
- Select the code snippet.
- Using an aliases
NOTE: If you select a code snippet directly using a shortcut or the
icon, a short description and the shortcut name are displayed in a tooltip.
TIP: You can use custom code snippets. To do this, create a CustomSnippets directory in the One Identity Manager installation directory to store the code snippets. Use Visual Studio documentation to develop your own code snippets.
Inputting values using dollar ($) notation
In input fields where a VB.NET term is expected, a help list opens when you enter $. All properties of the current object are displayed. You can also see a tooltip with a detailed description of the property. When you select a foreign key (FK) column, you can navigate to the columns in the relevant table using the arrow keys. To end selection in the target column, press Enter or double-click. The complete $ notation for your selection should now be shown in the input column. To close the help list without copying any data, press Esc or leave the input field.
Figure 32: Help list for dollar notation
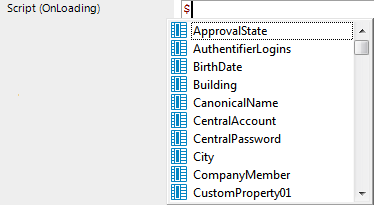
Table 138: Meaning of the symbols used in the help list
|

|
Property of current object. |
|

|
Primary key (PK). |
|

|
Foreign key (FK). |
|

|
Dynamic foreign key |
|

|
Table |
|

|
Special properties |
|

|
Script |
Table 139: Help list functions
|
Down arrow |
Opens the help list. |
|
Up arrow, down arrow |
Navigate to previous or next entry. |
|
Left arrow, right arrow |
Use the foreign key to switch to the parent object or back to the child object. |
|
Enter |
Accepts the value in dollar notation. |
IMPORTANT: After creating and editing the script, you should test compiling the script. Compile the scripts in the script library for this script to take effect.
NOTE: You can find detailed examples for syntax and usage of scripts on the installation medium in the QBM\dvd\AddOn\SDK\ScriptSamples directory.
To create a new script
-
In the Designer, select the Script Library category.
-
Start the Script Editor using the Create a new script task.
-
Edit the master data.
Table 140: Script master data
| Script |
Name of the script. Prefix custom scripts with CCC_. |
| Description |
Detailed description about the script's function |
| Script code |
One Identity Manager scripts are written in VB.Net syntax, which allows all VB.Net functions to be used. The values to be edited are given as preprocessor instructions. |
|
Locked |
Indicates if the script is locked and therefore may not be used. Locking the script is useful, for example, if it is currently being edited. |
To edit a script
-
In the Designer, select the script in the Script Library.
-
Select the Edit script task.
-
Edit the script master data.
Detailed information about this topic
IMPORTANT: After creating and editing the script, you should test compiling the script. Compile the scripts in the script library for this script to take effect.
To copy an existing script
-
In the Designer, select the script that you want to copy from the Script Library category.
-
Select the Copy script task.
-
In the Copy script dialog, check the following information and correct if necessary.
Table 141: Copying a script
| Old script name |
Name of the copied script. |
| script |
The name of the new script is made up of the CCC_ prefix and the name of the old script. You can change the name. Prefix custom scripts with CCC_. |
| Script code |
The script code from the original is copied over. If necessary, you can modify the script code of the script to copy beforehand. |
-
To create the copy, click OK.
-
In the Script Editor, edit the master data of the script.
Related topics
You can use the Script Editor to test a script.
To test a script
-
In the Designer, select the script in the Script Library.
-
Select the Edit script task.
-
Select the View | Test script menu item.
-
In the Test script view, select the script from the menu and modify the parameters as required.
All the parameters to be passed to the script are displayed with their data types. You can edit the values. You can also predefine values for the Base and Value script base class variables as input parameters and use these in the script.
-
Use Options to select one or more of the following options for running the test.
- Use master connection: This option specifies whether the script test is tested against the main database or an internal SQLite database. Scripts that relate to the application part of the One Identity Manager data model should always be tested with the main database. Scripts for system parts can be test with against the main database or the internal SQLite database.
- Use transaction: Specifies whether the script is executed within a transaction with subsequent rollback or whether the script is executed immediately against the database.
- Record SQL log: Specifies whether the database actions should be recorded in a SQL log while the script is running. The output is displayed in a separate dialog window. The execution time of the script is output in addition to the statement executed.
-
Select the Start button to run the script test.
The test results are displayed in the Result field after the script has been run.
Related topics
