To run an advanced database search in the Manager
-
In the Manager, select View | Database search.
The database search is displayed in the navigation view.
-
To open the advanced database search, click the Advanced button in the Search area.
- Double-click the search filter in the Saved filters area.
- Start the search using the Search button.
TIP: The saved search queries are displayed in the My One Identity Manager | My filters category. You can run or edit the search queries there or export them for other users.
NOTE: The Manager must be running in expert mode if you want to show an object's properties.
To show extended object properties
- Select the object and open the Properties context menu.
On General, you can see the object‘s general properties, for example, ID, status, or primary key.
All the object columns are displayed in a grid on Properties with their values. You can choose between a simple column view and the advanced view with additional data for column definitions.
On Access permissions, you can see which permissions are valid for an object based on permissions groups. The first entry shows the basic permissions for the table. The permissions for this particular object are displayed beneath that. The other entries show the column permissions.
TIP: Double-click the table entry, the object entry, or a column entry to display the permissions group from which the permissions were determined.
Table 36: Icon used for permissions
 |
Permissions exist. |
 |
Permissions have been removed by the object layer |
 |
Permissions limited by conditions. |
You can see which change labels the object belongs to on the Change labels tag. Here you can assign a new or an existing change label to the object and its dependent objects. For detailed information about working with change labels, see the One Identity Manager Operational Guide.
On the Export tab, you can export the object in the One Identity Manager-internal transfer format.
Related topics
It is possible to edit more than one object of the same object type at the same time in the Manager. The form tab of the master data form shows the number of selected objects and the object type. Input fields with different values are labeled with the  icon. When you edit an input field and save your changes, the change applies to all open objects.
To edit multiple objects at the same time:
- Use Shift + selection or Ctrl + selection to select the objects in the result list.
- Open the master data form either by pressing Enter, clicking the
 icon in the result list or clicking Tasks | Edit master data in the context menu.
If two users change the same object at the same time, this can cause conflicts when the object is saved, especially if the same property is changed. In this case, a dialog box appears when you save the object. You can use this dialog box to view and apply the changes.
All changes to the object that caused a conflict are shown.
Figure 25: Display of change conflicts
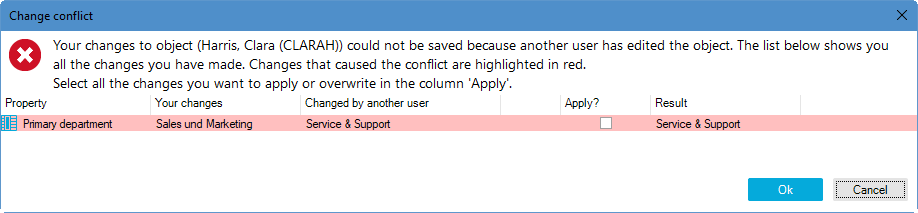
To apply your changes:
- Active the checkbox in the Apply column for your values that you wish to save.
Table 37: About change conflicts
| Property |
Property of the object that triggered a change conflict. |
| Your change |
Value of the property you entered and wish to save. |
| Change made by other user |
Value of the property that had already been saved by the other user. |
| Apply? |
Specify if your value should be applied.
To apply your value, select the checkbox. Otherwise the system keeps the value saved by the other user. |
| Result |
Current property value.
If you activate the checkbox in the Apply column, the value you entered is displayed. |


