Logging and committing objects in the Designer
All changed objects in the Designer are created in the internal database. Rights, formatting rules and side-effects of the Customizer are taken into consideration. Changes made by the user are also recorded in a change log.
To display change data in the Designer
- In the Designer, select the Database | Commit to database menu item.
The entries in the change log are grouped by editor. Actions ( add, change, and delete) that have been executed and changes to the object’s properties with old and new values are displayed in the log.
Table 41: Icons in the change log
|

|
Adds the object. |
|

|
Deletes the object. |
|

|
The object has been changed. |
The following functions are available in the change log:
- Enable or disable changes
You can disable individual changes in the change log. These changes are not transferred to the One Identity Manager database when the data is saved. You can however, re-enable changes at a later date. You can enable or disable each change using the corresponding icon in the change log toolbar.
- Assign change labels
It is also possible to create a group of all the changes in the change log, under one label.
- Before saving the recorded changes in the change log, select the required change label in the Change label menu.
- To assign individual changes to different change labels, use the Special change label context menu entry in the change log.
When the changes are transferred to the One Identity Manager database, the change label is applied to the relevant changes. For detailed information about working with change labels, see theOne Identity Manager Operational Guide.
- Save changes
All changes are saved to the One Identity Manager database as specified. This is done at object level so that, for example, processes are generated and formatting rules are observed. The principle "last writer wins" applies here as opposed to the previous object processing. That means that changes made by a user to object properties in the mean time are overwritten.
Table 42: Functions in the change log toolbar
 |
Enables change/section. |
 |
Ignores change/section. |
| |
Edit a change label. |
 |
Specifies a default change label. This change label is used for all subsequent changes. |
Related topics
Using the designer's own full-text search
Use full-text search to look for entries within the internal Designer database. You will find the full text search on its own menu bar in the Designer.
To search for a term
The objects found are entered in a list as you enter the search term.
Figure 26: Displaying the source
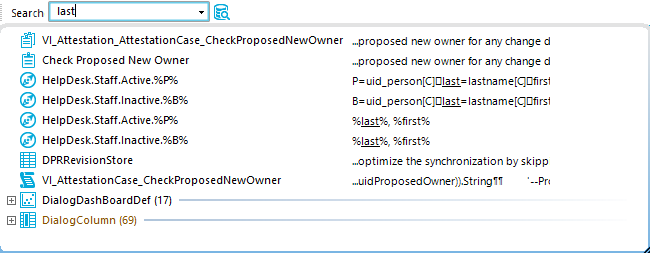
- The icon to the left of the entry shows the entry’s object type (table),e.g. a process, a table or a menu item.
- The source that the object is extracted from is shown to the right of the entry. The search term is highlighted by an underline.
- Database tables, object relations and the exact source are also displayed in a tooltip.
- Double-click an entry to switch to the corresponding object.
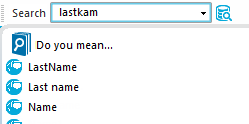
If no entries are found for a search term, the system makes suggestions that you can use as search terms by double-clicking.
Figure 27: Suggestions for search terms
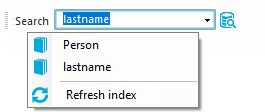
If you have selected an entry, the search term is added to the search history and is therefore available for further searches.
- Open the search history with the arrow in the search field.
- When you select an entry, all available sources are shown.
The number of entries in the search history depends on your program settings.
Figure 28: Search history
TIP: Update the full text catalog of the Designer database if you need to include objects in the search that have been edited after the program started, like new processes or column names. You do this with Update index, in the search history.
User-defined filters in the Designer
It is possible to limit the number of list entries in certain the Designer editors by using a filter. After creating a filter, the filter conditions are immediately implemented on the set of result currently displayed. A filter remains in use until you reset it.
The main components of a user filter are:
- A search in the objects' display values
- A customized search condition (where clause)
- A full text search
You have the option to set up ad-hoc filters and permanent filters. Ad hoc filters are used for a one-off reduction of list entries. These filters are not saved and are applied to the data immediately.
Create a permanent filter if you want to reuse certain search queries on a frequent basis. Permanent filters are saved in the user configuration and therefore are always available for use.
Detailed information about this topic
Using an ad-hoc filter
Ad hoc filters are used for a one-off reduction of list entries. These filters are not saved and are applied to the data immediately. The WHERE clause wizard helps you formulate a condition for database queries. The complete database query is composed internally.
To use an ad-hoc filter in the Designer
- In the Designer, select the Filter | Define filter menu and create the filter condition in the WHERE clause wizard.
IMPORTANT: Enter the condition for limiting the result set in SQLite notation. The condition is defined as a valid where clause for database queries. The condition relates to the selected database table found that is determined when the editor starts.
Related topics
