Object access
Permissions in this category provide for administrative operations on objects themselves (but not their properties) of the classes that you selected in the previous step of the Add Permission Entries wizard.
Administrative operations are selected from the list, which is displayed when you select Object access. You select the necessary operations by selecting the appropriate check boxes. For example, you might select List Object to allow viewing objects of certain types.
After you have selected the operations, click Finish to complete the Add Permission Entries wizard. The permission is added into the newly created Access Template.
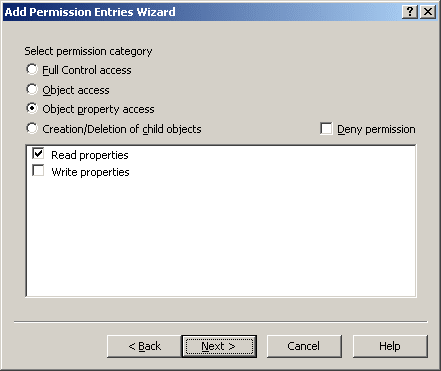
Object property access
Permissions in this category provide for administrative operations on object properties for objects of the classes that you selected in the previous step of the Add Permission Entries wizard.
When you select Object property access, you specify access to object properties. You can select Read properties and Write properties, as shown in the following figure.
After you click Next, the wizard displays a page where you can select the properties to which you want the permission to allow (or deny) access. The page is similar to the following figure.
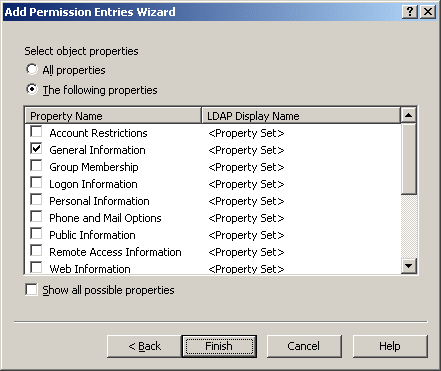
On that page, you can select one of the following options:
- All properties With this option, the permission controls access to all properties.
- The following properties With this option, the permission controls access to the properties you select from the list by selecting the appropriate check boxes.
|

|
NOTE: By default, all object properties are not displayed in the list. To display all object properties, select the Show all possible properties check box. |
After you have selected the properties you want, click Finish to complete the Add Permission Entries wizard. The permission is added to the Access Template.
Creation/Deletion of child objects permission
Permissions in this category provide for creation and deletion of child objects in container objects of the classes you selected in the previous step of the Add Permission Entries wizard.
When you select Creation/Deletion of child objects, you specify the creation, deletion, and move operations you want the permission to allow (or deny). The list of operations looks as shown in the following figure.
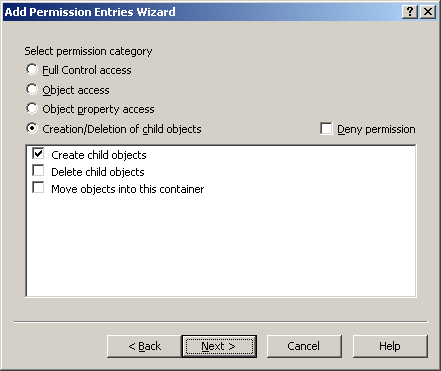
You can select the following operations:
- Create child objects Controls the creation of child objects of the classes you select in the next step.
- Delete child objects Controls the deletion of child objects of the classes you select in the next step.
- Move objects into this container Controls the relocation of object of the classes you select in the next step. This operation assumes moving objects from one container to another without permission to delete existing objects or create new objects.
After you click Next, the wizard displays the page where you can select the types of objects on which you want the permission to allow (or deny) the operations you selected in the previous step. The page is similar to the following figure.
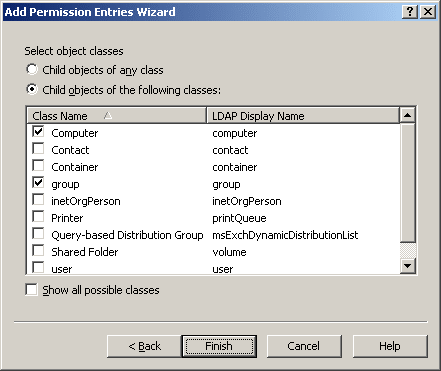
On that page, you select the types of objects for which you want the permission to allow (or deny) the creation, deletion, or move operation. You can select one of these options:
- Child objects of any class With this option, the permission controls the operations on objects of any type.
- Child objects of the following classes With this option, the permission controls the operations on objects of the type you select from the list by selecting the appropriate check boxes.
|
|
NOTE: By default, all object classes are not displayed in the list. To display all object classes, select the Show all possible classes check box. |
After you have selected the object classes, click Finish to complete the Add Permission Entries wizard. The permission is added to the Access Template.
Steps for creating an Access Template
To create an Access Template
- In the console tree, under Configuration | Access Templates, locate and select the folder in which you want to add the Access Template.
You can create a new folder as follows: Right-click Access Templates and select New | Access Template Container. Similarly, you can create a sub-folder in a folder: Right-click the folder and select New | Access Template Container.
- Right-click the folder, and select New | Access Template to start the New Object - Access Template wizard.
- On the first page of the wizard, do the following, and then click Next:
- In the Name box, type a name for the Access Template.
- In the Description box, type any optional information about the Access Template.
- On the second page of the wizard, configure the list of permission entries, and then click Next.
The instructions on how to add, modify, or delete permission entries are given later in this topic.
- Click Finish to create the Access Template that includes the permission entries you have specified.
To add a permission entry to an Access Template
- On the page that displays a list of permission entries included in the Access Template, click Add to start the Add Permission Entries wizard.
- On the first page of the wizard, select one of these options:
- All object classes The rights defined by this permission entry apply to objects of any class.
- Only the following classes The rights defined by this permission entry apply to objects of specific classes. Select object classes from the list. If the list does not include the object class you want, select Show all possible classes.
- Click Next.
- On the second page of the wizard, select one of these options:
- Full control access The rights to create or delete child objects, read and write properties, examine child objects and the object itself, add and remove the object from the directory, and read or write with any extended right. This option does not have any configuration parameters.
- Object access The rights to exercise certain generic permissions and extended rights on the objects. Select permissions and extended rights from the list to configure this option as appropriate.
- Object property access The rights to read or write certain properties of the object. Select check boxes to configure this option as appropriate: Read properties, Write properties. On the next page of the wizard, you can select the properties you want to be controlled by this permission entry.
- Creation/Deletion of child objects The rights to create or delete child objects of the object. Select check boxes to configure this option as appropriate: Create child objects, Delete child objects, Move objects into this container. On the next page of the wizard, you can specify the class or classes of child object you want to be controlled by this permission entry.
- If you want the Access Template to deny the rights defined by this permission entry, select the Deny permission check box. Otherwise, leave the check box cleared.
- Do the following, depending on the option you selected and configured in Step 4:
- Full control access or Object access Click Finish to add the permission entry to the Access Template.
- Object property access or Creation/Deletion of child objects Click Next to continue configuring the option.
- On the third page of the wizard, continue configuring the option you selected in Step 4, and then click Finish to add the permission entry to the Access Template:
- If you selected Object property access, select the properties to be controlled by this permission entry. You have two options: All properties and The following properties. With the second option, you must select properties from the list. If the list does not include the property you want, select Show all possible properties.
- If you selected Creation/Deletion of child objects, specify the class or classes of child object to be controlled by this permission entry. You have two options: Child objects of any class and Child objects of the following classes. With the second option, you must select one or more object classes from the list. If the list does not include the object class you want, select Show all possible classes.
To view or modify a permission entry in an Access Template
- On the page that displays a list of permission entries included in the Access Template, select the permission entry you want to view or modify, and click View/Edit to display the Modify Permission Entry dialog box.
- Examine the Apply Onto tab in the Modify Permission Entry dialog box. On this tab, you can view or modify the same settings as on the first page of the Add Permission Entries wizard (see Step 2 in the procedure above).
- Examine the Permissions tab in the Modify Permission Entry dialog box. This tab provides the same options as the second page of the Add Permission Entries wizard (see Step 4 in the procedure above). The options are read-only, so you cannot change the option that was selected upon creation of the permission entry. However, you can manage the configuration of the option:
- Object access Select generic permissions or extended rights you want to add to the Access Template.
- Object property access Select or clear these check boxes: Read properties, Write properties.
- Creation/Deletion of child objects Select or clear these check boxes: Create child objects, Delete child objects, Move objects into this container.
- If you want the Access Template to deny the rights defined by this permission entry, select the Deny permission check box on the Permissions tab. Otherwise, leave the check box cleared.
- If Object property access is selected on the Permissions tab, use the Object Properties tab in the Modify Permission Entry dialog box to view or modify the settings that determine which properties are controlled by this permission entry (see Step 7 in the procedure above).
- If Creation/Deletion of child objects is selected on the Permissions tab, use the Object Classes tab in the Modify Permission Entry dialog box to view or modify the settings that determine which classes of child object are controlled by this permission entry.
To delete a permission entry from an Access Template
- On the page that displays a list of permission entries included in the Access Template, select the permission entry you want to delete, and click Remove.
- Click Yes to confirm the deletion.
