Displaying members of a Managed Unit
Members of a Managed Unit are objects that match the criteria specified in the membership rules for the Managed Unit.
To display the members of a Managed Unit, expand Configuration/Managed Units in the console tree, and then click a Managed Unit in the console tree. Members of the Managed Unit are displayed in the details pane.
For each Managed Unit, it is possible to preset an individual set of columns to display in the details pane. This allows you to customize administrative views on a per-Managed Unit basis.
To preset columns in the details pane for a given Managed Unit, right-click the Managed Unit, click Properties, and go to the Default Columns tab. The tab is similar to the following figure.
Figure 10: Managed Unit - Preset columns
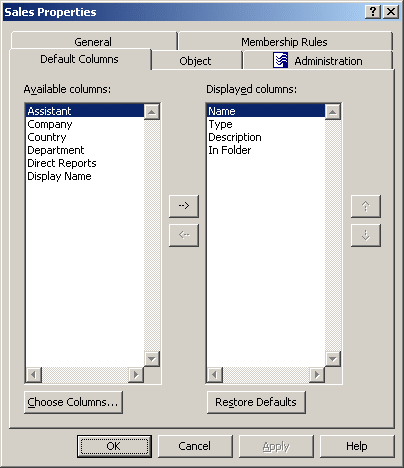
You can add a column to display by double-clicking its name in the Available columns list. To add columns to the Available Columns list, click Choose Columns. In the Choose Columns dialog box, you can select columns and, if necessary, modify the names to be displayed in column headings.
Double-clicking a column name in Available Columns adds the name to the Displayed Columns list. Click OK. The new column is displayed in the details pane after refreshing the view. Right-click Managed Units in the console tree and click Refresh; then, select the Managed Unit in the console tree: the new column appears in the details pane.
Steps for displaying members of a Managed Unit
To display the members of a Managed Unit
- In the console tree, expand Active Roles | Configuration | Managed Units.
- Under Managed Units, locate and select the Managed Unit.
The members of the Managed Unit are listed in the details pane.
To customize the list of Managed Unit members in the details pane
- Right-click the Managed Unit, and click Properties.
- In the Properties dialog box, click the Default Columns tab.
- On the Default Columns tab, add or remove column names from the Displayed Columns list.
- Click OK.
|

|
NOTE:
- For each Managed Unit, it is possible to configure an individual list of the default columns to display in the details pane, so you can perform the customization on a per-Managed Unit basis.
- You can populate the Displayed columns list by double-clicking column names in the Available columns list on the Default Columns tab. You can remove columns by double-clicking column names in the Displayed columns list.
- To add column items to the Available Columns list, click Choose Columns. In the Choose Columns dialog box, you can select columns and, if necessary, modify column names.
- For your changes to the Displayed columns list to take effect, the details pane needs to be refreshed: Right-click Managed Units in the console tree and click Refresh.
|
Adding or removing members from a Managed Unit
Members of a Managed Unit are defined by membership rules. Therefore, to add or remove members from a Managed Unit, you need to add, delete, or modify membership rules.
To add, delete or modify membership rules for a Managed Unit, display the Properties dialog box for that Managed Unit, and then click the Membership Rules tab. The tab is similar to the following figure.
Figure 11: Managed Unit - Adding or removing members
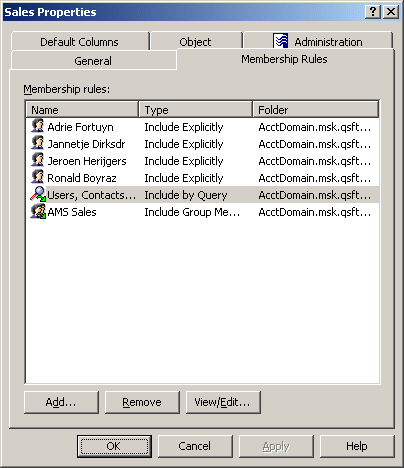
The Membership Rules tab displays a list of membership rules, with each entry indicating the name, type, and scope of the rule.
To add a membership rule, click Add. This displays the Membership Rule Type dialog box, discussed earlier in this chapter (see Creating a Managed Unit).
To modify a membership rule, select it from the Membership rules list, and click View/Edit. Only query-based rules can be modified in that way. If you select a rule of a different type, the View/Edit button is unavailable.
To delete a membership rule, select it from the Membership rules list, and click Remove.
As you add, modify or delete membership rules, the list of Managed Unit members automatically changes.
Steps for adding membership rules to a Managed Unit
To add a membership rule to a Managed Unit
- In the console tree, expand Active Roles | Configuration | Managed Units.
- Under Managed Units, locate the Managed Unit you want to modify, right-click it, and click Properties.
- On the Membership Rules tab, click Add. This displays the Membership Rule Type dialog box.
- Select the type of the membership rule you want to create. Do one of the following, and then click OK:
- To create a rule that statically adds members to the Managed Unit, click Include Explicitly.
- To create a rule that statically excludes members from the Managed Unit, click Exclude Explicitly.
- To create a rule that adds all members of a certain group to the Managed Unit, click Include Group Members.
- To create a rule that excludes all members of a certain group from the Managed Unit, click Exclude Group Members.
- To create a rule that populates the Managed Unit with the objects that match certain search criteria, click Include by Query.
- To create a rule that prevents the Managed Unit from including the objects that match certain search criteria, click Exclude by Query.
- To create a rule that prevents the deprovisioned objects, such as deprovisioned users or groups, from being removed from the Managed Unit, click Retain Deprovisioned.
If you select the Include by Query rule type or the Exclude by Query rule type in Step 5, the Create Membership Rule dialog box is displayed. Otherwise (except for the Retain Deprovisioned rule type), the Select Objects dialog box is displayed.
- Complete the Create Membership Rule or Select Objects dialog box by following the instructions that are given later in this topic.
- Click OK to close the Properties dialog box.
To complete the Create Membership Rule dialog box
- From the Find list, select the class of objects you want the membership rule to include or exclude from the Managed Unit. For example, when you select Users, the membership rule includes or excludes the users that match the conditions you specify.
- From the In list, select the domain or container that holds the objects you want the membership rule to include or exclude from the Managed Unit. To add folders to the In list, click Browse.
- Define the criteria of the membership rule. For example, to include or exclude the objects that have the letter T at the beginning of the name, type T in Name. You can use an asterisk (*) to represent any string of characters.
- Optionally, click Preview Rule to view a list of objects that match the criteria you have defined.
- Click Add Rule.
To complete the Select Object dialog box
- In the Look in list, click the domain or folder that holds the objects you want to select. To add a folder to the list, click Browse.
- Do one of the following, and then click OK:
- In the list of objects, double-click the object you want to add.
- In the lower box, type the entire name, or a part of the name, of the object you want to add. Then, click Check Names.
|
|
NOTE:
- The only way to populate Managed Units is by adding membership rules. The members of a Managed Unit are the objects that match the criteria defined by the membership rules.
- To display members of a Managed Unit, click the Managed Unit in the console tree. The members of the Managed Unit are displayed in the details pane.
- The Create Membership Rule dialog box is similar to the Find dialog box you use to search for objects in the directory. Once you have specified your search criteria, Active Roles allows you to save them as a membership rule, forcing the membership list to include the objects that match the search criteria. For instructions on how to specify search criteria in the Create Membership Rule dialog box, see Finding objects earlier in this document.
- The Find list includes the Custom Search entry. Selecting that entry displays the Custom Search tab, enabling you to build custom membership rules using advanced options, as well as to build advanced membership rules using the Lightweight Directory Access Protocol (LDAP), which is the primary access protocol for Active Directory. For more information about using advanced search options, see Steps for building a custom search and Steps for using advanced search options earlier in this document.
|
