Connecting to the Administration Service
To configure a particular Administration Service using the Active Roles console, you need to manually specify the Administration Service to connect to. Otherwise, the console automatically selects the Administration Service.
You can use the Connect to Administration Service dialog box to select the appropriate Administration Service. To display this dialog box, right-click Active Roles in the console tree and click Connect. The dialog box looks as shown in the following figure.
Figure 142: Connect to Administration Service
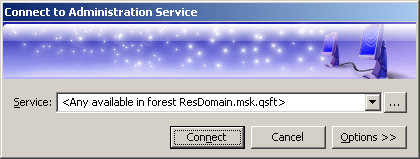
In the Service box, type or select the name of the computer running the Administration Service to connect to, and then click Connect. The Service box provides a list of names that were specified for previous connection sessions. The last selected name is displayed by default.
To select the Administration Service that is not in the list, click the Select button next to the Service box: 
This displays the Select Administration Service dialog box, shown in the following figure.
Figure 143: Select Administration Service
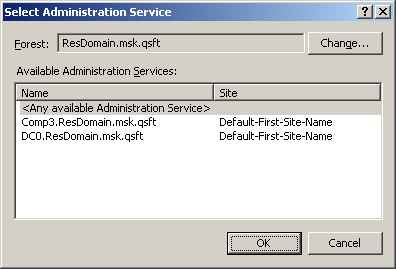
The Select Administration Service dialog box lists the Administration Services that are available in the specified forest. You can choose a different forest by clicking Change. The list items are sorted according to priority, considering site location and service load (less loaded Administration Services are displayed at the top of the list). To add a certain Service to the Connect to Administration Service dialog box, click that Service and then click OK.
If you have connected to a specific Service, the console will attempt to automatically connect to that Service on every subsequent start. If you have selected <Any available Administration Service>, the console will attempt to connect to the nearest, least loaded Service in the specified forest, giving preference to the Services that belong to the same replication group as the Service to which the console was connected in the previous session.
By default, the console connects to the Administration Service in the security context of your logon account (that is, the user account to which you have logged on). This means that you can only use the console to perform the tasks that are delegated to your user account. You have the option to establish a connection using a different account, in order to change the scope of the allowed tasks. Click Options to expand the Connect to Administration Service dialog box, as shown in the following figure.
Figure 144: Connect to Administration Service
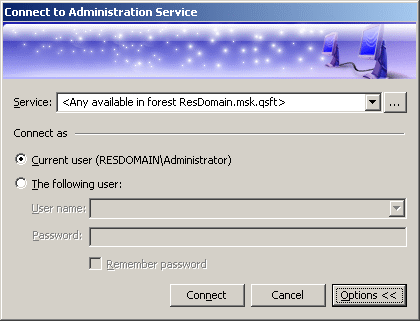
Click The following user and specify the user logon name and password of the account to be used for connection. By selecting the Remember password check box you can have the console automatically use the specified user name and password in the future connection sessions. Otherwise, on a subsequent start, the console will prompt you for a password.
Delegating control to users for accessing MMC interface
By default, on installing Active Roles, all users are allowed to log in to the MMC interface. To manage the MMC interface access for a user, you must configure the options using Configuration Center | MMC Interface Access| Manage settings. Selecting this option restricts all non Active Roles Administrators from using the console. All delegated users are affected, however, it does not apply to Active Roles Administrators.
To be able to log in to the MMC interface, the user must be delegated with the User Interfaces access rights on the User Interfaces container under Server Configuration. User Interfaces Access templates that provide the access rights are available as part of the Active Roles built-in Access templates in the User Interfaces container.
To delegate the control to users in the User Interfaces container you must apply the User Interface Access Template
- In the console tree, expand Active Roles | Configuration | Server Configuration.
- Under Server Configuration, locate the User Interfaces container, right-click it, and click Delegate Control.
-
On the Users or Groups page, click Add, and then select the users or groups to which you want to delegate the control. Click Next.
- On the Access Templates page, expand the Active Directory | User Interfaces folder, and select the check box next to User Interface Management-MMC Full control.
- Click Next and follow the instructions in the wizard, accepting the default settings.
-
After you complete these steps, the users and groups you selected in Step 3 are authorized to log in to the MMC interface.
- Click OK to close the Active Roles Security dialog box.
Steps for connecting to the Administration Service
When you start the Active Roles console, it automatically selects the appropriate Administration Service, and establishes a connection to that Service. However, you can connect to a specific Administration Service at any time.
To select the Administration Service to connect to
- In the console tree, right-click Active Roles, and then click Connect.
- In the Service box, type or select the name of the computer running the Administration Service to connect to, and then click the Connect button.
|

|
NOTE:
- If you do not see the Administration Service you want in the Service list, click the Select button next to the Service box. This displays a list of the Administration Services that are available in the specified forest. You can choose a different forest by clicking Change. To add a certain Service to the Service list, click that Service in the list of available Administration Services, and then click OK.
- If you need to establish a connection under a user account other than your logon account, click Options to display the Connect as area, and then click The following user and specify the user logon name and password of the account to be used for connection. By selecting the Remember password check box, you can have the console automatically use the specified user name and password in the future connection sessions. Otherwise, on a subsequent start, the console will prompt you for a password.
|
Adding and removing managed domains
Active Directory domains registered with Active Roles are referred to as managed domains. Each Administration Service maintains a list of managed domains, and stores this list in the Administration Database as part of the service configuration.
In the Active Roles console, the Add Managed Domain wizard is used to register domains for management. You can access the wizard as follows: Click the console tree root; then, in the details pane, in the Domains area, click Add Domain.
The Add Managed Domain wizard prompts you for the following information:
- The name of the domain you want to register.
- The credentials that Active Roles will use to access the domain.
You have the option to use the default credentials (the service account of the Administration Service) or enter the user name and password of a different account (override account). In both cases, the account must have adequate rights in the managed domain. For more information, refer to the “Access to Managed Domains” section in the Active Roles Quick Start Guide.
If you choose the option to access the managed domain using the service account information, consider the following. This option applies to all Administration Services in your environment. Each Administration Service in your environment will use its own service account to access the domain. Since different service accounts may have different levels of access to the domain, Active Roles may have different access rights to the domain, depending on which Administration Service is being used to manage the domain. The result is that the behavior of Active Roles may vary when you switch to a different Administration Service.
After you add a managed domain, the Administration Service retrieves the domain information, such as the Active Directory schema and the hierarchy of containers. This process is referred to as loading domain information.
It may take a few minutes for the Administration Service to load the domain information. Once this process is completed, the domain is available for management. Select the Active Directory item in the console tree and press F5 to refresh the details pane and display the new domain. To start managing the domain, select it in the details pane and press ENTER; or expand the domain item in the console tree.
It is possible to remove a domain from the list of managed domains. Once removed, the domain and all directory objects contained in the domain can no longer be managed with Active Roles. To remove a managed domain, select the console tree root and click Go to Managed Domains in the details pane, in the Domains area. This causes the details pane to display a list of managed domains. In the list, right-click the domain you want to remove, and click Delete.
