To use linked mailboxes with Exchange Resource Forest Management (ERFM) in Active Roles for your organization, your deployment must meet the following requirements.
Multi-forest deployment
Your organization must have at least two Active Directory (AD) forests:
-
Account forest: One or more forests that contain the user accounts.
-
Resource forest: A forest that contains the Exchange server and will store the mailboxes and the shadow accounts connecting the linked mailboxes to the user objects. ERFM requires Exchange Server 2013 or later installed in the resource forest.
For more information on planning and configuring multi-forest AD deployments, see Setting up a forest trust to support linked mailboxes and Plan a multi-forest deployment in the Microsoft documentation.
For more information on the Microsoft Exchange Server versions Active Roles supports, see Supported platforms in the Active Roles Release Notes.
Two-way trust relation
The resource and account forests must identify each other as trusted domains (that is, they must be in a two-way trust relation).
Applying the ERFM - Mailbox Management built-in policy
You must apply the ERFM - Mailbox Management built-in policy (or a copy of it) on the Organizational Unit (OU) whose users will use linked mailboxes. For more information, see Applying the ERFM Mailbox Management policy to an OU.
(Optional) Modifying the ERFM scheduled task
Once the ERFM - Mailbox Management built-in policy is configured for an OU, Active Roles synchronizes the properties of every managed master user account to the corresponding shadow account with the ERFM - Mailbox Management built-in scheduled task.
By default, the scheduled task runs on a daily basis, and normally, you do not need to modify its settings. To change the default ERFM scheduling (for example, because of organizational reasons), or run it manually so that you can immediately identify master accounts in your OU, see Configuring the ERFM Mailbox Management scheduled task.
(Optional) Changing the default location of the shadow accounts
By default, the ERFM - Mailbox Management built-in policy saves shadow accounts in the Users container of the resource forest. If your organization stores other users as well in the Users container, then One Identity recommends changing the container for storing the shadow accounts for clarity.
For more information, see Changing the location of the shadow accounts.
(Optional) Modifying the synchronized properties of the master account
By default, ERFM synchronizes a pre-defined set of user and mailbox properties between the master accounts and shadow accounts. If you need to modify and/or expand the default set of synchronized properties (for example, because of organizational reasons), open and update the applicable ERFM - Mailbox Management policy settings.
For the list of default synchronized properties and more information on changing them, see Configuring the synchronized, back-synchronized or substituted properties of linked mailboxes.
(Optional) Delegating Exchange Access Templates
If you want to manage linked mailboxes with non-administrator users, you must assign one or more of the following Exchange Access Templates (ATs) to them in the Active Roles Console:
-
Exchange - Manage Resource, Linked and Shared Mailboxes
-
Exchange - Convert Linked Mailbox to User Mailbox
-
Exchange - Convert User Mailbox to Linked Mailbox
-
Exchange - Create Linked Mailboxes
-
Exchange - Read ERFM Attributes
-
Exchange - Recipients Full Control
TIP: To provide full control for a user to create, view, or change linked mailboxes in the Exchange forest, assign the Exchange - Recipients Full Control AT to them.
For more information on how to apply ATs, see Applying Access Templates.
To provision linked mailboxes in the resource forest model with Exchange Resource Forest Management (ERFM), you must register the resource forest and the account forest(s) of your organization in Active Roles as managed domains.
Prerequisites
To register the forests, you must have access to administrator accounts with sufficient rights in the account forest(s) and the resource forest.
-
To register the account forest(s), you must use the Active Roles Administration Service account.
-
To register the resource forest, you must use a Microsoft Exchange administrator account of the resource forest. Specifically, this Exchange administrator account must have the following rights and permissions:
-
It must be a member of the Account Operators domain security group.
-
It must have read access to Exchange configuration data in the resource forest. For more information on how to configure read access, see Permission to read Exchange configuration data in the Active Roles Quick Start Guide.
-
If your organization uses Microsoft Exchange 2013, the account must also be a member of the Recipient Management role group in the resource forest, and it must have the remote Exchange Management Shell enabled.
For more information on how to configure these permission settings, see Access to Exchange Organizations and Support for remote Exchange Management Shell in the Active Roles Quick Start Guide.
To register the account forest(s) in Active Roles
-
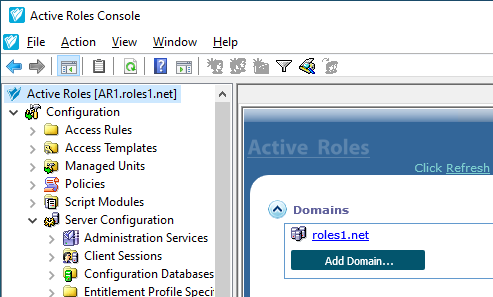
In the Active Roles Console, open the Add Managed Domain Wizard. To do so, open the Active Roles main page by clicking the top Active Roles node, then click Domains > Add Domain.
Figure 121: Active Roles Console – Add Domain setting in the main node
-
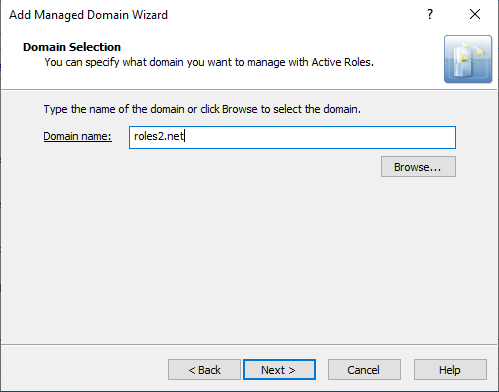
In the Domain Selection step, either enter the domain name of the forest, or click Browse to select it.
Figure 122: Add Managed Domain Wizard > Domain Selection – Specifying an account forest
-
In the Active Roles Credentials step, under Access the domain using, select The service account information the Administration Service uses to log on.
-
To apply your changes, click Finish.
Active Roles then establishes the connection to the configured forest, indicated with the Domain information is being loaded message on the main page. Once Active Roles connected to the domain, the Active Roles Console will indicate it with the Available for management message.
TIP: To check the current domain connection status, use the click to update the display link. The link is replaced with the Available for management feedback once Active Roles finishes connecting to the forest.
To register the resource forest (Exchange forest) in Active Roles
-
In the Active Roles Console, open the Add Managed Domain Wizard. To do so, open the Active Roles main page by clicking the top Active Roles node, then click Domains > Add Domain.
Figure 123: Active Roles Console – Add Domain setting in the main node
-
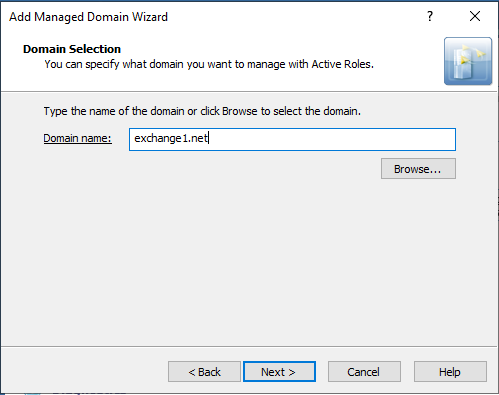
In the Domain Selection step, either enter the domain name of the forest, or click Browse to select it.
Figure 124: Add Managed Domain Wizard > Domain Selection – Specifying the resource forest
-
In the Active Roles Credentials step, under Access the domain using, select The Windows user account information specified below, and provide the User name, Password and User domain of the resource forest administrator account.
NOTE: Make sure that you specify a valid resource forest administrator user in this step, instead of the Active Roles service account used for registering the account forest(s).
Using your Active Roles administrator account in this step can result in Active Roles being unable to create the shadow accounts later in the resource forest.
-
To apply your changes, click Finish.
Active Roles then establishes the connection to the configured forest, indicated with the Domain information is being loaded message on the main page. Once Active Roles connected to the domain, the Active Roles Console will indicate it with the Available for management message.
TIP: To check the current domain connection status, use the click to update the display link. The link is replaced with the Available for management feedback once Active Roles finishes connecting to the forest.
Active Roles can provision linked mailboxes automatically for users only if the ERFM - Mailbox Management built-in policy is applied to the Organizational Unit (OU) of the users in the Active Roles Console.
Prerequisites
Before applying the ERFM - Mailbox Management policy to an OU in the Active Roles Console, make sure that the account forest(s) and the resource forest are already registered in Active Roles as managed domains.
For more information, see Registering the resource and account forests in Active Roles
To apply the ERFM - Mailbox Management policy to an OU
-
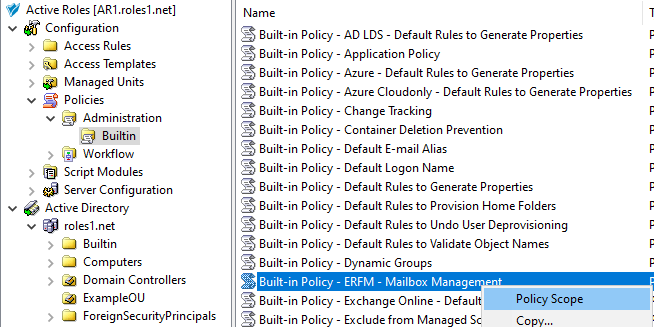
In the Active Roles Console, in the Active Directory (AD) tree, navigate to Configuration > Policies > Administration > Builtin.
-
To open the Scope tab of the ERFM - Mailbox Management policy, right-click Built-in Policy - ERFM - Mailbox Management, then in the context menu, click Policy Scope.
Figure 125: Active Roles Console – Opening the Policy Scope settings of the ERFM - Mailbox Management built-in policy
-
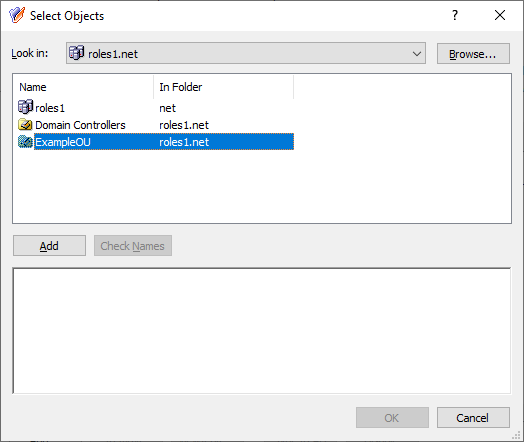
To enable linked mailboxes for an OU, in the Active Roles Policy Scope for Built-in Policy window, select the OU to which you want to apply the policy. Click Add, select the OU in the Select Objects window, click Add, then click OK.
TIP: If the Select Objects window lists no objects, use the Click here to display objects link.
Figure 126: Active Roles Console – Selecting the OU for the ERFM - Mailbox Management policy
-
To apply your changes, click OK.
Figure 127: Active Roles Console – Applying the OU to the scope of the ERFM - Mailbox Management policy

After the policy is applied, creating a new on-premises user in the OU with the Create an Exchange Mailbox setting enabled will automatically result in the following provisioning steps:
-
Active Roles creates the master user account of the user on the account forest.
-
Active Roles then creates the linked mailbox of the user in the Exchange server of the resource forest, and a shadow user account connected to the master user account.
NOTE: Consider the following when using the ERFM - Mailbox Management policy:
-
If you registered the forest root domain of the resource forest to Active Roles as a managed domain, then Active Roles will create shadow accounts in that domain. Otherwise, Active Roles creates shadow accounts in the domain that is listed first in the ordered list of the resource forest managed domains.
-
After the policy is configured, linked mailboxes will only be available for users in the OU who were created after applying the policy, and for existing users with no mailboxes. For more information on configuring a linked mailbox for existing users, see Creating a linked mailbox for an existing user with no mailbox.
Once the ERFM - Mailbox Management built-in policy is configured for an OU, Active Roles synchronizes the properties of every managed master user account to the corresponding shadow account with the ERFM - Mailbox Management built-in scheduled task.
By default, the scheduled task runs on a daily basis, and normally you do not need to modify its settings. However, it can happen that you need to:
-
Change the default ERFM scheduling, for example, because of organizational reasons.
-
Run the scheduled task manually to make Active Roles immediately identify the existing master accounts of your Organizational Unit (OU), without waiting for its scheduled run to complete.
NOTE: The ERFM - Mailbox Management scheduled task affects only user accounts whose OU is in the scope of the ERFM - Mailbox Management built-in policy, or a copy of that policy.
To run the ERFM - Mailbox Management built-in schedule manually
-
In the Active Roles Console, in the Active Directory (AD) tree, navigate to Configuration > Server Configuration > Scheduled Task > Builtin.
-
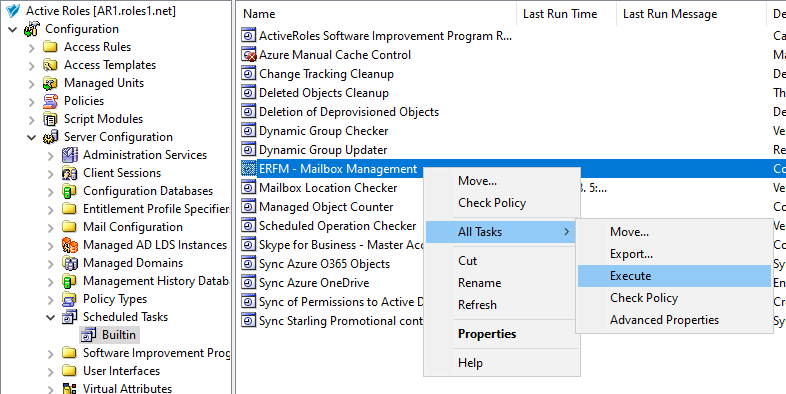
Right click the scheduled task ERFM - Mailbox Management, then click All Tasks > Execute.
Figure 128: Active Roles Console – Running the ERFM Mailbox Management scheduled task
To modify the settings of the ERFM - Mailbox Management built-in schedule
-
In the Active Roles Console, in the Active Directory (AD) tree, navigate to Configuration > Server Configuration > Scheduled Task > Builtin.
-
Open the scheduling properties of the ERFM - Mailbox Management built-in scheduled task. To do so, either:
-
Double-click ERFM - Mailbox Management, then in the Properties window, open the Schedule tab.
-
Right-click ERFM - Mailbox Management, then click Properties > Schedule.
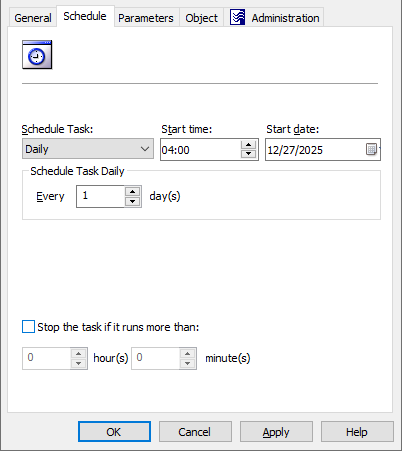
Figure 129: Active Roles Console – Scheduling properties of the scheduled task
-
To change the default scheduling settings of the task for your needs, modify the options of the Schedule tab accordingly:
-
Schedule Task: Specifies how frequently Active Roles runs the task (each hour, every day, or on a weekly/monthly basis). By default, tasks are run on a daily basis.
-
Start time and Start date: These settings specify the time and date of the first scheduled task run. These settings are not available if Schedule Task is set to Once or When Service starts.
-
Schedule Task Hourly / Daily / Weekly / Monthly: These settings specify the time interval of repeating the configured task.
For example, setting Schedule Task to Hourly lets you specify the time interval between two task runs in hours and minutes, while setting it to Weekly lets you specify not just the number of weeks between two task runs, but also the days of the week on which Active Roles must run the task.
NOTE: This setting is not available if Schedule Task is set to Once or When Service starts.
-
Stop the task if it runs more than: When selected, this setting sets a timeout (in hours and minutes) after which the task stops if it runs longer than the specified interval.
-
To save your settings, click Apply, then OK.
