Converse agora com nosso suporte
Chat com o suporte

Active Roles 7.6 - Administration Guide

Introduction About Active Roles Getting Started Rule-based Administrative Views Role-based Administration
Access Templates as administrative roles Access Template management tasks Examples of use Deployment considerations Windows claims-based Access Rules
Rule-based AutoProvisioning and Deprovisioning
About Policy Objects Policy Object management tasks Policy configuration tasks
Property Generation and Validation User Logon Name Generation Group Membership AutoProvisioning E-mail Alias Generation Exchange Mailbox AutoProvisioning AutoProvisioning for SaaS products OneDrive Provisioning Home Folder AutoProvisioning Script Execution Office 365 and Azure Tenant Selection User Account Deprovisioning Office 365 Licenses Retention Group Membership Removal Exchange Mailbox Deprovisioning Home Folder Deprovisioning User Account Relocation User Account Permanent Deletion Group Object Deprovisioning Group Object Relocation Group Object Permanent Deletion Notification Distribution Report Distribution
Deployment considerations Checking for policy compliance Deprovisioning users or groups Restoring deprovisioned users or groups Container Deletion Prevention policy Picture management rules Policy extensions
Workflows
Understanding workflow Workflow activities overview Configuring a workflow
Creating a workflow definition Configuring workflow start conditions Configuring workflow parameters Adding activities to a workflow Configuring an Approval activity Configuring a Notification activity Configuring a Script activity Configuring an If-Else activity Configuring a Stop/Break activity Configuring an Add Report Section activity Configuring a Search activity Configuring CRUD activities Configuring a Save Object Properties activity Configuring a Modify Requested Changes activity Enabling or disabling an activity Enabling or disabling a workflow Using the initialization script
Example: Approval workflow E-mail based approval Automation workflow Activity extensions
Temporal Group Memberships Group Family Dynamic Groups Active Roles Reporting Management History
Understanding Management History Management History configuration Viewing change history
Workflow activity report sections Policy report items Active Roles internal policy report items
Examining user activity
Entitlement Profile Recycle Bin AD LDS Data Management One Identity Starling Management Managing One Identity Starling Connect Configuring linked mailboxes with Exchange Resource Forest Management Configuring remote mailboxes for on-premises users Azure AD, Office 365, and Exchange Online management
Configuring Active Roles to manage hybrid AD objects Managing Hybrid AD Users Unified provisioning policy for Azure O365 Tenant Selection, Office 365 License Selection, and Office 365 Roles Selection, and OneDrive provisioning Office 365 roles management for hybrid environment users Managing Office 365 Contacts Managing Hybrid AD Groups Managing Office 365 Groups Managing Azure Security Groups Managing cloud-only distribution groups Managing cloud-only Azure users Managing cloud-only Azure guest users Managing cloud-only Azure contacts Changes to Active Roles policies for cloud-only Azure objects Managing room mailboxes Managing cloud-only shared mailboxes
Managing Configuration of Active Roles
Connecting to the Administration Service Adding and removing managed domains Using unmanaged domains Evaluating product usage Creating and using virtual attributes Examining client sessions Monitoring performance Customizing the console Using Configuration Center Changing the Active Roles Admin account Enabling or disabling diagnostic logs Active Roles Log Viewer
SQL Server Replication Appendix A: Using regular expressions Appendix B: Administrative Template Appendix C: Communication ports Appendix D: Active Roles and supported Azure environments [[[Missing Linked File System.LinkedTitle]]] Appendix E: Active Roles integration with other One Identity and Quest products Appendix F: Active Roles integration with Duo Appendix G: Active Roles integration with Okta

Step 2: Applying the Policy Object

Step 2: Applying the Policy Object

You can apply the Policy Object by using the Enforce Policy page in the New Deprovisioning Policy Object wizard, or you can complete the wizard and then use the Enforce Policy command on the domain, OU, or Managed Unit where you want to apply the policy.

For more information on how to apply a Policy Object, see Applying Policy Objects and Managing policy scope earlier in this chapter.

Scenario 2: Managed Unit for deprovisioned groups

This scenario describes how to configure a Managed Unit and a Group Object Deprovisioning policy so that the Managed Unit includes all deprovisioned groups. The policy sets the Notes property to Deprovisioned upon the deprovisioning of a group, whereas the Managed Unit is configured to include the groups that have the Notes property set to Deprovisioned.

To implement this scenario, you must perform the following actions:

  1. Create and configure the Managed Unit.
  2. Configure the Policy Object that defines the appropriate policy.
  3. Apply the Policy Object to a domain, OU, or Managed Unit.

As a result, after deprovisioning a group in the container you selected in Step 3, Active Roles automatically adds that group to the Managed Unit you created in Step 1.

The following sections elaborate on the steps to implement this scenario.

Step 1: Creating and configuring the Managed Unit

You can create and configure the Managed Unit by using the Active Roles console:

  1. In the console tree, under Configuration, right-click Managed Units, and select New | Managed Unit.
  2. In Name, type a name for the Managed Unit. For example, you might type Deprovisioned Users.
  3. Click Next.
  4. Configure the membership rule to have the Managed Unit include the deprovisioned user accounts from all domains that are registered with Active Roles (managed domains):
    1. On the wizard page, click Add.
    2. In the Membership Rule Type dialog box, click Include by Query, and then click OK.
    3. Use the Create Membership Rule window to set up the rule:
      • In Find, click Users.
      • Click Browse and select Active Directory.
      • Click the Advanced tab.
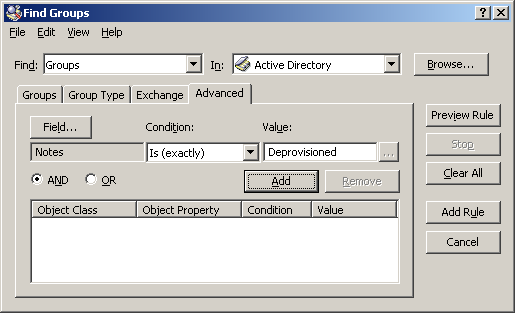
      • Click the Field button, and then click Notes.
      • In Condition, click Is (exactly).
      • In Value, type Deprovisioned.

    At this stage, the window should look like the following figure.

    Figure 87: Find Groups

  • Click the Add button.
  • Click the Add Rule button.
  1. On the wizard page, click Add.
  2. In the Membership Rule Type dialog box, click Retain Deprovisioned, and then click OK.
  1. Click Next, click Next, and then click Finish.

Step 2: Configuring the Policy Object

You can configure the Policy Object you need by modifying the Policy Object that implements the previous scenario, see Scenario 1: Disabling and renaming the user account upon deprovisioning earlier in this section.

Display the Properties dialog box for that Policy Object and go to the Policies tab. Then, select the policy from the list, and click View/Edit to display the Group Object Deprovisioning Policy Properties dialog box. Click the Change Properties tab.

The Change Properties tab looks similar to the page of the same name in the wizard you used to create the Policy Object. You can use that tab to add the update rule for the Notes property:

  1. Click Add to display the Select Object Property dialog box.
  2. Select the check box next to the Notes property, and then click OK.
  3. In the Add Value dialog box, type Deprovisioned in the ‘Notes’ must be box, and then click OK.

Click OK to close the Group Object Deprovisioning Policy Properties dialog box.

Documentos relacionados

The document was helpful.

Selecione a classificação

I easily found the information I needed.

Selecione a classificação