Step 1: Creating and configuring the Policy Object
Step 1: Creating and configuring the Policy Object
You can create and configure the Policy Object you need by using the New Provisioning Policy Object wizard. For information about the wizard, see Creating a Policy Object in the Policy Object management tasks section earlier in this chapter.
To configure the policy, click User Logon Name Generation on the Select Policy Type page of the wizard. Then, click Next.
On the User Logon Name (pre-Windows 2000) Generation Rules page, click Add. Then, complete the Configure Value dialog box as follows:
- Click Add.
- Configure the entry to include the first character of the user first name:
- Under Entry type, click User Property.
- Under Entry properties, click Select.
- In the Select Object Property window, click First Name in the Object property list, and then click OK.
- Under Entry properties, click The first, and make sure the box next to that option reads 1.
- Click OK.
- Click Add.
- Configure the entry to optionally include a uniqueness number:
- Under Entry type, click Uniqueness Number.
- Under Entry properties, click Add if the property value is in use, and make sure the Fixed-length number, with leading zeroes check box is cleared.
- Click OK.
- Click Add.
- Configure the entry to include the user last name:
- Under Entry type, click User Property.
- Under Entry properties, click Select.
- In the Select Object Property window, click Last Name in the Object property list, and then click OK.
- Click OK.
After you complete these steps, the list of entries in the Configure Value dialog box should look like the following figure.
Figure 59: Configure Value
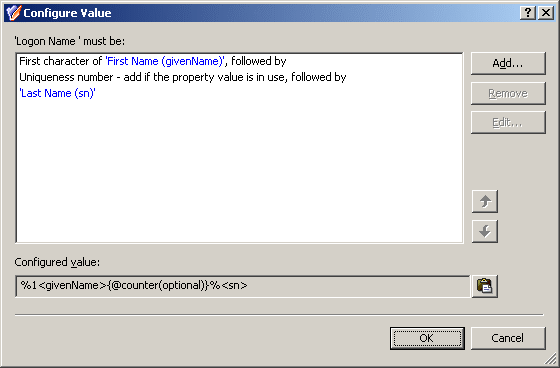
Click OK to close the Configure Value dialog box.
You also need to set up the limitation on the length of the name. On the User Logon Name (pre-Windows 2000) Generation Rules page, click the Advanced button. In the Advanced dialog box, in the Maximum length, in characters box, type 8, and then click OK.
Click Next and follow the instructions in the wizard to create the Policy Object.
Step 2: Applying the Policy Object
Step 2: Applying the Policy Object
You can apply the Policy Object by using the Enforce Policy page in the New Provisioning Policy Object wizard, or you can complete the wizard and then use the Enforce Policy command on the domain, OU, or Managed Unit where you want to apply the policy.
For more information on how to apply a Policy Object, see Applying Policy Objects and Managing policy scope earlier in this chapter.
Scenario 2: Using multiple rules
The policy described in this scenario uses multiple rules to generate the pre-Windows 2000 user logon name. The rules are as follows:
- The first character of the user first name, followed by the user last name
- The first two characters of the user first name, followed by the user last name
- The first three characters of the user first name, followed by the user last name
The length of the policy-generated name is at most eight characters. If the name is longer, trailing characters are truncated as needed.
Examples of names generated by this policy are as follows:
- JSmitson
- JoSmitso
- JohSmits
The policy generates the name JoSmitso for the user John Smitson if the name JSmitson is in use. If both JSmitson and JoSmitso are in use, the policy generates the name JohSmits.
To implement this scenario, you must perform the following actions:
- Configure the Policy Object that defines the appropriate policy.
- Apply the Policy Object to a domain, OU, or Managed Unit.
As a result, when assigning a pre-Windows 2000 user logon name to a user account in the container you selected in Step 2, the Active Roles user interfaces provide a Generate button to create the name in accordance with the policy rules. In the event of a naming conflict, clicking the Generate button causes the policy to apply a subsequent rule.
The following two sections elaborate on the steps to implement this scenario.
Step 1: Configuring the Policy Object
Step 1: Configuring the Policy Object
You can configure the Policy Object you need by modifying the Policy Object that implements the previous scenario; see Scenario 1: Using uniqueness number earlier in this section.
Display the Properties dialog box for that Policy Object and go to the Policies tab. Then, select the policy from the list, and click View/Edit to display the User Logon Name Generation Policy Properties dialog box.
The Generation Rules tab in the User Logon Name Generation Policy Properties dialog box looks similar to the User Logon Name (pre-Windows 2000) Generation Rules page in the wizard you used to configure the policy. You can use that tab to add or modify policy rules.
First, modify the rule to remove the uniqueness number entry. On the Generation Rules tab, select the rule and click View/Edit to display the Configure Value dialog box. Then, select the uniqueness number entry as shown in the following figure, and click Remove.
Figure 60: Configure Value
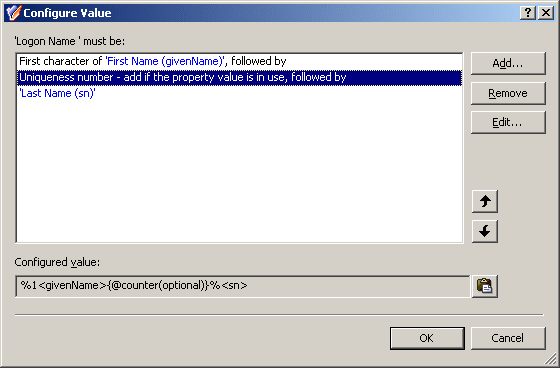
Click OK to close the Configure Value dialog box.
Next, configure the additional policy rules as follows.
- On the Generation Rules tab, click Add to display the Configure Value dialog box.
- In the Configure Value dialog box, click Add to display the Add Entry window.
- Configure the entry to include the first two character of the user first name:
- Under Entry type, click User Property.
- Under Entry properties, click Select.
- In the Select Object Property window, click First Name in the Object property list, and then click OK.
- Under Entry properties, click The first, and enter 2 in the box next to that option.
- Click OK to close the Add Entry window.
- In the Configure Value dialog box, click Add to display the Add Entry window.
- Configure the entry to include the user last name:
- Under Entry type, click User Property.
- Under Entry properties, click Select.
- In the Select Object Property window, click Last Name in the Object property list, and then click OK.
- Click OK to close the Add Entry window.
- Click OK to close the Configure Value dialog box.
- Repeat Steps 1 through 6 with the following alteration:
In Step 3, sub-step d), enter 3 in the box next to the The first option.
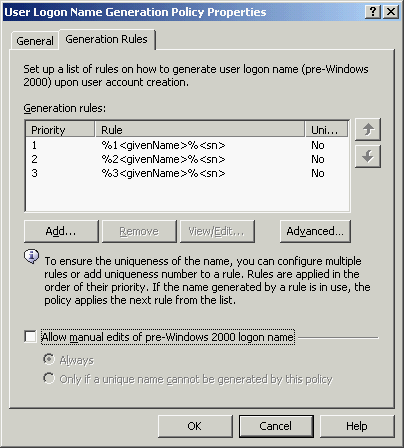
After you complete these steps, the list of rules on the Generation Rules tab should look as follows:
Figure 61: Generation rules
Click OK to close the User Logon Name Generation Policy Properties dialog box.
