Converse agora com nosso suporte
Chat com o suporte

Active Roles 7.6 - Administration Guide

Introduction About Active Roles Getting Started Rule-based Administrative Views Role-based Administration
Access Templates as administrative roles Access Template management tasks Examples of use Deployment considerations Windows claims-based Access Rules
Rule-based AutoProvisioning and Deprovisioning
About Policy Objects Policy Object management tasks Policy configuration tasks
Property Generation and Validation User Logon Name Generation Group Membership AutoProvisioning E-mail Alias Generation Exchange Mailbox AutoProvisioning AutoProvisioning for SaaS products OneDrive Provisioning Home Folder AutoProvisioning Script Execution Office 365 and Azure Tenant Selection User Account Deprovisioning Office 365 Licenses Retention Group Membership Removal Exchange Mailbox Deprovisioning Home Folder Deprovisioning User Account Relocation User Account Permanent Deletion Group Object Deprovisioning Group Object Relocation Group Object Permanent Deletion Notification Distribution Report Distribution
Deployment considerations Checking for policy compliance Deprovisioning users or groups Restoring deprovisioned users or groups Container Deletion Prevention policy Picture management rules Policy extensions
Workflows
Understanding workflow Workflow activities overview Configuring a workflow
Creating a workflow definition Configuring workflow start conditions Configuring workflow parameters Adding activities to a workflow Configuring an Approval activity Configuring a Notification activity Configuring a Script activity Configuring an If-Else activity Configuring a Stop/Break activity Configuring an Add Report Section activity Configuring a Search activity Configuring CRUD activities Configuring a Save Object Properties activity Configuring a Modify Requested Changes activity Enabling or disabling an activity Enabling or disabling a workflow Using the initialization script
Example: Approval workflow E-mail based approval Automation workflow Activity extensions
Temporal Group Memberships Group Family Dynamic Groups Active Roles Reporting Management History
Understanding Management History Management History configuration Viewing change history
Workflow activity report sections Policy report items Active Roles internal policy report items
Examining user activity
Entitlement Profile Recycle Bin AD LDS Data Management One Identity Starling Management Managing One Identity Starling Connect Configuring linked mailboxes with Exchange Resource Forest Management Configuring remote mailboxes for on-premises users Azure AD, Office 365, and Exchange Online management
Configuring Active Roles to manage hybrid AD objects Managing Hybrid AD Users Unified provisioning policy for Azure O365 Tenant Selection, Office 365 License Selection, and Office 365 Roles Selection, and OneDrive provisioning Office 365 roles management for hybrid environment users Managing Office 365 Contacts Managing Hybrid AD Groups Managing Office 365 Groups Managing Azure Security Groups Managing cloud-only distribution groups Managing cloud-only Azure users Managing cloud-only Azure guest users Managing cloud-only Azure contacts Changes to Active Roles policies for cloud-only Azure objects Managing room mailboxes Managing cloud-only shared mailboxes
Managing Configuration of Active Roles
Connecting to the Administration Service Adding and removing managed domains Using unmanaged domains Evaluating product usage Creating and using virtual attributes Examining client sessions Monitoring performance Customizing the console Using Configuration Center Changing the Active Roles Admin account Enabling or disabling diagnostic logs Active Roles Log Viewer
SQL Server Replication Appendix A: Using regular expressions Appendix B: Administrative Template Appendix C: Communication ports Appendix D: Active Roles and supported Azure environments [[[Missing Linked File System.LinkedTitle]]] Appendix E: Active Roles integration with other One Identity and Quest products Appendix F: Active Roles integration with Duo Appendix G: Active Roles integration with Okta

Create or rename home folder on file server as needed

When selected, this option directs Active Roles to attempt the creation or renaming of a (non-local) home folder on the file server when the Home Directory property is set or modified on a user account in Active Directory. The renaming of the home folder is attempted if the Home Directory property value contains the %username% notation and the changes to the user account include modification of the pre-Windows 2000 logon name of the user account. In other cases, the creation of a new home folder is attempted.

For example, with the Connect: Z: To: \\Server\Share\%username% policy setting, selecting this check box together with the option to apply the policy setting upon creation of a user account causes Active Roles to attempt the creation of the home folder for the user account. Active Roles attempts to create the holder with the following network path: \\Server\Share\LogonName, where LogonName stands for the pre-Windows 2000 logon name of the user account.

Another example is setting the Home Drive and Home Directory properties on an existing user account in Active Directory: With this check box selected, Active Roles attempts to create the folder specified by the network path that is assigned to the Home Directory property.

If creation or renaming of the home folder fails on the file server, then the creation or modification of the user account fails as well. To prevent such an error condition, you could clear this check box.

The result is that Active Roles applies the changes to the Home Drive and Home Directory properties in Active Directory without attempting an operation on the file server, which allows the use of a different tool for creating home folders on the file server.

Copy user permissions on home folder from parent folder

Upon creation or renaming of a home folder for a particular user account, this option ensures that the user account has the same rights on the home folder as it has on the folder in which the home folder resides.

Set user as home folder owner

Upon creation or renaming of a home folder for a particular user account, this option ensures that the user account is set as the owner of the home folder.

An owner of a folder is authorized to make any changes to permission settings on the folder. For example, an owner can authorize other persons to access the folder.

Set user permissions on home folder

Upon creation or renaming of a home folder for a particular user account, this option ensures that the user account has the specified access rights on the home folder.

With the Grant Full Access setting, the user account is authorized to perform any operation on the folder and its contents except for making changes to permission settings. With the Grant Change Access setting, the user account is authorized to view and modify the contents of the folder.

When finished, click Next to display the Home Share Management page. This page lets you configure policy options for creating home shares.

Figure 73: Home share management

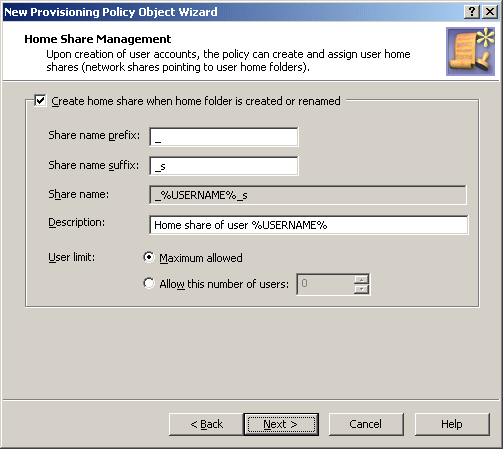
To have the policy create home shares, select the Create home share when home folder is created or renamed check box.

When you configure the policy to create home shares, you can specify the prefix and suffix for the home share names.

Specifying a prefix and suffix allows you to establish a naming convention for home shares. Suppose you want home shares to be displayed at the top of the list of shares. To do so, you can use an underscore as the prefix. You may also assign a suffix to distinguish home shares created by the policy. For example, to distinguish the home shares of users from the Sales department, you could use the suffix _s. Then, when you create a user account with the pre-Windows 2000 logon name set to JohnB, the policy will map the user’s home folder to the selected drive and specify \\Server\_JohnB_s as the path to the home folder. The policy will also create the share _JohnB_s that points to the folder \\Server\Home\JohnB.

Optionally, in the Description box, you can type a comment about the home share. The users will see it when viewing share properties.

You can also limit the number of users that can connect to the share at one time. Click Maximum allowed or Allow this number of users. With the latter option, specify a number in the box next to the option.

Documentos relacionados

The document was helpful.

Selecione a classificação

I easily found the information I needed.

Selecione a classificação