System logging, SNMP and e-mail alerts
E-mail alerts
Topics:
Querying SPS status information using agents
Customize system logging in One Identity Safeguard for Privileged Sessions (SPS)
Configuring system logging
One Identity Safeguard for Privileged Sessions (SPS) can send its system log messages to remote syslog servers (for example, syslog-ng Premium Edition, syslog-ng Store Box, Splunk, or HPE ArcSight Data Platform).
NOTE: To send log messages in any custom format, contact our Support Team.
|
|
Caution:
The retention time for local logs of SPS is seven days. To retain them longer, forward them to a remote logserver. |

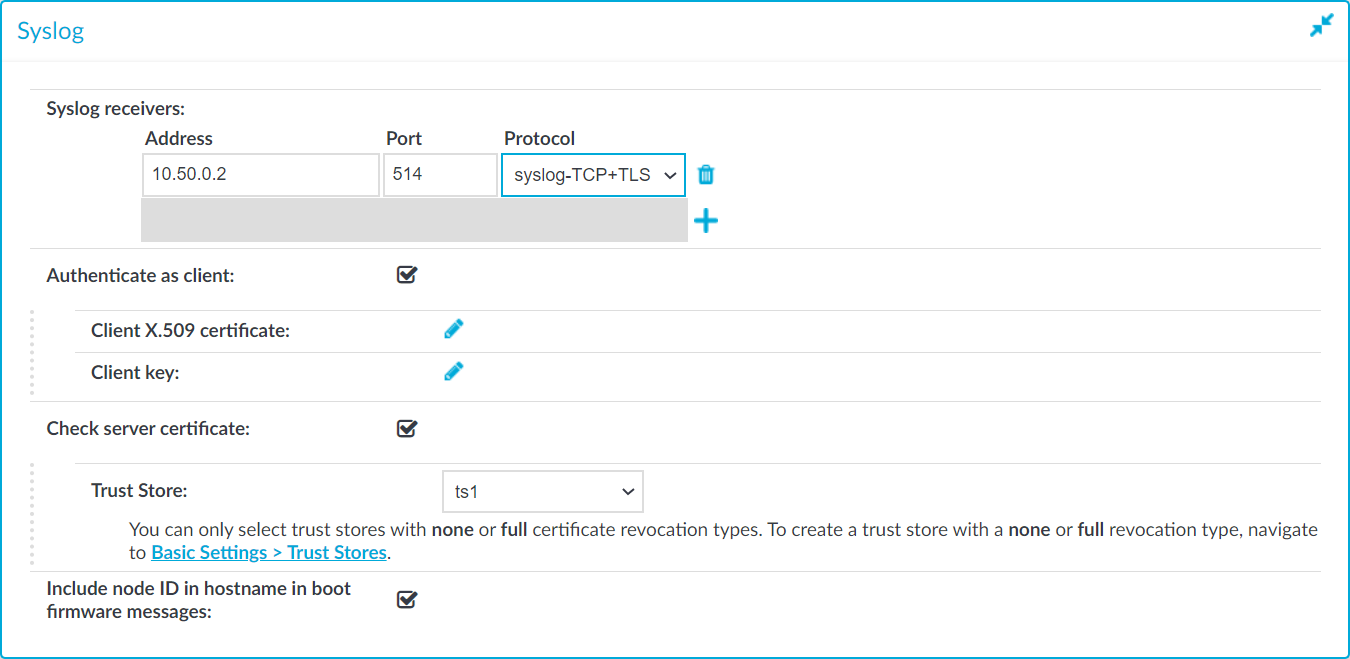
Figure 52: Basic Settings > Management > Syslog — Configuring system logging
To configure logging to a remote server
-
Navigate to Basic Settings > Management.
-
Click
in the Syslog > Syslog receivers field to add a new syslog server.
-
Enter the IP address and port of the syslog server into the respective fields.
Use an IPv4 address.
-
Select the network protocol used to transfer the messages in the Protocol field. The legacy- prefix corresponds to the legacy BSD-syslog protocol described in RFC3164, while the syslog- prefix corresponds to the new IETF-syslog protocol described in RFC5424. Note that not every syslog server supports the IETF protocol yet.
Select TCP+TLS to send the log messages using a TLS-encrypted connection.
TIP: Transferring the syslog messages using TCP ensures that the server receives them.
Transferring the syslog messages using TLS encryption ensures that third parties cannot read the messages. However, not every syslog server accepts encrypted connections. The syslog-ng Premium Edition and Open Source Edition applications, and the syslog-ng Store Box (which is a log-collector appliance similar to SPS) support both encrypted connections and the new IETF-syslog protocol as well. For details on these products, see syslog-ng Premium Edition and syslog-ng Store Box.
-
If the syslog server requires mutual authentication, that is, a certificate from SPS, check Authenticate as client.
- Generate and sign a certificate for SPS, then click the
icon in the Client X.509 certificate field to upload the certificate. After that, click the
- Generate and sign a certificate for SPS, then click the
-
If you have selected the TCP+TLS protocol and you want SPS to verify the certificate of the syslog server, complete the following steps. Otherwise, click
.
-
Select Check server certificate.
-
Select a Trust Store.
NOTE: You can only select a trust store with None or Full revocation check type.
SPS will use this trust store to verify the certificate of the server, and reject the connections if the verification fails. For more information on creating trust stores, see Verifying certificates with Certificate Authorities using trust stores.
-
Click
-
-
To display separate hostnames for syslog messages sent by the nodes of a SPS HA cluster, select the Include node ID in hostname in boot firmware messages option. The node ID included in the hostname file of the syslog message is the MAC address of the node's HA interface. (Messages of the core firmware are always sent by the primary node.)
The boot firmware boots up SPS, provides High Availability support, and starts the core firmware. The core firmware, in turn, handles everything else: provides the web interface, manages the connections, and so on.
-
Click the
icons to add new servers or delete existing ones.
NOTE: To reduce the risk of the syslog server not receiving log messages from SPS because of a network outage or other problem with the syslog server, SPS buffers up to 10 Megabytes of log messages to its hard disk in case the syslog server becomes unaccessible.
Configuring e-mail alerts
The following describes how to configure e-mail alerts.
To configure e-mail alerts
-
Navigate to Basic Settings > Management > Mail settings.
-
If you want to encrypt the communication between SPS and the SMTP server, in Encryption, select the STARTTLS option and complete the following steps:
-
If you want SPS to verify the certificate of the server, select Only accept certificates issued by the specified CA certificate and click the
Click Browse, select the certificate of the Certificate Authority (CA) that issued the certificate of the SMTP server, then click Upload. Alternatively, you can paste the certificate into the Copy-paste field and click Set.
SPS will use this CA certificate to verify the certificate of the server, and reject the connections if the verification fails.
-
If the SMTP server requires mutual authentication, that is, it expects a certificate from SPS, enable Authenticate as client. Generate and sign a certificate for SPS, then click
One Identity recommends using 2048-bit RSA keys (or stronger).
-
-
If you want SPS to authenticate to the SMTP server, in Authentication, select the Enabled option. Enter the Username to authenticate with.
To configure or change the password to use to authenticate to the SMTP server, click Change and enter the password. Click Update. Click
NOTE: One Identity Safeguard for Privileged Sessions (SPS) accepts passwords that are not longer than 150 characters. Letters A-Z, a-z, numbers 0-9, the space character, as well as the following special characters can be used: !"#$%&'()*+,-./:;<>=?@[]\^-`{}_|
-
Enter the IP address or the hostname of the mail server into the SMTP server address field.
Use an IPv4 address.
Figure 53: Basic Settings > Management > Mail settings — Configuring e-mail sending
-
Enter the e-mail address where you want to receive e-mails from into the Send e-mails as field. This can be useful for e-mail filtering purposes. SPS sends e-mails from the address provided here. If no e-mail address is entered, e-mails will be sent from the default e-mail address.
-
Enter the e-mail address of the administrator into the Administrator's e-mail address field. SPS sends notifications related to system-events (but not alerts and reports) to this address.
-
Enter the e-mail address of the administrator into the Send e-mail alerts to field. SPS sends monitoring alerts to this address.
-
Enter the e-mail address the person who should receive traffic reports from SPS into the Send reports to field. For details on reports, see Reports.
-
Click
-
Click Test to send a test message.
If the test message does not arrive to the server, check if SPS can access the server. For details, see Troubleshooting One Identity Safeguard for Privileged Sessions (SPS).
-
Navigate to Basic Settings > Alerting & Monitoring and select in which situations should SPS send an e-mail alert. For details, see Configuring system monitoring on SPS.
-
Click

Configuring SNMP alerts
SPS can send alerts to a central monitoring server through SNMP (Simple Network Management Protocol).
To configure SNMP alerts
-
Navigate to Basic Settings > Management > SNMP trap settings.
-
Enter the IP address or the hostname of the SNMP server into the SNMP server address field.
Use an IPv4 address.
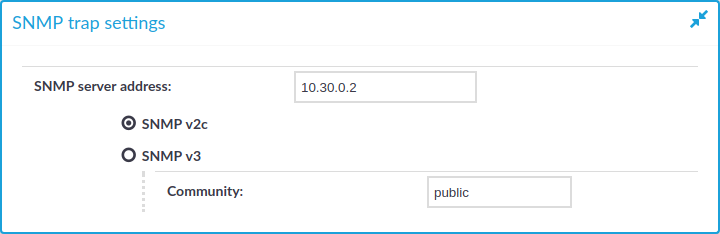
Figure 54: Basic Settings > Management > SNMP trap settings — Configuring SNMP alerts
-
Select the SNMP protocol to use.
(Optional) To use the SNMP v2c protocol for SNMP queries, select SNMP v2c, and enter the community to use into the Community field. Otherwise, skip these steps.
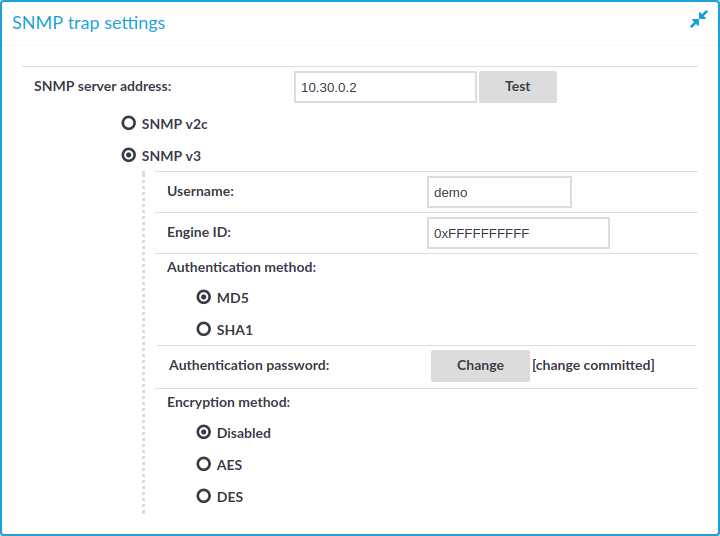
(Optional) To use the SNMP v3 protocol, select SNMP v3 and complete the following steps. Otherwise, skip these steps.
-
Enter the username to use into the Username field.
-
Enter the engine ID to use into the Engine ID field. The engine ID is a hexadecimal number at least 10 digits long, starting with 0x. For example, 0xABABABABAB.
-
Select the authentication method (MD5 or SHA1) to use from the options under the Authentication method: field.
-
Enter the password to use into the Authentication password field.
-
Select the encryption method (Disabled, DES or AES) to use from the options under the Encryption method: field .
-
Enter the encryption password to use into the Encryption password: field.
Figure 55: Basic Settings > Management > SNMP trap settings — Configuring SNMP alerts using SNMPv3
NOTE: One Identity Safeguard for Privileged Sessions (SPS) accepts passwords that are not longer than 150 characters. Letters A-Z, a-z, numbers 0-9, the space character, as well as the following special characters can be used: !"#$%&'()*+,-./:;<>=?@[]\^-`{}_|
-
-
Click
-
Navigate to Basic Settings > Alerting & Monitoring and select in which situations SPS should send an SNMP alert. For details, see Configuring system monitoring on SPS.
-
Click