The following describes how to request timestamps from a remote Timestamping Authority (TSA).
To request timestamps from a remote TSA
-
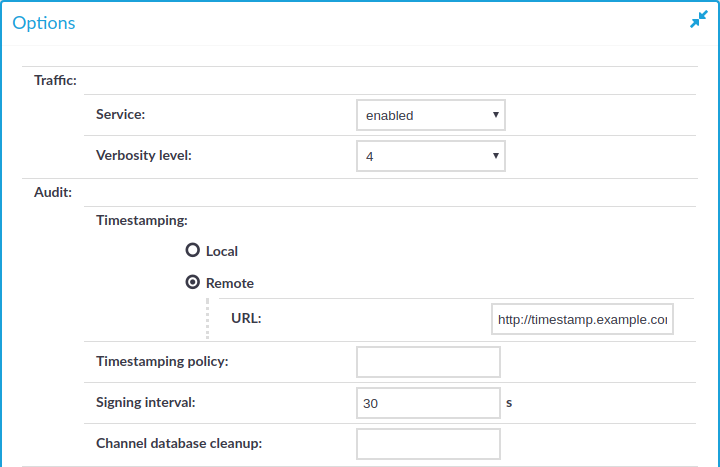
Configure the remote TSA, and the timestamping interval. You have to repeat these steps for each protocol (HTTP, ICA, RDP, SSH, Telnet, and VNC) you want to configure:
Figure 175: <Protocol name> Control > Global Options — Configuring a remote TSA
-
In the protocol control settings, navigate to Global Options > Timestamping (for example, SSH Control > Global Options > Timestamping).
-
Select Remote.
-
Enter the address of the timestamping server into the URL field. Note that currently only plain HTTP services are supported, password-protected and HTTPS services are not supported.
-
If the Timestamping Server has timestamping policies configured, enter the OID of the policy to use into the Timestamping policy field. One Identity Safeguard for Privileged Sessions (SPS) will include this ID in the timestamping requests sent to the TSA.
-
Set the Signing interval. You can choose any value between 10 and 100 000 seconds.
NOTE: The same interval setting applies to timestamping and signing.
-
Click  .
.
-
Configure audit policies to use timestamping. You have to repeat these steps for each audit policy you want to configure:
-
Navigate to Policies > Audit Policies and select the audit policy you will use in your connections.
TIP: By default, every connection uses the built-in default audit policy. Unless you use a custom audit policy, modifying the default audit policy will affect every audited channel of the connections passing through One Identity Safeguard for Privileged Sessions (SPS).
-
Select the Enable timestamping option.
Figure 176: Policies > Audit Policies — Timestamping audit trails
-
Click . SPS will automatically add timestamps to the audit trails of every connection that is audited and uses this audit policy.
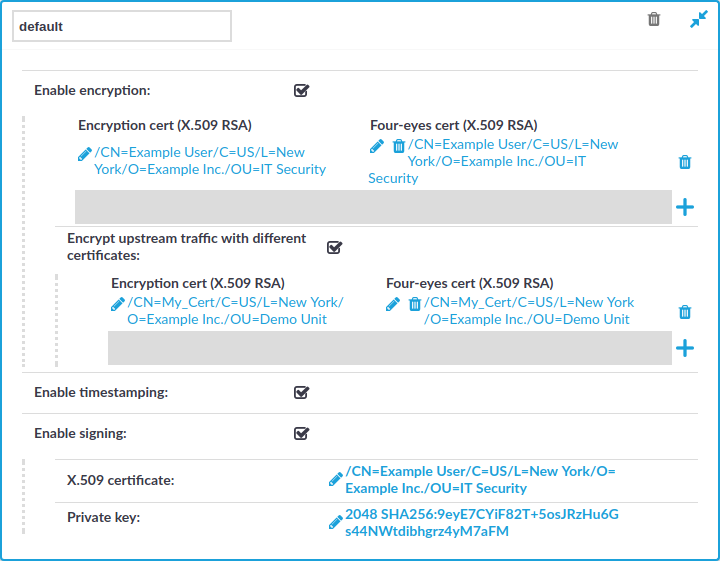
One Identity Safeguard for Privileged Sessions (SPS) can digitally sign the audit trails to prevent the manipulation of the audit trail files. This requires an X.509 certificate and also the private key of the certificate. Note that SPS can generate a private key that you can use to create a certificate, but SPS itself cannot create the certificate used to sign the audit trails.
To enable the digital signing of the audit trails
-
Configure the signing interval. You have to repeat these steps for each protocol (HTTP, ICA, RDP, SSH, Telnet, and VNC) you want to configure:
Figure 177: <Protocol name> Control > Global Options — Configuring the signing interval
-
In the protocol control settings, navigate to Global Options > Timestamping (for example, SSH Control > Global Options > Timestamping).
-
Set the Signing interval. You can choose any value between 10 and 100 000 seconds.
NOTE: The same interval setting applies to timestamping and signing.
-
Click .
-
Navigate to Policies > Audit Policies and select the audit policy you will use in your connections.
Figure 178: Policies > Audit Policies — Signing audit trails
TIP: By default, every connection uses the built-in default audit policy. Unless you use a custom audit policy, modifying the default audit policy will affect every audited channel of the connections passing through One Identity Safeguard for Privileged Sessions (SPS).
-
Select the Enable signing option.
-
Upload a certificate and the corresponding private key to SPS.
-
Click . SPS will automatically sign the audit trails of every connection that is audited and uses this audit policy.
-
Repeat the above steps for other audit policies if needed.
One Identity Safeguard for Privileged Sessions (SPS) can check the validity of certificates using the certificates and certificate-revocation lists of the certificate authorities that issued the certificates. This can be used for example to verify the certificates of the servers in SSH/RDP connections.
To create a list of CA certificates to use during the certificate validation
-
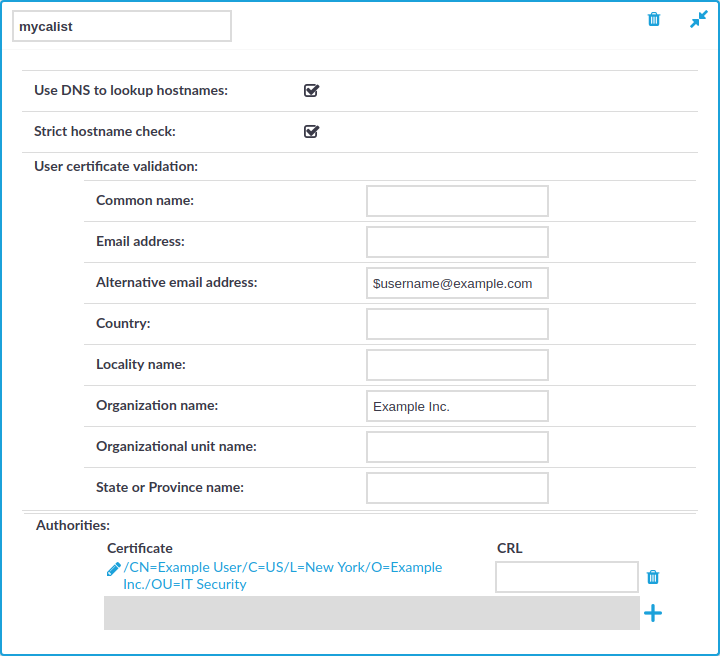
Navigate to Policies > Trusted CA Lists and click  to create a new list.
Figure 179: Policies > Trusted CA Lists — Creating trusted CA lists
-
Enter a name for the CA list into the topmost field.
-
Click  in the Certificate field, and upload the certificate of the Certificate Authority (CA) that will be used to validate the certificates.
-
Enter the URL of the Certificate Revocation List of the CA into the CRL field. Certificates appearing on the CRL list will be automatically rejected.
NOTE: Note that only X.509 CRLs are accepted in either PEM and DER format. PKCS7 CRLs are not accepted.
|

|
Caution:
From SPS version 6.5.0, SPS verifies the signature and the expiration on the Certificate Revocation Lists (CRL) configured at Policies > Trusted CA Lists. The CRLs must be signed by the same Certificate Authority for which it was uploaded. If the validation of the remote CRL fails (or when the remote CRL is unavailable), an alert is generated. Despite the alert, SPS still updates the active CRL with the remote CRL unless the previously downloaded CRL local copy is still valid. Note that it is a security issue if it is not possible to validate the signature on the CRL. If the local copy of the CRL expires, connections that rely on the Trusted CA may fail.
In conjunction with this change, if the remote CRL is specified as a HTTPS URL, the web server certificate is no longer verified before the download.
CRL refresh is implemented as a background service running hourly. Therefore if the problem with the remote CRL persists, you may get alerts every hour. |
-
To further limit which certificates are accepted, you may use the following options:
-
Strict hostname check: Select this option to accept only certificates when the Common Name of the certificate contains the hostname or the IP address of the host showing the certificate.
-
Use DNS to lookup hostnames: Select this option to use the domain name server set on Basic Settings > Network > Naming to resolve the hostnames and IP addresses for certificate validation. If you have enabled the Strict hostname check option, you probably want to enable this option as well.
-
To restrict the accepted certificates based on the content of the certificate, enter the required value into the appropriate field of the User certificate validation section. For example, to accept only certificates that contain Example Inc. in their Organization Name field, enter Example Inc. in to the Organization Name field. In the Common name, E-mail address, and Alternative e-mail address fields you can use the $username macro to refer to the username used in the connection. This macro makes it possible to check that the user is using his own certificate.
-
Click .
One Identity Safeguard for Privileged Sessions (SPS) can check the validity of certificates using the certificates and certificate revocation lists of the certificate authorities (CA) that issued the certificates. This can be used to verify the certificates of the servers in TLS connections.
Trust stores serve as local certificate storages where you can store the certificate chains of trusted CAs. Create and configure custom trust stores to verify the certificates in TLS connections. Note that you cannot modify the built-in trust store, which contains common CA certificates that the operational system of SPS uses.
You can use custom trust stores in the following locations:
Prerequisites
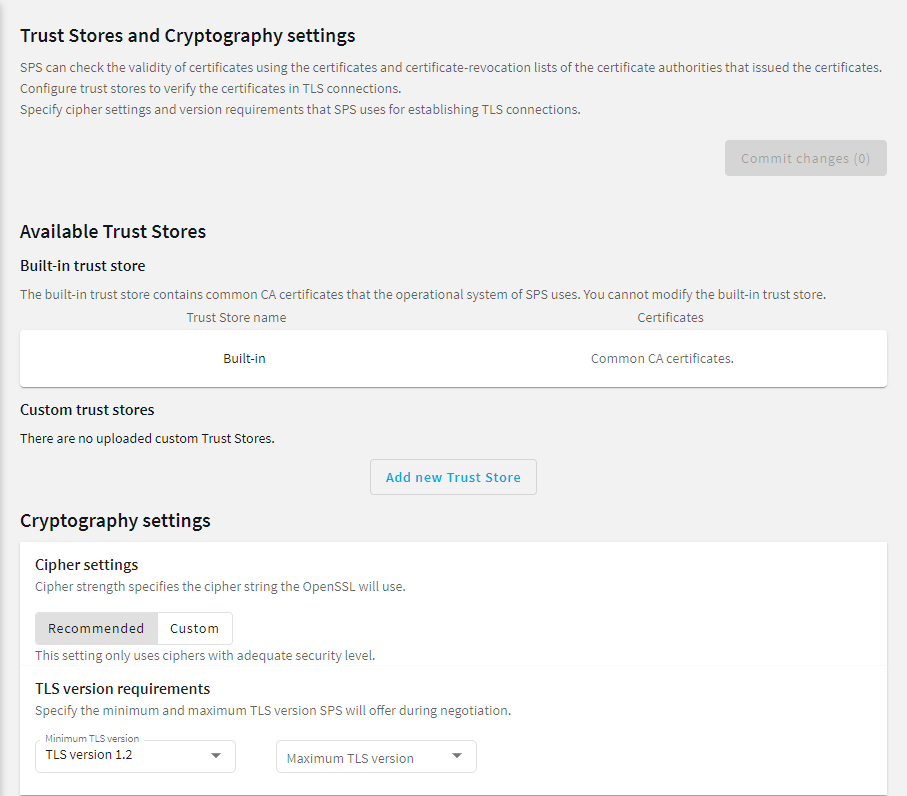
To specify cipher settings and version requirements that SPS uses for establishing TLS connections in the Cryptography Settings section, navigate to Basic Settings > Trust Stores.
Figure 180: Basic Settings > Trust Stores — Cryptography settings
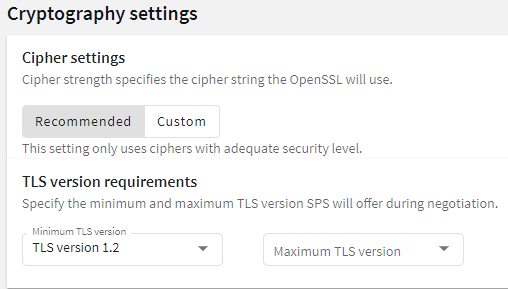
Cipher strength specifies the cipher string OpenSSL will use. The following settings options are possible:
-
Recommended: this setting only uses ciphers with adequate security level.
-
Custom: this setting allows you to specify the list of ciphers you want to permit SPS to use in the connection. This setting is only recommended to ensure compatibility with older systems. For more details on customizing this list, check the 'openssl-ciphers' manual page on your SPS appliance.
For example: ALL:!aNULL:@STRENGTH
Minimum TLS version specifies the minimal TLS version SPS will offer during negotiation. The following settings options are possible:
-
TLS 1.2: this setting will only offer TLS version 1.2 during negotiation. This is the recommended setting.
-
TLS 1.1: this setting will offer TLS version 1.1 and later versions during negotiation.
-
TLS 1.0: this setting will offer TLS version 1.0 and later versions during negotiation.
Maximum TLS version specifies the maximal TLS version SPS will offer during negotiation. The following settings options are possible:
-
TLS 1.2: this setting will only offer TLS version 1.2 during negotiation. This is the recommended setting.
-
TLS 1.1: this setting will offer TLS version 1.1 and later versions during negotiation.
-
TLS 1.0: this setting will offer TLS version 1.0 and later versions during negotiation.
-
Latest: this setting will offer the latest TLS version during negotiation.
NOTE: Note that SPS only permits TLS-encrypted connections. SSLv3 is not supported.
NOTE: TLS 1.1 and 1.2 support for Windows 7 Service Pack 1 (SP1) and for Windows Server 2008 R2 Service Pack 2 (SP2) is not available by default. For more information about the requirements and process of enabling this feature, click here or contact our Support Team.
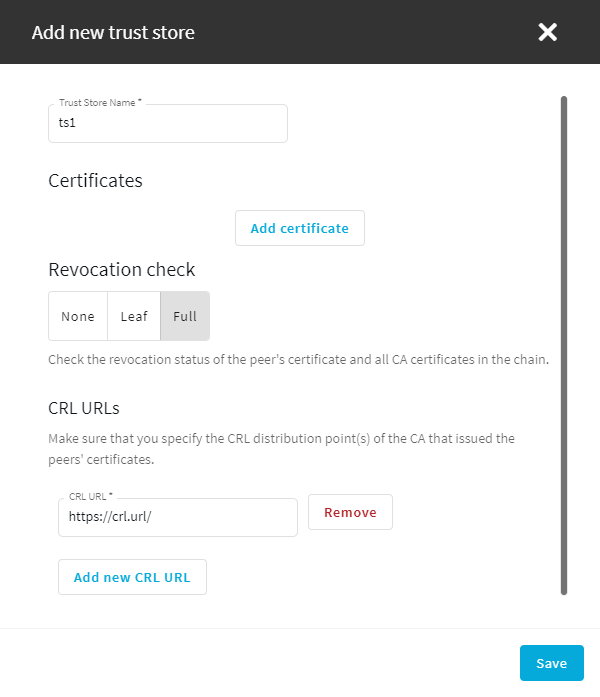
To create a custom trust store or edit an existing custom trust store
-
Navigate to Basic Settings > Trust Stores.
Figure 181: Basic Settings > Trust Stores
-
In the Custom trust stores section, click Add new Trust Store. To change the settings of an existing trust store, click Edit.
The Add new trust store or Edit trust store window opens.
Figure 182: Basic Settings > Trust Stores — Add new trust store
-
In the Trust Store Name field, enter a name for the trust store. For example ts1.
-
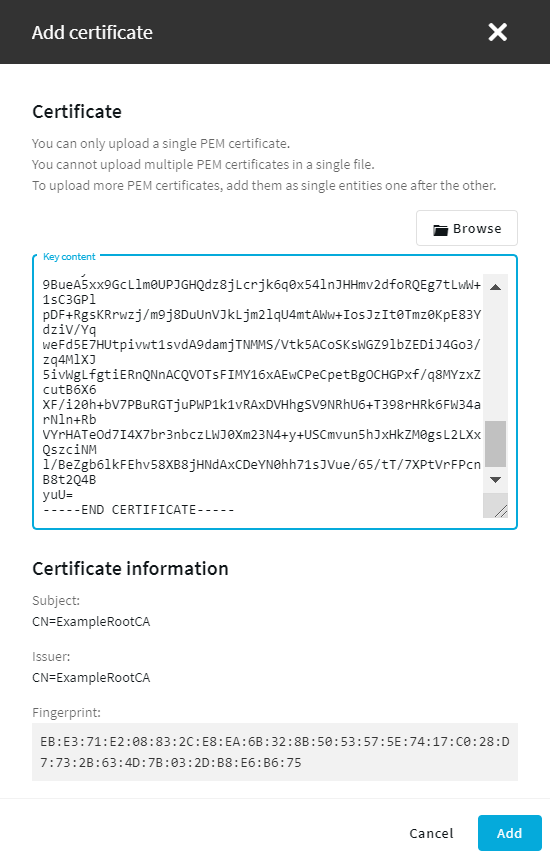
To add the certificate of the CA to the trust store that will be used to validate the certificates, click Add certificate. The Add certificate window opens.
-
Paste or drag the PEM certificate file to the Key content field. You can also click Browse to navigate to the PEM certificate file on your computer.
Figure 183: Basic Settings > Trust Stores — Add certificate
-
You will have to upload all the CA certificates from the users' certificate chains (including the root CA). Therefore, these CA certificates must be available on your computer in PEM format.
-
The certificates of the users must contain the user name used to authenticate on SPS. You must know which certificate field will contain the user names (for example, CN or UID).
-
The certificates must be imported into the browsers of the users. SPS offers the possibility to authenticate with a certificate only if a personal certificate is available in the browser.
NOTE:
You can only upload a single PEM certificate.
You cannot upload multiple PEM certificates in a single file.
To upload more PEM certificates, add them as single entities one by one.
-
Click Add.
-
Set the revocation check type for the trust store.
-
None: Do not check certificate revocation status.
-
Leaf: Check the revocation status of the peer's certificate, but do not check the revocation status of the CA certificates in the chain.
-
Full: Check the revocation status of the peer's certificate and all CA certificates in the chain.
-
If you set the revocation check type to Leaf or Full, click Add new CRL URL to specify the CRL distribution point(s) of the CA that issued the peers' certificates.
-
Enter the URL of the Certificate Revocation List (CRL) of the CA into the CRL URL field. Certificates appearing on the CRL list will be automatically rejected.
-
Click Remove to remove a CRL distribution point from the trust store.
-
Click Save and close the window.
- To delete a certificate from a trust store, click Edit to open the Edit trust store window, click on the certificate, and click Delete.
- To delete a trust store, click Edit to open the Edit trust store window, and click Delete.
-
Click .
