
Defender as a Service Dashboard
|
• |
address and credentials required to access the Defender as a Service dashboard. |
|
2 |
|
NOTE: To obtain this response you must install the Dell Defender Cloud App. Links to download the app are included in your confirmation email. |
Defender as a Service can be used as a two-factor authentication provider from within Cloud Access Manager. For instructions on how to configure two-factor authentication, please refer to Configuring front-end authenticators.
|
• |
Configure Defender as a Service with the Cloud Access Manager login URL and signing certificate. |
When this is complete, users with the appropriate permissions will see a Defender as a Service icon in the Cloud Access Manager portal and can single-sign on (SSO) to the Defender as a Service Dashboard.
|
1 |
|
2 |
From the list of application templates, select Dell Defender as a Service. |
|
3 |
You will be prompted to enter the Tenant Id for your subscription. You can find the Tenant Id in the Website Authentication settings of the Defender as a Service portal when federated authentication is set to SAML. It is also the last section of the dashboard address as shown in your subscription confirmation email. Click Save & Next. |
|
4 |
Click Next to move through the remaining pages of the wizard to complete the application configuration using the default settings. You should review the settings as you proceed to ensure they are correct for your environment. In particular, you should consider limiting access to the Defender as a Service application by selecting a particular role on the Permissions page. |
|
5 |
When you reach the Application Portal page, click Finish. You are presented with the federation settings. Make a note of the IDP Login URL and download the Certificate, as these will be required when you configure the Defender as a Service Dashboard. |
|
1 |
Logon to the Defender as a Service Dashboard and navigate to Settings | Website Authentication. |
|
2 |
|
3 |
Enter the IDP Login URL from the Cloud Access Manager federation settings page. |
|
5 |
Click Save. |
Using Dell's Security Analytics Engine
This section describes how to configure Cloud Access Manager to use Dell’s Security Analytics Engine. The example takes you through the steps required to configure Cloud Access Manager to adapt its access control based on the risk score reported by the Security Analytics Engine. For more information on how to configure the Security Analytics Engine, please refer to the following chapters in the Security Analytics Engine User Guide:
|
• |
|
• |
|
• |
|
IMPORTANT: Any additional chapters within the Security Analytics Engine User Guide will not apply to Cloud Access Manager and using them may cause complications for both Cloud Access Manager and the Security Analytics Engine. |
Enabling Dell's Security Analytics Engine
|
1 |
|
2 |
Select Dell's Security Analytics Engine will manage step-up authentication decisions from the list. |
|
• |
Create a new Cloud Access Manager role named Security Analytics Engine Helpdesk. |
|
NOTE: Users assigned the Security Analytics Engine Helpdesk role should refer to the following chapters of the Security Analytics Engine Help Desk User Guide for information on using the Security Analytics Engine:
|
Configuring Cloud Access Manager to use Dell's Security Analytics Engine for access control
|
1 |
|
2 |
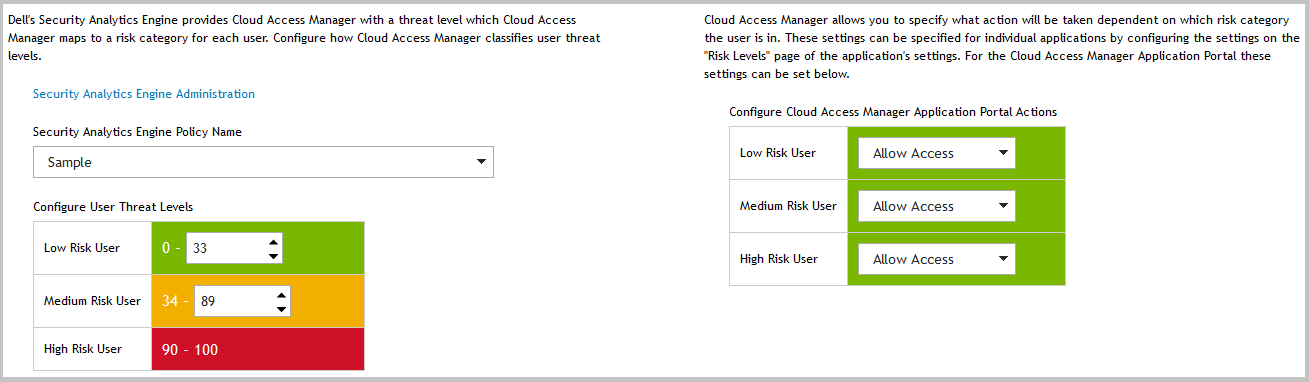
In the Security Analytics Engine Policy Name list select the required policy. |
|
NOTE: Additional Security Analytics Engine policies can be configured from within the Security Analytics Engine Administration page. |
|
1 |
|
2 |
In the Configure User Threat Levels table set the upper bound of the risk score for low risk users. |
|
3 |
In the Configure User Threat Levels table set the upper bound of the risk score for medium risk users. |
|
1 |
|
2 |
In the Configure Cloud Access Manager Application Portal Actions table, set the desired actions for low, medium and high risk users. |
|
1 |
Navigate to the Applications page and click the name of the application that you wish to configure. |
|
2 |
Click the Threat Levels tab. |
|
• |
Select Use the configured user threat levels to set user access to this application to configure access based on the user threat levels configured on the Externalized Access Control page. |
|
• |
Select Override configured user threat levels to set user access to this application to configure specific threat levels for this application. |
|
• |
Select Roles determine which users are assessed by the Security Analytics Engine to configure specific threat levels for this application and only use the Security Analytics Engine to authorize users in particular roles. |
|
b |
Select the required roles for users to be authorized by the Security Analytics Engine from the Standard authentication roles list, then click Add Role to add the role to the list of SAE authentication roles. Users not in roles required for authorization by Security Analytics Engine will be authorized for application access based on roles set on the Permissions tab. |
|
NOTE: The default action for all threat levels is to allow access. You may edit the threat levels for multiple apps at once by using the commands on the Options menu on the Applications page. |
|
1 |
Navigate to the Roles page. |
|
4 |
From the Cloud Access Manager Administration portal, navigate to the Settings page and then to the Externalized Access Control page. |
|
5 |
Click the Security Analytics Engine Administration link. If you are logged on as the fallback user you will be prompted to authenticate. Use the same password that you used to authenticate to Cloud Access Manager. If you are logged on as a federated user you will be taken directly to the Security Analytics Engine administration page without the need to re-authenticate. |
From the Cloud Access Manager Application portal:
|
2 |
Click the Security Analytics Engine Administration link. |