Using predefined Access Templates
Active Roles offers an extensive suite of preconfigured Access Templates that represent typical administrative roles, enabling the correct level of administrative authority to be delegated quickly and consistently.
The predefined Access Templates are located in containers under Configuration > Access Templates in the Active Roles Console. You can display a list of Access Templates in the details pane by expanding Configuration > Access Templates and then selecting one of these containers in the Console tree:
For more information on predefined Access Templates and their recommended use, see the Active Roles Built-in Access Templates Reference Guide.
Creating an Access Template
The Active Roles Console provides the New Object - Access Template wizard for creating Access Templates. To start the wizard, right-click Access Templates in the Console tree, and select New > Access Template. In this case, the wizard adds an Access Template to the Access Templates container.
NOTE: One Identity recommends storing custom Access Templates in a separate container. To create a new container, right-click Access Templates in the Console tree, and select New > Access Template Container. After creating a new container, you can add new Access Templates to that container instead of the default Access Templates container by right-clicking the container in the Console tree and selecting New > Access Template.
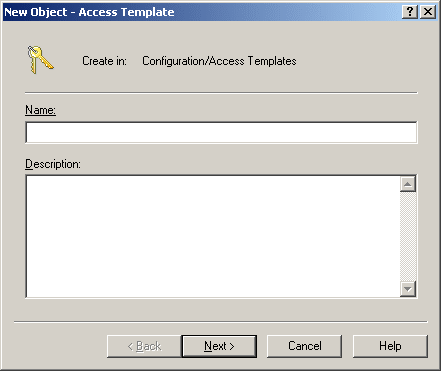
The first page of the wizard looks as shown in the following figure.
Figure 13: Creating a new Access Template

On this page, type a name and description for the new Access Template. The Active Roles Console will display the name and description in the list of Access Templates in the details pane.
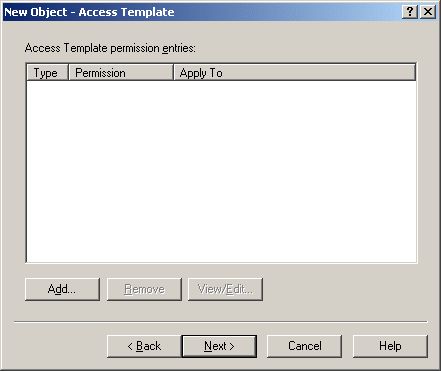
Click Next. The second page of the wizard looks as shown in the following figure.
Figure 14: Access Template permission entries

This page prompts you to configure a list of Access Template permission entries. You can use the Add, Remove and View/Edit buttons to add, remove and modify an entry, respectively. Clicking Add starts the Add Permission Entries Wizard that helps you configure permission entries. The wizard is discussed later in this section.
After you have completed the list of permission entries, click Next, and then click Finish. The new Access Template is created.
Add Permission Entries wizard
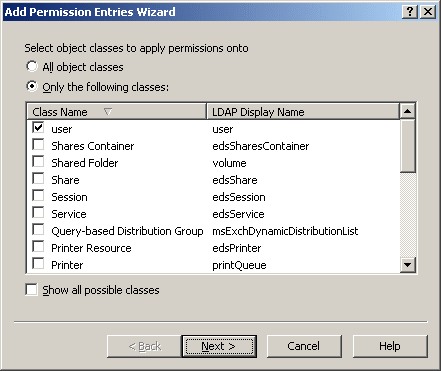
The Add Permission Entries Wizard lets you specify the permission to be added into the Access Template. The first page of the wizard looks as shown in the following figure.
Figure 15: Add Permission Entries

On this page, you select the types of objects to which you want the permission to allow (or deny) access. You can select one of these options:
-
All object classes: With this option, the permission controls access to objects of any type.
-
Only the following classes: With this option, the permission controls access to objects of the type you choose by selecting the appropriate check boxes in the list.
NOTE: By default, all object classes are not displayed in the list. To display all object classes, select the Show all possible classes check box.
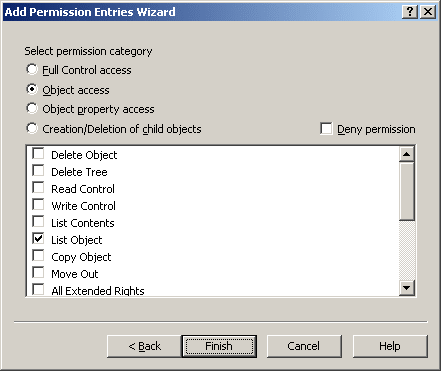
After you have selected the object classes you want, click Next. The next page of the wizard looks as shown in the following figure.
Figure 16: Permission category

On this page, you select a permission category, and specify whether you want the permission to allow or deny certain administrative actions.
You can select one of the following permission categories:
-
Full Control access: Allows or denies all administrative actions on an object.
-
Object access: Controls how an object is accessed and controlled.
-
Object property access: Controls access to an object’s attributes.
-
Creation/Deletion of child objects: Allows or denies creation or deletion of objects in a container.
If you want the permission to deny certain administrative actions, select the Deny permission check box.
The following sections elaborate on the permission categories you can select in the Add Permission Entries Wizard.
Full Control access
Permissions in this category grant access to all object (and object property) administrative operations for the classes selected in the previous step of the Add Permission Entries Wizard.
After you select Full Control access and click Finish, the permission is added to the newly-created Access Template.


