Renaming a user account
To rename a user account, right-click the account and click Rename. Type a new name and press ENTER. This displays the Rename User dialog box, shown in the following figure. In the Rename User dialog box, you can change the user’s first name, last name, display name, and logon name.
Figure 7: Rename User
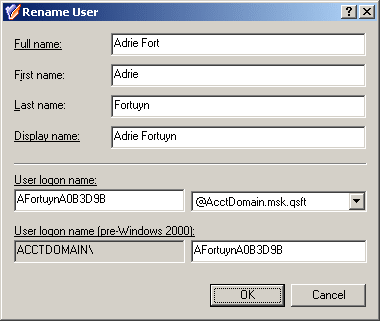
In the Rename User dialog box, hyperlinks are used to indicate the properties controlled by Active Roles policies (see Getting policy-related information earlier in this document).
Steps for renaming a user account
To rename a user account
- In the console tree, locate and select the folder that contains the user account.
- In the details pane, right-click the user account and click Rename.
- Type a new name (or clear the existing name), and then press ENTER to display the Rename User dialog box.
- Use the Rename User dialog box to modify (if needed) the naming properties of the user account such as the user full name, first name, last name, display name, and logon name.
- When finished, click OK.
|

|
NOTE:
- The behavior of the Rename User dialog box may vary depending on the configuration of Active Roles policies. To determine whether a given item in the dialog box is under the control of a certain policy, observe the text label next to the item: the underlined text label indicates that some policy restrictions are in effect. Click underlined text labels to examine the policies that govern the behavior of the dialog box.
- You can use the Find function of Active Roles in order to locate the user account that you want to rename. Once you have found the user account, you can open the Rename User dialog box for that account as follows: Right-click the user account in the list of search results, click Rename, type a new name, and then press ENTER.
|
Disabling and enabling a user account
A user account can be disabled as a security measure to prevent a particular user from logging on, instead of deleting the user account.
To disable a user account, right-click the account and click Disable Account. To enable a user account, right-click a disabled account and click Enable Account. The Enable Account command only appears on disabled accounts. Disabled user accounts are marked with the following icon: 
Steps for disabling a user account
To disable a user account
- In the console tree, locate and select the folder that contains the user account.
- In the details pane, right-click the user account and click Disable Account.
|
|
NOTE:
- To prevent particular users from logging on for security reasons, the administrator can disable user accounts instead of deleting user accounts.
- The Disable Account command is displayed if the account is enabled and thus can be used for logon; otherwise, the Enable Account command is displayed on the menu. By using the Enable Account command the administrator can change the status of the disabled account so as to allow the user to log on with that account.
- You can use the Find function of Active Roles in order to locate the user account you want to disable. Once you have found the user account, you can disable it as follows: Right-click the user account in the list of search results and click Disable Account.
- Since the Copy function ensures that the copy of a user account belongs to the same groups as the original user account, the administrator can create a disabled user account that belongs to certain groups, and then make copies of that account in order to simplify the creation of user accounts with common group memberships.
|
