
Active Roles provides the ability to restore deprovisioned groups. The purpose of this operation, referred to as the Undo Deprovisioning operation, is to roll back the changes that were made to a group by the Deprovision operation. When a deprovisioned group needs to be restored (for example, if a group has been deprovisioned by mistake), the Undo Deprovisioning operation allows the group to be restored to the state it was in before the changes were made.
Introduction
Getting Started
Starting the Active Roles console
User Interface overview
View mode
Using Managed Units
Setting up filter
Finding objects
One Identity Starling Two-factor Authentication for Active Roles
User or Service Account Management
Steps for searching for a user, contact, or group
Steps for searching for a computer
Steps for searching for an Organizational Unit
Steps for using advanced search options
Steps for building a custom search
LDAP syntax
Getting policy-related information
About user accounts
User account management tasks
Group Management
Creating a user account
Finding a user account
Copying a user account
Modifying user account properties
Renaming a user account
Disabling and enabling a user account
Resetting user password
Adding user accounts to groups
Removing a user account from groups
Changing a user’s primary group
Performing Exchange tasks on a user account
Moving user accounts
Exporting and importing user accounts
Deleting user accounts
Deprovisioning a user account
Restoring a deprovisioned user account
Managing user certificates
Management of group Managed Service Accounts
About groups
Group management tasks
Computer Account Management
Creating a group
Finding a group
Copying a group
Modifying group properties
Changing group type and group scope
Renaming a group
Assigning a manager over a group
Adding members to a group
Removing members from a group
Performing Exchange tasks on a group
Moving groups
Exporting and importing groups
Deleting groups
Deprovisioning groups
Restoring deprovisioned groups
Administering query-based distribution groups
Administering dynamic (rule-based) groups
Using temporal group memberships
About computer accounts
Computer account management tasks
Organizational Unit Management
Creating a computer account
Finding a computer account
Modifying computer account properties
Disabling and enabling a computer account
Resetting a computer account
Adding computer accounts to groups
Removing a computer account from groups
Moving computer accounts
Exporting and importing computer accounts
Deleting computer accounts
Managing a remote computer
Using Remote Desktop Connection
Viewing BitLocker recovery passwords
About Organizational Units
Organizational Unit management tasks
Management of Contacts
Management of Exchange Recipients
Creating an Exchange mailbox
Steps for creating a user mailbox
Steps for creating a room or equipment Mailbox
Steps for creating a linked mailbox
Steps for creating a shared mailbox
Performing Exchange tasks
Managing Exchange-related properties
Exchange General tab
Exchange Advanced tab
E-mail Addresses tab
Mail Flow Settings tab
Mailbox Settings tab
Mailbox Features tab
Calendar Settings tab
Resource Information tab
Master Account tab
Mailbox Sharing tab
Managing Unified Messaging users
Restoring deprovisioned groups
Steps for restoring a deprovisioned group
To restore a deprovisioned group
- In the console tree, locate and select the folder that contains the group you want to restore.
- In the details pane, right-click the group, and then click Undo Deprovisioning.
- Wait while Active Roles restores the group.
- When you click the Undo Deprovisioning command, the operation progress and results are displayed. When the operation is completed, Active Roles displays the operation summary, and allows you to examine the operation results in detail. You can view a report that lists the actions taken during the restore operation. For each action, the report informs about success or failure of the action. In the event of a failure, the report provides a description of the error situation.
Administering query-based distribution groups
Query-based distribution group is a type of distribution group introduced in Exchange Server. The difference from the usual distribution group is that members of a query-based group are not statically placed into it. Email is propagated among the members of the group, but only among those of them who is currently in the state to comply with the specified LDAP query of this distribution group.
You can create a query-based distribution group as follows: in the console tree, right-click the container where you want to add the group, select New | Query-based Distribution Group, and then follow the instructions in the wizard. The following figure shows the step of the wizard where you can set up a query.
Figure 17: Administering query-based distribution groups
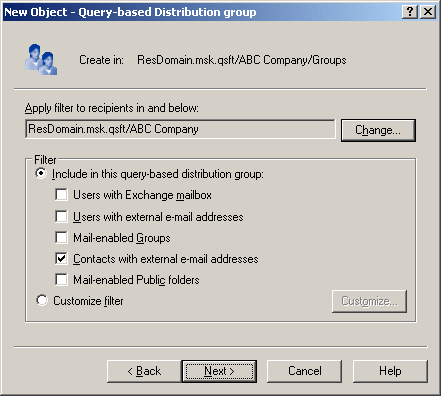
On this page, you can choose between predefined filters and custom filter. If select Custom filter, click Customize to configure the filter. This displays the Custom Search window where you can specify your search criteria.
You can manage a query-based distribution group in much the same way as you do with regular distribution groups: right-click the group and then select a command on the shortcut menu.
Steps for creating a query-based distribution group
To create a query-based distribution group
- In the console tree, right-click the folder in which you want to add the group, and select New | Query-based Distribution Group.
- In Query-based Distribution Group name, type a name for the group, and then click Next.
- The box under Apply filter to recipients in and below displays the folder to search for recipients. Click Change to select the folder that contains the recipients you want the group to include.
The query returns only recipients in the selected folder and its sub-folders. To get the results that you want, you may have to select a parent folder or create multiple queries.
- Under Filter, do one of the following:
- Click Include in this query-based distribution group, and then click each item you want to include in the criteria for membership in the query-based distribution group. The following criteria are pre-defined:
- Public folders that are mail-enabled
- Click Customize filter and then click Customize to create your own criteria for the query.
- Click Next to see a summary of the query-based distribution group you are about to create.
- Click Finish to create the query-based distribution group. The new query-based distribution group is displayed in the details pane.
- Right-click the query-based distribution group you just created and click Properties.
- On the Preview tab, click Start to view the query results and verify that the correct recipients are included in the group.
