Changing group type and group scope
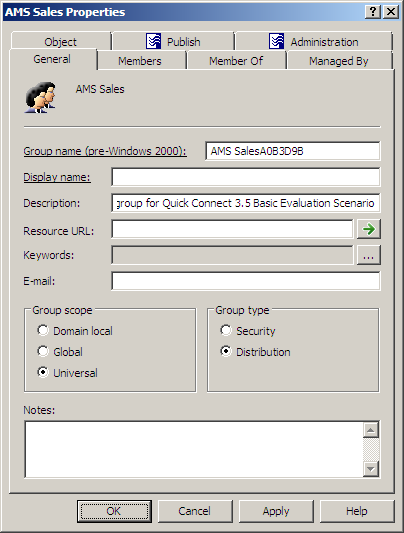
To change group scope or group type, right-click the group, click Properties, and go to the General tab in the Properties dialog box, shown in the following figure. On the General tab, click the group type in the Group type area or click the group scope under Group scope.
Figure 13: Changing group type and group scope
Steps for changing group scope
To change group scope
- In the console tree, locate and select the folder that contains the group you want to modify.
- In the details pane, right-click the group you want to modify, and then click Properties.
- On the General tab in the Properties dialog box, under Group scope, click the group scope you want for this group.
For information about possible scope settings, see About groups earlier in this document.
|

|
NOTE:
The following changes of the group scope are allowed:
- Global to universal This is allowed if the group you want to change is not a member of another global group.
- Domain local to universal This is allowed if the group you want to change does not have another domain local group as a member.
- Universal to global This is allowed if the group you want to change does not have another universal group as a member.
- Universal to domain local No restrictions for this operation.
|
Steps for converting a group to another group type
To convert a group to another group type
- In the console tree, locate and select the folder that contains the group you want to modify.
- In the details pane, right-click the group you want to modify, and then click Properties.
- On the General tab in the Properties dialog box, under Group type, click the group type you want for this group.
Renaming a group
To rename a group, right-click the group, and then click Rename. Type a new name and press ENTER. This displays the Rename Group dialog box, shown in the following figure. In the Rename Group dialog box, you can change the group name and group name (pre-Windows 2000).
Figure 14: Rename Group
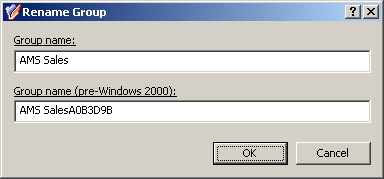
In the Rename Group dialog box, hyperlinks are used to indicate the properties controlled by Active Roles policies (see Getting policy-related information earlier in this document).
