To assign a manager over a group, right-click the group, click Properties, and go to the Managed By tab in the Properties dialog box, shown in the following figure. On the Managed By tab, click Change and select the user or contact to designate as the manager.
Figure 15: Assigning a manager over a group

If you select Manager can update membership list, the manager can use Active Roles to add and remove members from the group.
It is possible to assign multiple group owners, to load balance the management of the group. To assign additional owners to the group, click the button next to the Secondary owners box. Group owners can be given the same rights over the group as the manager. For example, selecting the check box beneath the Secondary owners box gives the secondary owners the authority to add or remove members from the group.
It is possible to assign management of the group to another group: you can select a group in the Select Objects dialog box that you use to specify the manager or a secondary owner. This enables every member of the group to act as the manager or secondary owner.
To assign a manager over a group
- In the console tree, locate and select the folder that contains the group.
- In the details pane, right-click the group, and then click Properties.
- On the Managed By tab in the Properties dialog box, click Change under the Name box.
- Use the Select Objects dialog box to locate and select the user or contact you want to be responsible for the group - the manager of the group.
- Optionally, select the Manager can update membership list check box in order to authorize the manager to add or remove members from the group.
|

|
NOTE:
- To assign additional managers to the group, click the button next to the Secondary owners box. Secondary owners can be given the same rights over the group as the manager. For example, selecting the check box beneath the Secondary owners box gives the secondary owners the authority to add or remove members from the group.
- You can select a group for the role of the manager or secondary owner. This enables every member of the group to act as the manager or secondary owner.
- You can use the Find function of Active Roles in order to locate the group you want to modify. Once you have found the group, you can open the Properties dialog box for that group as follows: Right-click the group in the list of search results and click Properties.
|
Depending on its scope, a group may contain members (users, groups, computers, contacts) from anywhere in the forest, or only members from its own domain.
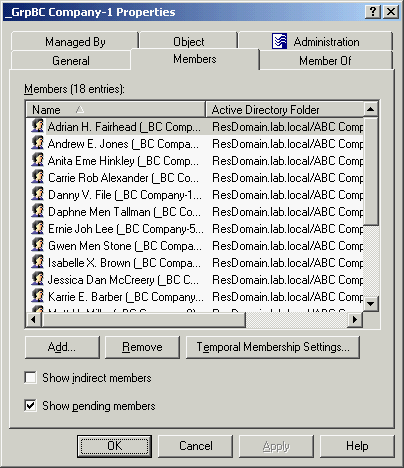
To add members to a group, right-click the group, click Properties, and go to the Members tab in the Properties dialog box. On the Members tab, click Add. This displays the Select Objects dialog box where you can select the objects you want to add to the group.
In the Select Objects dialog box, you can select objects from the list or type object names. Use the Check Names button to verify the names you type. If Active Roles cannot find an object, it prompts you to correct the name.
The Members tab lists objects that belong to the group. If the Show indirect members check box is selected, the list also includes the objects that belong to the group because of group nesting.
The Temporal Membership Settings button can be used to specify the date and time when the selected members should be added or removed from the group. For more information about this feature, see Using temporal group memberships later in this document.
Figure 16: Adding members to a group

On the Members tab, you can manage user accounts and other objects directly from the list of members. To manage a group member, right-click the member and use commands on the shortcut menu.
|

|
NOTE:When you select multiple groups, the Members tab lists the objects that belong to each of the selected groups. If a given object does not belong to one of the selected groups, then that object does not appear in the list. |


