Converse agora com nosso suporte
Chat com o suporte

Active Roles 7.6 - User Guide

Introduction Getting Started One Identity Starling Two-factor Authentication for Active Roles User or Service Account Management Group Management Computer Account Management Organizational Unit Management Management of Contacts Management of Exchange Recipients

Steps for enabling a disabled user account

To enable a disabled user account

  1. In the console tree, locate and select the folder that contains the user account.
  2. In the details pane, right-click the user account and click Enable Account.

NOTE:

  • The Enable Account command is displayed if the account is disabled and thus cannot be used for logon; otherwise, the Disable Account command is displayed on the menu. To prevent particular users from logging on for security reasons, the administrator can disable user accounts by using the Disable Account command.
  • You can use the Find function of Active Roles in order to locate the user account you want to enable. Once you have found the user account, you can enable it as follows: Right-click the user account in the list of search results and click Enable Account.

Resetting user password

To reset the password for a user account, right-click the account and click Reset Password. This displays the Reset Password dialog box, shown in the following figure. In the Reset Password dialog box, it is possible to generate passwords, set password options, and unlock the account if it is locked out. To generate a password, click the button next to the New Password box.

Figure 8: Reset Password

Steps for resetting a user password

To reset a user password

  1. In the console tree, locate and select the folder that contains the user account whose password you want to reset.
  2. In the details pane, right-click the user account whose password you want to reset, and then click Reset Password to display the Reset Password dialog box.
  3. Type and confirm the password, or click the button next to the New password box to have Active Roles generate a password.
  4. Select the appropriate check boxes to specify password options. Thus, if you want to require the user to change this password at the next logon process, select the User must change password at next logon check box.
  5. When finished, click OK.

NOTE:
  • For an auto-generated password, you can see how to spell out the password: Click the second button next to the New password box to display the Spelling Out dialog box.
  • Services that are authenticated with a user account must be reset if the password for the service’s user account is changed.
  • You can use the Find function of Active Roles in order to locate the user account whose password you want to reset. Once you have found the user account, you can open the Reset Password dialog box for that account as follows: Right-click the user account in the list of search results and click Reset Password.

Adding user accounts to groups

To add user accounts to groups, select the accounts, right-click the selection, and click Add to a group. This displays the Select Objects dialog box where you can select the groups to which you want to add the accounts.

In the Select Objects dialog box, you can select groups from the list or type group names, separating them with semicolons. Use the Check Names button to verify the names you type. If Active Roles cannot find a group, it prompts you to correct the name.

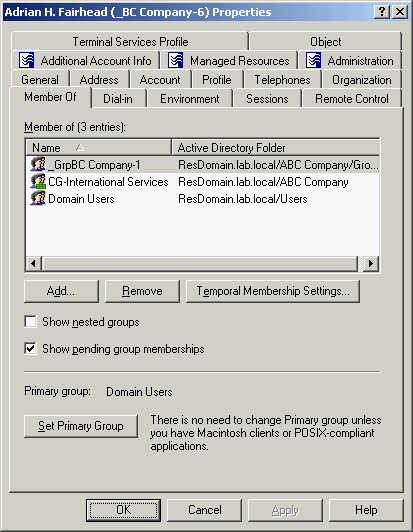
You can also add a user account to groups by modifying the group membership list on the Member Of tab in the Properties dialog box. To display the Properties dialog box, right-click the user account and click Properties.

The Member Of tab lists the groups to which the account belongs, as shown in the following figure. If the Show nested groups check box is selected, the list also includes the groups to which the account belongs owing to group nesting.

The Temporal Membership Settings button can be used to specify the date and time when the user should be added or removed from the selected groups. For more information about this feature, see Using temporal group memberships later in this document.

Figure 9: Adding user accounts to groups

On the Member Of tab, you can manage groups directly from the list of groups. To manage a group, right-click it, and use commands on the shortcut menu.

You can add the user account to groups by clicking Add on the Member Of tab. This displays the Select Objects dialog box, allowing you to select the groups to which you want to add the user account.

NOTE:When you select multiple user accounts, the Member Of tab lists the groups to which all the selected accounts belong. If one of the accounts does not belong to a given group, that group does not appear in the list.
Documentos relacionados

The document was helpful.

Selecione a classificação

I easily found the information I needed.

Selecione a classificação