Configuring the routing table
The routing table contains the network destinations SPS can reach. You have to make sure that both the monitored connections, and the local services of SPS (including connections made to the backup and archive servers, the syslog server, and the SMTP server) are routed properly.
You can add multiple IPv4 and IPv6 addresses and address ranges along with their respective gateways.
To configure the routing table
-
To add a new routing entry, navigate to Basic Settings > Network.
You can add interface-specific network routes using the Advanced routing option of each interface. Otherwise, use the Routing table option to manage networking routes.
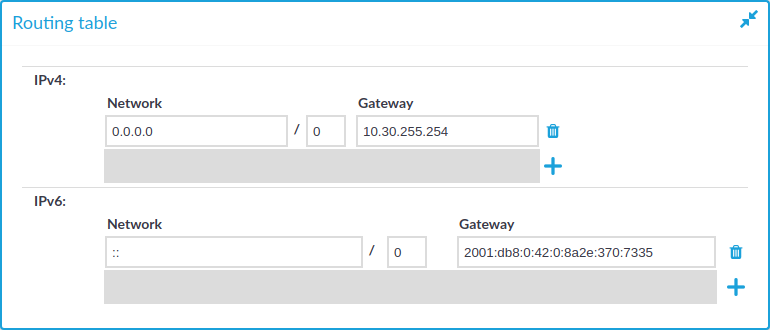
Figure 55: Basic Settings > Network > Routing table — Routing
-
Click  , then enter the IP address and the network prefix into the Network field.
-
Enter the IP address of the gateway used on that subnetwork into the Gateway field.
-
Click  .
.
Configuring date and time
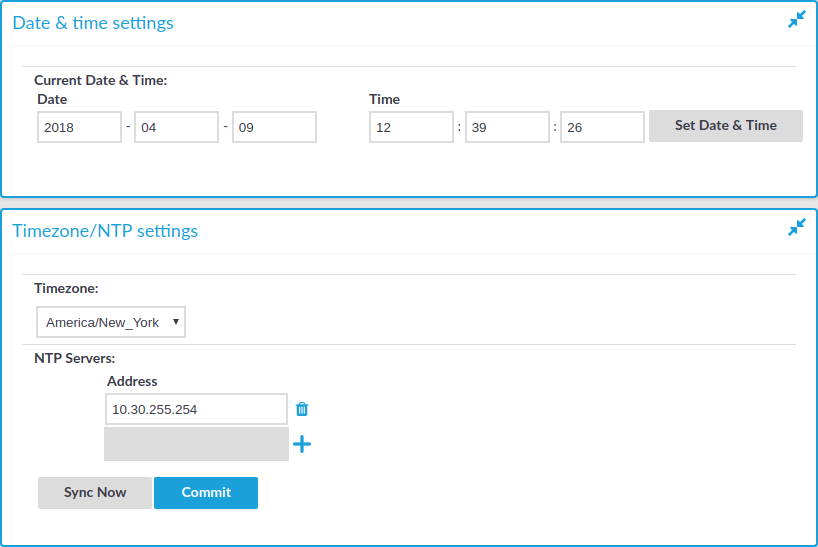
To configure the date and time-related settings of SPS, navigate to Basic Settings > Date & Time.
Figure 56: Basic Settings > Date & Time — Date and time management
|

|
Caution:
It is essential to set the date and time correctly on SPS, otherwise the date information of the logs and audit trails will be inaccurate.
SPS displays a warning on this page and sends an alert if the time becomes out of sync. |
To explicitly set the date and time on SPS, enter the current date into respective fields of the Date & Time settings group and click Set Date & Time.
When two SPS units are operating in High Availability mode, the secondary node automatically synchronizes its time and date to the primary node. To manually synchronize the time between the nodes, click Sync Master (available only in High Availability mode).
To retrieve the date automatically from a time server, complete the following steps:
-
Select your timezone in the Timezone field.
-
Enter the IP address of an NTP time server into the Address field.
Use an IPv4 address.
-
Click .
-
Click the  and
and  icons to add new servers or delete existing ones.
-
Optional: If the time setting of SPS is very inaccurate (that is, the difference between the system time and the actual time is great), it might take a long time to retrieve the date from the NTP server. In this case, click Sync Now or Sync Master to sync the time immediately using SNTP.
System logging, SNMP and e-mail alerts
E-mail alerts and system logging can be configured on the Basic Settings > Management page.
Topics:
Configuring system logging
One Identity Safeguard for Privileged Sessions (SPS) can send its system log messages to remote syslog servers (for example, syslog-ng Premium Edition, syslog-ng Store Box, Splunk, or HPE ArcSight Data Platform).
|
|
Caution:
The retention time for local logs of SPS is seven days. To retain them longer, forward them to a remote logserver. |
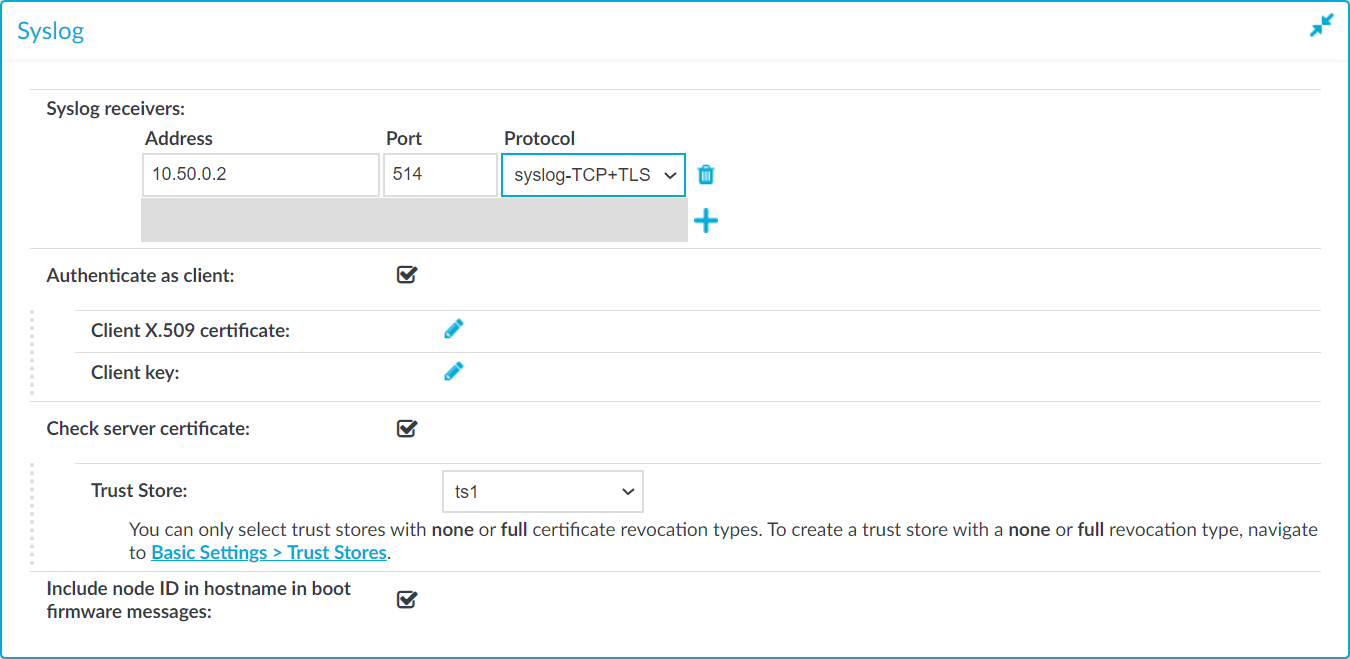
Figure 57: Basic Settings > Management > Syslog — Configuring system logging
To configure logging to a remote server
-
Navigate to Basic Settings > Management.
-
Click in the Syslog > Syslog receivers field to add a new syslog server.
-
Enter the IP address and port of the syslog server into the respective fields.
Use an IPv4 address.
-
Select the network protocol used to transfer the messages in the Protocol field. The legacy- prefix corresponds to the legacy BSD-syslog protocol described in RFC3164, while the syslog- prefix corresponds to the new IETF-syslog protocol described in RFC5424. Note that not every syslog server supports the IETF protocol yet.
Select TCP+TLS to send the log messages using a TLS-encrypted connection.
TIP: Transferring the syslog messages using TCP ensures that the server receives them.
Transferring the syslog messages using TLS encryption ensures that third parties cannot read the messages. However, not every syslog server accepts encrypted connections. The syslog-ng Premium Edition and Open Source Edition applications, and the syslog-ng Store Box (which is a log-collector appliance similar to SPS) support both encrypted connections and the new IETF-syslog protocol as well. For details on these products, see syslog-ng Premium Edition and syslog-ng Store Box.
-
If the syslog server requires mutual authentication, that is, a certificate from SPS, check Authenticate as client.
- Generate and sign a certificate for SPS, then click the
 icon in the Client X.509 certificate field to upload the certificate. After that, click the icon in the Client key field and upload the private key corresponding to the certificate.
-
If you have selected the TCP+TLS protocol and you want SPS to verify the certificate of the syslog server, complete the following steps. Otherwise, click .
-
Select Check server certificate.
-
Select a Trust Store.
NOTE: You can only select a trust store with None or Full revocation check type.
SPS will use this trust store to verify the certificate of the server, and reject the connections if the verification fails. For more information on creating trust stores, see Verifying certificates with Certificate Authorities using trust stores.
-
Click .
-
To display separate hostnames for syslog messages sent by the nodes of a SPS HA cluster, select the Include node ID in hostname in boot firmware messages option. The node ID included in the hostname file of the syslog message is the MAC address of the node's HA interface. (Messages of the core firmware are always sent by the primary node.)
The boot firmware boots up SPS, provides High Availability support, and starts the core firmware. The core firmware, in turn, handles everything else: provides the web interface, manages the connections, and so on.
-
Click the and icons to add new servers or delete existing ones.
NOTE: To reduce the risk of the syslog server not receiving log messages from SPS because of a network outage or other problem with the syslog server, SPS buffers up to 10 Megabytes of log messages to its hard disk in case the syslog server becomes unaccessible.
