Creating rules for restricting access to search audit data
If you want users to access audit data on the Search interface only for sessions for which they are granted permission, complete the following steps.
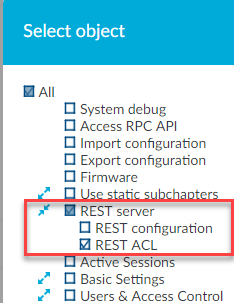
To be able to see the Audit Data Access menu item and use this functionality, you must enable the REST ACL check box as described below.
-
Navigate to Users & Access Control > Appliance Access.
- Click Edit.
-
Expand REST server.
- Select the REST ACL check box.
Figure 97: Users & Access Control > Appliance Access — Select REST ACL
The following describes how you can create rules to restrict the search by providing access privileges for users to audit data.
Prerequisites
-
You have created a local user group as described in Managing local user groups.
-
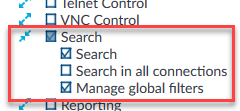
You have added search access rights to your local user group as described in Assigning privileges to user groups for the One Identity Safeguard for Privileged Sessions (SPS) web interface.
NOTE: Ensure that you clear the Search in all connections check box as shown below.
Figure 98: Users & Access Control > Appliance Access — Add search access rights to local user groups
-
You have created a local user, and added the user to the local user group. For more information, see Managing user rights and usergroups.
To create search rules to access audit data
-
If you have multiple SPS appliances and they are organized into a cluster where one of the nodes is the Search Master (or Central Search) node, log in to that node.
- Navigate to Users & Access Control > Audit Data Access.
- Click Create new.
Figure 99: Users & Access Control > Audit Data Access — Create new audit data access rule (ADAR)

- In the Name field, enter a name for your rule.
- In the Groups field, enter an existing local user group for which you want to restrict access to audit data.
- In the Query field, enter the correct query syntax to define which audit data this user group can access.
-
Optionally, for a quick visualization of the audit data that each group can access with this search query, click Preview.
TIP: If required, modify the query syntax using the Query field, and the preview is updated accordingly.
Example: Restrict access to search audit data for a user
You want a user to access audit data on the Search interface related to the SSH protocol only.
-
Create a local user group, for example, search-only-ssh as described in Managing local user groups.
-
Add search access rights to your search-only-ssh user group as described in Assigning privileges to user groups for the One Identity Safeguard for Privileged Sessions (SPS) web interface.
NOTE: Ensure that you clear the Search in all connections check box.
Figure 100: Users & Access Control > Appliance Access — Add search access rights to local user groups
-
Create an audit data access rule (ADAR) for the search-only-ssh user group. Use the correct query syntax, for example, protocol: SSH.
Figure 101: Users & Access Control > Audit Data Access — Create new rule
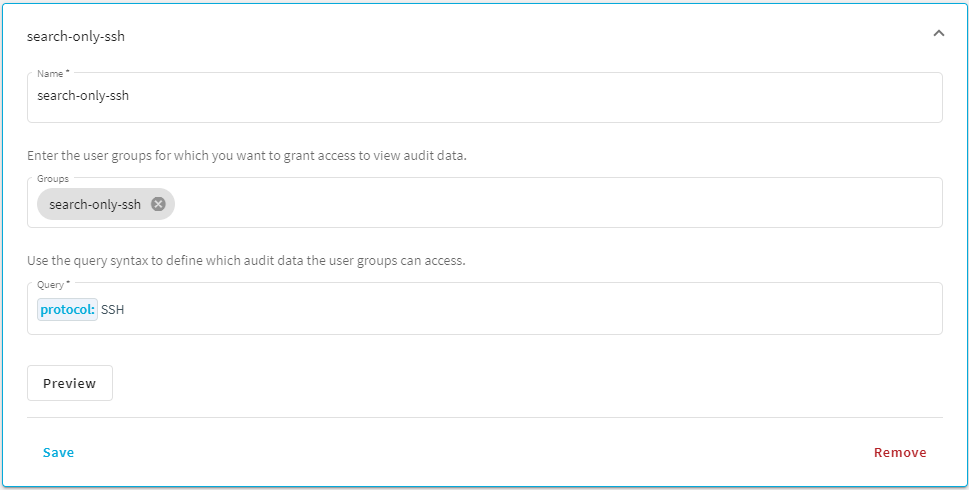
Optionally, for a quick visualization of the audit data that the search-only-ssh group can access with this search query, click Preview.
-
Create a local user, and add the user to the search-only-ssh group. For more information, see Managing user rights and usergroups.
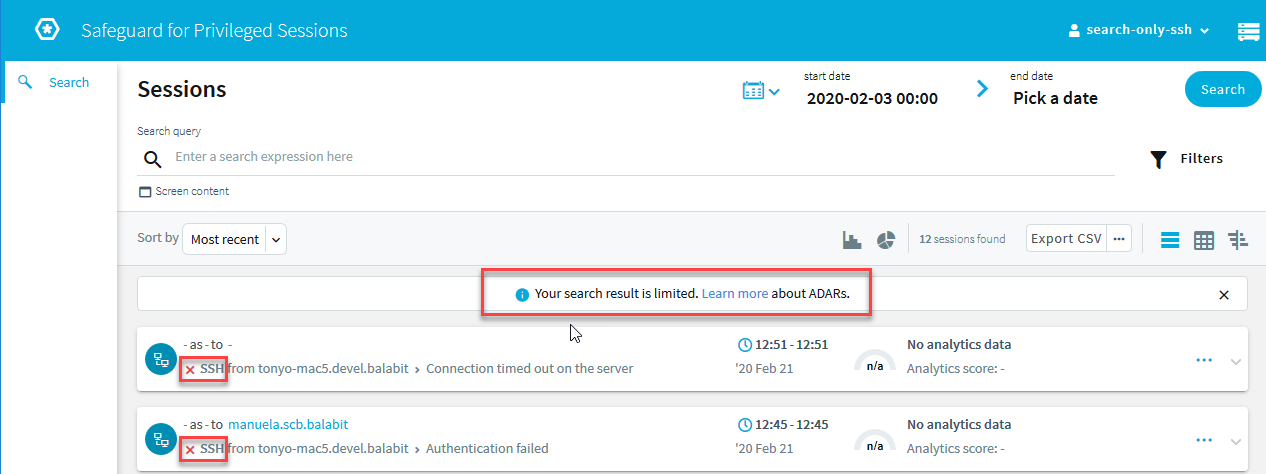
Result: Your local user will have access to audit data related to the SSH protocol only on the Search interface.
Figure 102: Search — Only SSH audit data is displayed for the user
Displaying the privileges of users and user groups
One Identity Safeguard for Privileged Sessions (SPS) version 3.2 and later provides an interface to query the user-rights and privileges of individual users and user groups. To display the privileges of a user or usergroup, navigate to Users & Access Control > Access Rights Report, enter the name of the user or group into the respective field, then click Filter. Note that:
-
It is not possible to filter on both the username and the group at the same time.
-
Partial matches are also displayed.
-
Usergroups can be local usergroups, userlists, or LDAP usergroups.
Web interface permissions
For usergroups accessing the SPS web interface, a table is displayed that lists the pages of the SPS web interface that the user or usergroup can access. The following information is displayed:
-
Page: The name of the page or group of pages, for example, Basic Settings.
-
Element: If a group has access only to a section of a page, the name of the element is listed here. For example, a particular Channel Policy.
-
Group: The name of the usergroup.
-
Permission: The type of access that the user or usergroup has to the page: read or read and write/perform.
Figure 103: Users & Access Control > Access Rights Report — Displaying web interface permissions

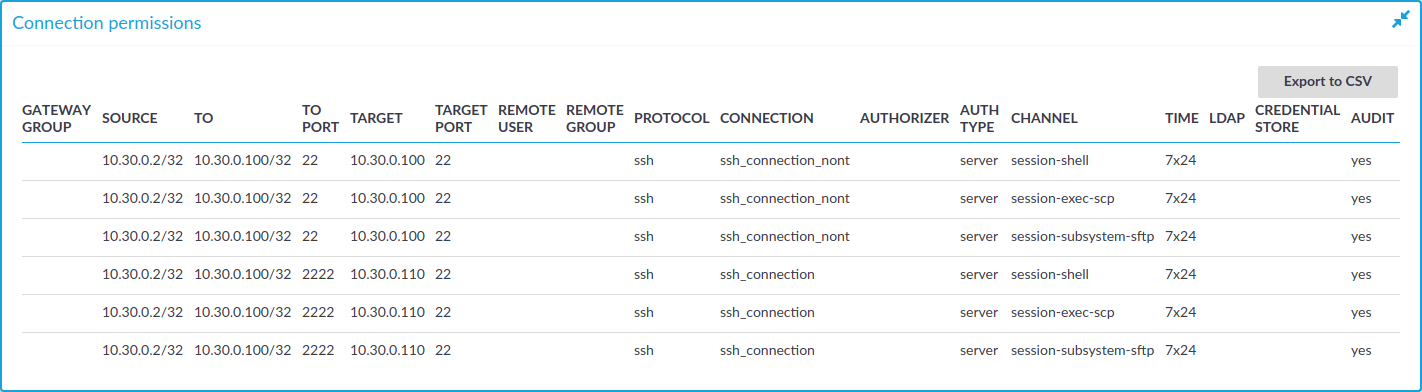
Connection permissions
To review which servers a user or usergroup can access, SPS collects the main information about the connections the user or group is permitted to use. The following information is displayed.
NOTE: To display the usergroups that can access a specific Connection Policy, open the Connection Policy, then on the Connections page, select Show connection permissions > Show.
Figure 104: Users & Access Control > Connection permissions — Displaying connection permissions
-
Gateway group: Lists the group memberships required to access the connection. Group memberships can be restricted at the following places:
-
Connection > Gateway authentication > Groups
-
Channel Policies > Gateway group
-
Policies > Usermapping Policies > Groups
-
Source: Refers to the following field from the session database:
Source IP: The IP address of the client.
-
To: Refers to the following field from the session database:
Destination IP: The IP address of the server as requested by the client.
-
To port: Refers to the following field from the session database:
Destination port: The port number of the server as requested by the client.
-
Target: Refers to the following field from the session database:
Server IP: The IP address of the server connected by SPS.
-
Target port: Refers to the following field from the session database:
Server port: The port number of the server connected by SPS.
-
Remote user: Refers to the following field from the session database:
Username on server: The username used to log in to the remote server. This username can differ from the client-side username if usermapping is used in the connection. For details on usermapping, see Configuring usermapping policies.
-
Remote group: The group that can access the destination server, as set in the Usermapping Policy (if any).
-
Protocol: The protocol used in the connection (Citrix ICA, HTTP, RDP, SSH, Telnet, or VNC).
-
Connection: Refers to the following field from the session database:
Connection policy ID: The identifier of the connection policy.
-
Authorizer: Refers to the following field from the session database:
Four-eyes authorizer: The username of the user who authorized the session. Available only if 4-eyes authorization is required for the channel. For details on 4-eyes authorization, see Configuring four-eyes authorization.
-
Auth type: The authentication method used in the client-side connection during gateway authentication.
-
Channel: The type of the channel, for example, session-shell.
-
Time: The name of the Time Policy used in the connection.
-
LDAP: The name of the LDAP Server used in the connection (if any).
-
Credential store: The name of the Credential Store used in the connection (if any).
-
Audit: Indicates if the connection is recorded into audit trails.
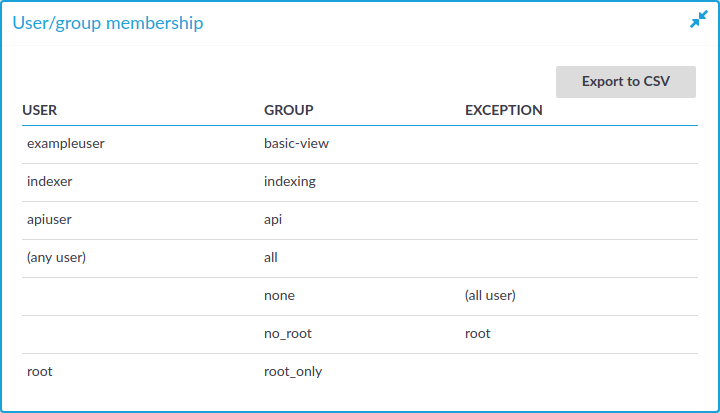
Usergroup memberships
When searching for users, the table displays the group memberships of the matching users. When searching for usergroups, the table displays the members of the matching groups. The following information is displayed:
-
User: The username of the user.
-
Group: The name of the usergroup or userlist.
-
Exception: Usernames that are denied in case of default-deny userlists managed locally on SPS.
Figure 105: Users & Access Control > Connection permissions — Displaying usergroup and userlist memberships
Listing and searching configuration changes
One Identity Safeguard for Privileged Sessions (SPS) automatically tracks every change of its configuration. To display the history of changes, select Users & Access Control > Configuration History. The changes are displayed on a search interface. For more information on using and customizing this interface, see Using the internal search interface.
The following information is displayed about each modification:
Figure 106: Users & Access Control > Configuration History — Browsing configuration changes
-
Timestamp: The date of the modification.
-
Author: Username of the administrator who modified the configuration of SPS.
-
Page: The menu item that was modified.
-
Field name: The name of the field or option that was modified.
-
New value: The new value of the configuration parameter.
-
Message: The changelog or commit log that the administrator submitted. This field is available only if the Require commit log option is enabled (see below).
-
Old value: The old value of the configuration parameter.
-
Swap: Signs if the order of objects was modified on the page (for example the order of two policies in the list).
To request the administrators to write an explanation to every configuration change, navigate to Users & Access Control > Settings > Accounting settings and select the Require commit log option.
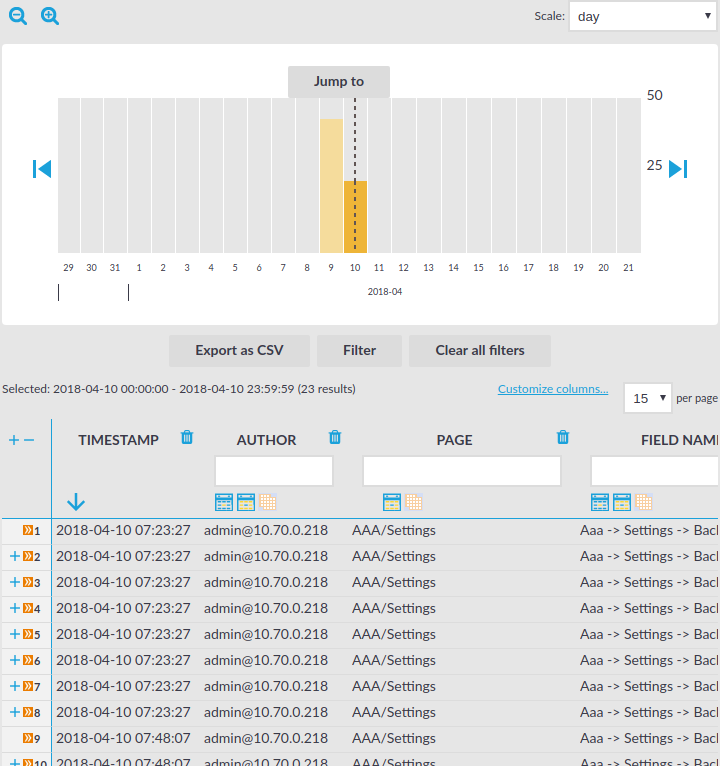
Using the internal search interface
The internal search interface is for browsing and filtering the configuration changes and reports of One Identity Safeguard for Privileged Sessions (SPS).
Figure 107: Users & Access Control > Configuration History — The internal search interface
The bars display the number of results in the selected interval. Use the  and
and  icons to zoom, and the arrows to display the previous or the next intervals. To explicitly select a date, select Jump to and set the date in the calendar. You can change the length of the displayed interval with the Scale option.
Hovering the mouse above a bar displays the number of entries and the start and end date of the period that the bar represents. Click a bar to display the entries of that period in the table. Use Shift+Click to select multiple bars.
If data is too long to fit on one line, it is automatically wrapped and only the first line is displayed. To expand a row, click  . To shrink the row back to its original size, click
  . To expand/shrink all rows, click the respective button on the header of the table. The rows can also be expanded/shrunk by double clicking on the respective row.
