Authentication in MSSQL
For the audited MSSQL connections, SPS(SPS) supports SQL Server Authentication.
SPS records the username used in the authentication process into the Username and Remote username fields of the connection database.
For authenticated sessions, SPS can perform group-based user authorization that allows you to finetune access to your servers and services: you can set the required group membership in the Channel policy of the MSSQL connection. Note that group-based authorization in MSSQL works only for authenticated sessions (for MSSQL connections, SPS uses this server only to retrieve the group membership of authenticated users, you cannot authenticate the users to LDAP from SPS). If a username is not available for the session, SPS will permit the connection even if the Remote groups field is set.
SPS does not store failed MSSQL authentication attempts in the connection database. This means that the Verdict field of the Search page will never contain CONN-AUTH-FAIL values for MSSQL connections.
Creating a new MSSQL authentication policy
An authentication policy is a list of authentication methods that can be used in a connection. Connection definitions refer to an authentication policy to determine how the client can authenticate to the target server. Separate authentication methods can be used on the client and the server-side of the connection.
To create a new authentication policy
-
Navigate to MSSQL Control > Authentication Policies, and click  .
.
Figure 214: MSSQL Control > Authentication Policies — Configuring MSSQL authentication policies

-
Enter a name for the policy into the Name field.
-
Select the authentication method used on the client-side in the Authenticate the client to SPS using field. For the client-side connection, SPS can authenticate the client inband (within the MSSQL protocol) using the following authentication methods:
-
LDAP: SPS will authenticate the client to the LDAP database set in the LDAP Server of the connection policy. To use LDAP authentication on the client side, select Authenticate the client to SPS using > LDAP.
NOTE:SPS will authenticate the client-side connection to the LDAP server configured in the connection policy. This is not necessarily the same as the LDAP server used to authenticate the users accessing the SPS web interface.
-
Local user database: Authenticate the client locally on the SPS gateway using a Local user database. Select the database to use in the Local user database field. For details on creating a Local User Database, see Creating a Local User Database.
-
RADIUS: SPS will authenticate the client to the specified RADIUS server. Select Authenticate the client to SPS using > RADIUS, enter the IP address or hostname of the RADIUS server into the Address field, the port number of the RADIUS server into the Port field, and the shared secret of the RADIUS server into the Shared secret field. Only password-authentication is supported (including one-time passwords), challenge-response based authentication is not.
Use an IPv4 address.
To add more RADIUS servers, click and fill in the respective fields.
-
None: Do not perform client-side authentication, the client will authenticate only on the target server.
|

|
Caution:
Hazard of security breach. If the None authentication option is selected on the client side and SPS is configured to use public-key or certificate based authentication on the server, the user will not be authenticated at all unless gateway authentication is required for the connection. |
-
Click  .
.
Creating and editing protocol-level MSSQL settings
Procedure
MSSQL settings determine the parameters of the connection on the protocol level, including timeout value, and so on. Complete the following procedure to create a new MSSQL settings profile or edit an existing one:
|
|
Caution:
Modifying the MSSQL settings is recommended only to advanced users. Do not modify these settings unless you exactly know what you are doing. |
To create and edit protocol-level MSSQL settings
-
Navigate to the Settings tab of the MSSQL Control menu item and click to create a MSSQL setting profile. Enter a name for the profile (for example, mssql_special).
-
Click  to display the parameters of the connection.
-
Modify the parameters as needed. The following parameters are available:
-
Idle timeout: Timeout value for the connection in seconds. To avoid early timeout, set it to a larger value, for example, a week (604800 seconds).
|
|
Caution:
Determining if a connection is idle is based on the network traffic generated by the connection, not the activity of the user. For example, if an application or the taskbar of a graphical desktop displays the time which is updated every minute, it generates network traffic every minute, negating the effects of timeout values greater than one minute and preventing One Identity Safeguard for Privileged Sessions (SPS) from closing the connection. |
-
Enable pre channel check: Select this option to evaluate the connection and channel policies before establishing the server-side connection. That way if the connection is not permitted at all, SPS does not establish the server-side connection.
-
To configure TLS security settings on both the Client side and the Server side, proceed to TLS security settings.
Figure 215: <Protocol> Control > Settings > TLS security settings - configuring TLS security settings

-
Cipher strength specifies the cipher string OpenSSL will use. The following options are possible:
-
Recommended: this setting only uses ciphers with adequate security level.
-
Custom: this setting allows you to specify the list of ciphers you want to permit SPS to use in the connection. This setting is only recommended to ensure compatibility with older systems. For more details on customizing this list, check the 'openssl-ciphers' manual page on your SPS appliance.
For example: ALL:!aNULL:@STRENGTH
-
Minimum TLS version specifies the minimal TLS version SPS will offer during negotiation. The following options are possible:
-
TLS 1.2: this setting only offers TLS version 1.2 during the negotiation. This is the recommended setting.
-
TLS 1.1: this setting offers TLS version 1.1 and later versions during the negotiation.
-
TLS 1.0: this setting offers TLS version 1.0 and later versions during the negotiation.
NOTE: Note that SPS only permits TLS-encrypted connections. SSLv3 is not supported.
-
Click .
-
Select this settings profile in the MSSQL settings field of your connections.
Enabling TLS-encryption for MSSQL connections
The following steps describe how to enable TLS-encryption in a MSSQL connection policy. Note that when using encryption, One Identity Safeguard for Privileged Sessions (SPS) automatically changes the port number of the connection policy to 992.
Prerequisites
Depending on your requirements, one or more of the following might be needed:
-
An X.509 certificate and its private key. SPS can display the same certificate to the peers on both the client and the server side. You can also use different certificates for the client and server sides. Use your own PKI system to generate these certificates, as they cannot be created on SPS. Note that the Common Name of the certificate must contain the domain name or the IP address of SPS, otherwise the clients might reject the certificate.
-
To generate certificates on-the-fly for a connection, a signing certificate authority is required. For details on creating a signing CA, see Signing certificates on-the-fly.
-
To require the peers of SPS to have an X.509 certificate signed by a specific Certificate Authority, a list of the trusted certificate authorities is needed. For details on creating a trusted CA list, see Verifying certificates with Certificate Authorities.
TIP: One Identity recommends using 2048-bit RSA keys (or stronger).
To enable TLS-encryption in a MSSQL connection policy
-
Navigate to MSSQL Control > Connections and select the connection policy in which you want to enable TLS.
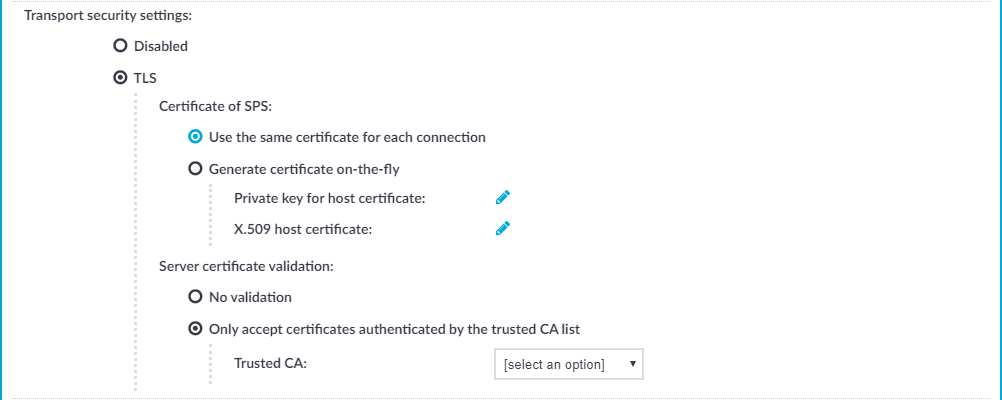
Figure 216: MSSQL Control > Connections — Enabling TLS-encryption for MSSQL connections
-
Set the encryption settings in the Transport security settings section.
-
Select the certificate to show to the peers.
-
To use the same certificate for every peer, complete the following steps.
-
Generate and sign a certificate for SPS in your PKI system, and export the certificate and its private key.
-
Select Use the same certificate for each connection.
-
Select Private key for host certificate, click  and upload the private key.
-
Select X.509 host certificate, click and upload the certificate.
-
To use a separate certificate for every connection, complete the following steps.
-
Create a certificate authority that will be used to sign the certificates that SPS shows to the peer. For details, see Signing certificates on-the-fly.
-
Select Generate certificate on-the-fly.
-
In the Signing CA field, select the certificate authority to use.
-
Select which certificatie validation method SPS should use in the Server certificate validation section.
-
To permit connections from peers without requesting a certificate, select No validation.
-
To permit connections only from peers with a valid certificate that was signed by a specific CA, complete the following steps.
-
Create a list of trusted Certificate Authorities that will be used to validate the certificates of the peers. For details on creating a trusted CA list, see Verifying certificates with Certificate Authorities.
-
Select Only accept certificates authenticated by the trusted CA list.
-
Select the certificate authority list to use in the Trusted CA field.
-
Click .
Expected result
The encryption settings are applied to the connection policy.
