Chat now with support
Chat with Support

One Identity Safeguard for Privileged Sessions 7.1.1 - Administration Guide

Preface Introduction The concepts of One Identity Safeguard for Privileged Sessions (SPS)
The philosophy of One Identity Safeguard for Privileged Sessions (SPS) Policies Credential Stores Plugin framework Indexing Supported protocols and client applications Modes of operation Connecting to a server through One Identity Safeguard for Privileged Sessions (SPS) Archive and backup concepts Maximizing the scope of auditing IPv6 in One Identity Safeguard for Privileged Sessions (SPS) SSH host keys Authenticating clients using public-key authentication in SSH The gateway authentication process Four-eyes authorization Network interfaces High Availability support in One Identity Safeguard for Privileged Sessions (SPS) Versions and releases of One Identity Safeguard for Privileged Sessions (SPS) Accessing and configuring One Identity Safeguard for Privileged Sessions (SPS)
Cloud deployment considerations The Welcome Wizard and the first login Basic settings
Supported web browsers The structure of the web interface Network settings Configuring date and time System logging, SNMP and e-mail alerts Configuring system monitoring on SPS Data and configuration backups Archiving Cleaning up audit data Using plugins Forwarding data to third-party systems Starling integration
User management and access control
Login settings Managing One Identity Safeguard for Privileged Sessions (SPS) users locally Setting password policies for local users Managing local user groups Managing One Identity Safeguard for Privileged Sessions (SPS) users from an LDAP database Authenticating users to a RADIUS server Authenticating users with X.509 certificates Authenticating users with SAML2 Managing user rights and usergroups Creating rules for restricting access to search audit data Displaying the privileges of users and user groups Listing and searching configuration changes
Managing One Identity Safeguard for Privileged Sessions (SPS)
Controlling One Identity Safeguard for Privileged Sessions (SPS): reboot, shutdown Managing One Identity Safeguard for Privileged Sessions (SPS) clusters Managing a High Availability One Identity Safeguard for Privileged Sessions (SPS) cluster Upgrading One Identity Safeguard for Privileged Sessions (SPS) Managing the One Identity Safeguard for Privileged Sessions (SPS) license Accessing the One Identity Safeguard for Privileged Sessions (SPS) console Sealed mode Out-of-band management of One Identity Safeguard for Privileged Sessions (SPS) Managing the certificates used on One Identity Safeguard for Privileged Sessions (SPS)
General connection settings HTTP-specific settings ICA-specific settings MSSQL-specific settings RDP-specific settings SSH-specific settings Using Sudo with SPS Telnet-specific settings VMware Horizon View connections VNC-specific settings Indexing audit trails Using the Search interface Advanced authentication and authorization techniques Reports The One Identity Safeguard for Privileged Sessions (SPS) REST API One Identity Safeguard for Privileged Sessions (SPS) scenarios Troubleshooting One Identity Safeguard for Privileged Sessions (SPS)
Network troubleshooting Gathering data about system problems Viewing logs on One Identity Safeguard for Privileged Sessions (SPS) Changing log verbosity level of One Identity Safeguard for Privileged Sessions (SPS) Collecting logs and system information for error reporting Collecting logs and system information of the boot process for error reporting Support hotfixes Status history and statistics Troubleshooting a One Identity Safeguard for Privileged Sessions (SPS) cluster Understanding One Identity Safeguard for Privileged Sessions (SPS) RAID status Restoring One Identity Safeguard for Privileged Sessions (SPS) configuration and data VNC is not working with TLS Configuring the IPMI from the BIOS after losing IPMI password Incomplete TSA response received Using UPN usernames in audited SSH connections
Using SPS with SPP Configuring external devices Using SCP with agent-forwarding Security checklist for configuring One Identity Safeguard for Privileged Sessions (SPS) Jumplists for in-product help Configuring SPS to use an LDAP backend Glossary

Managing local user groups

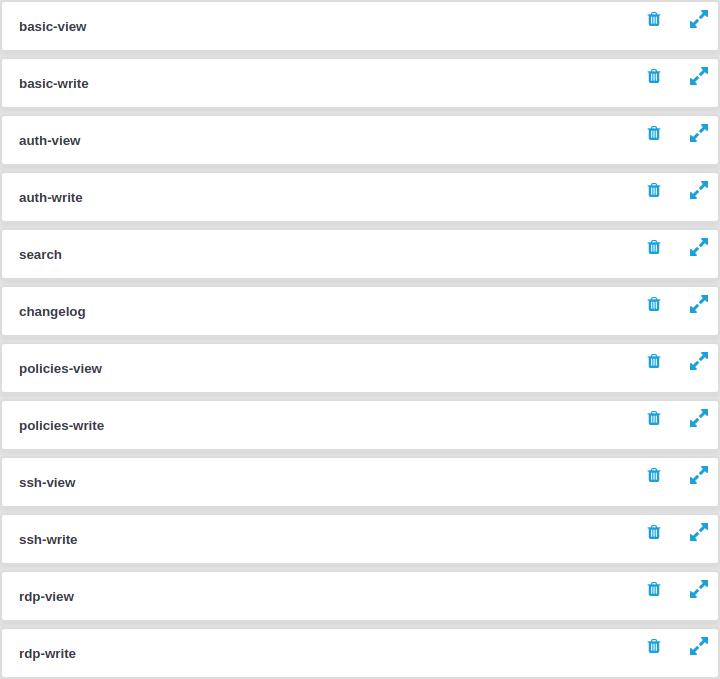
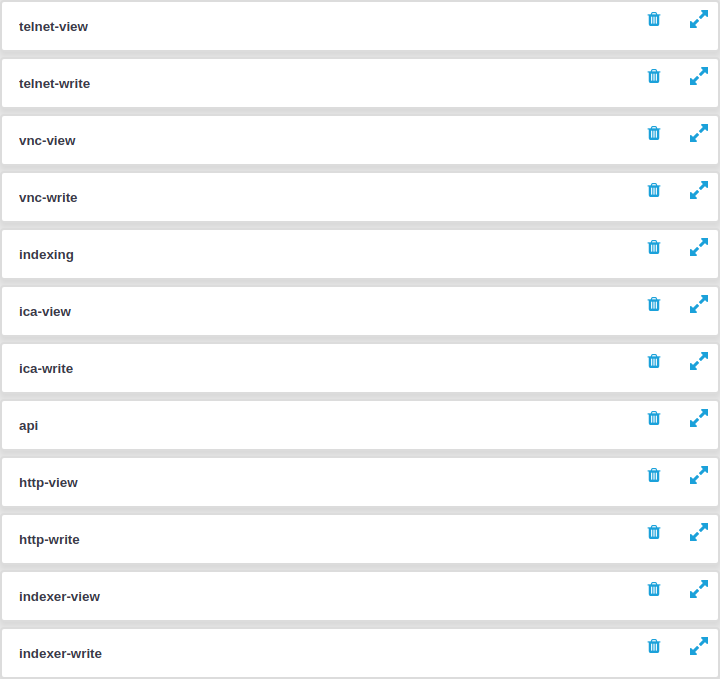
You can use local groups to control the privileges of One Identity Safeguard for Privileged Sessions (SPS) local users — who can view and configure what.

For the description of built-in groups, see Built-in usergroups of One Identity Safeguard for Privileged Sessions (SPS).

Use Users & Access Control > Local User Groups to:

  • Create a new user group.

  • Display which users belong to a particular local user group.

  • Edit group membership.

To create a new user group

  1. Navigate to Users & Access Control > Local User Groups and click .

    Figure 84: Users & Access Control > Local User Groups — Group management

  2. Enter a name for the group.

  3. Enter the names of the users belonging to the group. Click to add more users.

  4. To save your modifications, click Commit.

    Once you have added your user groups, the next step is to start assigning privileges to them. For more information, see Assigning privileges to user groups for the One Identity Safeguard for Privileged Sessions (SPS) web interface.

Managing One Identity Safeguard for Privileged Sessions (SPS) users from an LDAP database

The One Identity Safeguard for Privileged Sessions (SPS) web interface can authenticate users to an external LDAP database to simplify the integration of SPS to your existing infrastructure. You can also specify multiple LDAP servers, so that if the first server becomes unavailable, SPS can try to connect to another server.

NOTE: Consider the following:

  • Local users, including the admin user, are available by default.

  • The admin user has every privilege and cannot be deleted.

  • SPS accepts both pre-Windows 2000 style and Windows 2003 style User Principal Names (UPNs). UPNs consist of a username, the at (@) character, and a domain name, for example administrator@example.com.

  • For SSH usernames, SPS supports only valid UTF-8 strings.

  • The following characters cannot be used in:

    • user names: /\[]:;|=+*?<>"
    • group names: /\[]:;|=+*?<>"@,

  • When using RADIUS authentication with LDAP users, the users are authenticated to the RADIUS server; however, their group memberships are managed in LDAP. For details, see "Authenticating users to a RADIUS server" in the Administration Guide.

  • If the matching rule for an attribute is case insensitive in the LDAP database, SPS treats user names and group names in a case insensitive manner.
Prerequisites

Make sure that the response timeout of the LDAP/Active Directory server is set to a minimum of 120 seconds.

To configure an LDAP server

  1. Navigate to Users & Access Control > Login options > Manage AD/LDAP Servers.

  2. Select the LDAP server from the list. Alternatively, if no LDAP server exists yet, click Add new server and select the server type you want to create:

Adding a new Active Directory server

This section describes how to configure Active Directory (AD) servers.

To create a new Active Directory (AD) server

  1. To create a Microsoft Active directory server, navigate to Users & Access Control > Login options > Manage AD/LDAP Servers, click Add new server and select Active directory.

    Figure 85: Users & Access Control > Login Options > Manage AD/LDAP Servers — Active Directory

  2. In the Name field, enter the server name.

  3. Enter the IP address/hostname and the port of the LDAP server in the respective text boxes.

    Consider the following when specifying the address information:

    • If you want to encrypt the communication between SPS and the LDAP server, use the following port numbers:

      • For TLS, specify 636 as the port number.

      • For STARTTLS, specify 389 as the port number.

    • Use an IPv4 adress or a hostname.

    • To add multiple servers, click and enter the address of the next server. If a server is unreachable, SPS will try to connect to the next server in the list in failover mode.

    • When you configure the location of the LDAP server, that is, the IP address or hostname and the port number, you can use a Service record (SRV record), which is a type of information record in the DNS that maps the name of a service to the DNS name of the server. SRV records have the following format: _ldap._tcp.<SITE_NAME>._sites.dc._msdcs.<DOMAIN.NAME> in the Address field. SPS looks up the SRV record during committing the configuration change.

      For more information on SRV records, see the relevant Microsoft documentation.

    • Caution:

      If you connect to the LDAP server over a TLS-encrypted connection with certificate verification, you must fill the Address field with a name or IP address, which must be present in the certificate.

  4. Configure AD settings.

    • To also check group membership based on group Distinguished Names (DNs) in a user attribute, select Enable checking for group DNs in user objects and enter the name of the user attribute, for example, memberOf in the User attribute of group DNs field.

      Caution:

      If you have too many groups, using this option significantly slows down logging in to the SPS web interface.

      Use this option only if you have an LDAP schema where the user groups can only be determined from a user attribute that contains the group DNs.

    • To enable nested groups, select Enable AD group membership check, then Enable nested groups.

      Caution:

      Nested groups can slow down the query and cause the connection to timeout if the LDAP tree is very large. In this case, disable the Enable nested groups option.

    • To check for group membership based on user DNs in group attributes, use the Check the user DN in these groups option.

      For more information, see Active Directory LDAP backend.

  5. Configure the options of the Distinguished Names field.

    • In the User Base DN field, enter the name of the DN to be used as the base of queries regarding users (for example: OU=People,DC=demodomain,DC=exampleinc).

      NOTE: This field is mandatory. You can use the same value for the User Base DN and the Group Base DN settings.

      To speed up LDAP operations, specify a sufficiently narrow base for the LDAP subtrees where users and groups are stored.

    • In the Group Base DN field, enter the name of the DN to be used as the base of queries regarding groups (for example: OU=Groups,DC=demodomain,DC=exampleinc).

      NOTE: This field is mandatory. You can use the same value for the User Base DN and the Group Base DN settings.

      To speed up LDAP operations, specify a sufficiently narrow base for the LDAP subtrees where users and groups are stored.

    • In the Bind DN field, enter the Distinguished Name that SPS must use to bind to the LDAP directory (for example: CN=Administrator,DC=demodomain,DC=exampleinc).

      NOTE: SPS accepts both pre Windows 2000-style and Windows 2003-style account names, or User Principal Names (UPNs). For example, administrator@example.com is also accepted.

  6. Configure the Set shared secret option.

    To configure or change the password to use when binding to the LDAP server, click Set password, enter the password, and click Update.

    NOTE: SPS accepts passwords that are not longer than 150 characters and supports the following characters:

    • Letters A-Z, a-z

    • Numbers 0-9

    • The space character

    • Special characters: !"#$%&'()*+,-./:;<>=?@[]\^-`{}_|

  7. If you want to encrypt the communication between SPS and the LDAP server, in Encryption, select the TLS or the STARTTLS option and verify the certificate of the server.

    NOTE: TLS-encrypted connection to Microsoft Active Directory is supported only on Windows 2003 Server and newer platforms. Windows 2000 Server is not supported.

    • If you want SPS to verify the certificate of the server, under Certificate requirements, select Trust Store.

      Caution:

      SPS checks if the certificate revocation list (CRL) has expired and that the CRL has been signed by the same certificate authority (CA).

      Caution:

      If you connect to the LDAP server over a TLS-encrypted connection with certificate verification, you must fill the Address field with a name or IP address, which must be present in the certificate.

    • If the LDAP server requires mutual authentication, that is, it expects a certificate from SPS, enable Authenticate as a client. Generate and sign a certificate for SPS, upload the certificate and its private key, and click Save.

    TIP: One Identity recommends using 2048-bit RSA keys (or stronger).

  8. To save your modifications, click Commit.

    NOTE: You must configure the usergroups in SPS, and possibly in your LDAP database. For details on using usergroups, see Using usergroups.

Adding a new POSIX LDAP server

This section describes how to configure POSIX LDAP servers.

To create a new POSIX LDAP server

  1. To create a POSIX LDAP server, navigate to Users & Access Control > Login options > Manage AD/LDAP Servers, click Add new server and select POSIX LDAP.

    Figure 86: Users & Access Control > Login Options > Manage AD/LDAP Servers — POSIX LDAP

  2. In the Name field, enter the server name.

  3. Enter the IP address/hostname and the port of the LDAP server in the respective text boxes.

    Consider the following when specifying the address information:

    • If you want to encrypt the communication between SPS and the LDAP server, use the following port numbers:

      • For TLS, specify 636 as the port number.

      • For STARTTLS, specify 389 as the port number.

    • Use an IPv4 adress or a hostname.

    • To add multiple servers, click and enter the address of the next server. If a server is unreachable, SPS will try to connect to the next server in the list in failover mode.

    • When you configure the location of the LDAP server, that is, the IP address or hostname and the port number, you can use a Service record (SRV record), which is a type of information record in the DNS that maps the name of a service to the DNS name of the server. SRV records have the following format: _ldap._tcp.<SITE_NAME>._sites.dc._msdcs.<DOMAIN.NAME> in the Address field. SPS looks up the SRV record during committing the configuration change.

      For more information on SRV records, see the relevant Microsoft documentation.

    • Caution:

      If you connect to the LDAP server over a TLS-encrypted connection with certificate verification, you must fill the Address field with a name or IP address, which must be present in the certificate.

  4. Configure POSIX settings.

    If your LDAP server uses a custom POSIX LDAP scheme, you might need to set which LDAP attributes store the username, or the attributes that set group memberships. For example, if your LDAP scheme does not use the uid attribute to store the usernames, set the Username (user ID) attribute name option.

    In addition to the primary group membership checking, you can allow checking for supplementary group memberships by selecting Enable POSIX group membership check and specifying the POSIX group membership attribute name field.

    To also check group membership based on group Distinguished Names (DNs) in a user attribute, select Enable checking for group DNs in user objects. Then, enter the name of the user attribute (for example, memberOf) in the User attribute of group DNs field, and objectClass (for example, groupOfNames) in the Group objectClass field.

    Caution:

    If you have too many groups, using this option significantly slows down logging in to the SPS web interface.

    Use this option only if you have an LDAP schema where the user groups can only be determined from a user attribute that contains the group DNs.

    To check for group membership based on user DNs in group attributes, use the Check the user DN in these groups option.

    For more information, see POSIX LDAP backend.

    For an overview about LDAP user and group resolution in SPS, see Overview.

  5. Configure the options of the Distinguished Names field.

    • In the User Base DN field, enter the name of the DN to be used as the base of queries regarding users (for example: OU=People,DC=demodomain,DC=exampleinc).

      NOTE: This field is mandatory. You can use the same value for the User Base DN and the Group Base DN settings.

      To speed up LDAP operations, specify a sufficiently narrow base for the LDAP subtrees where users and groups are stored.

    • In the Group Base DN field, enter the name of the DN to be used as the base of queries regarding groups (for example: OU=Groups,DC=demodomain,DC=exampleinc).

      NOTE: This field is mandatory. You can use the same value for the User Base DN and the Group Base DN settings.

      To speed up LDAP operations, specify a sufficiently narrow base for the LDAP subtrees where users and groups are stored.

    • In the Bind DN field, enter the Distinguished Name that SPS must use to bind to the LDAP directory (for example: CN=Administrator,DC=demodomain,DC=exampleinc).

      NOTE: SPS accepts both pre Windows 2000-style and Windows 2003-style account names, or User Principal Names (UPNs). For example, administrator@example.com is also accepted.

  6. If you want to encrypt the communication between SPS and the LDAP server, in Encryption, select the TLS or the STARTTLS option and verify the certificate of the server.

    NOTE: TLS-encrypted connection to Microsoft Active Directory is supported only on Windows 2003 Server and newer platforms. Windows 2000 Server is not supported.

    • If you want SPS to verify the certificate of the server, under Certificate requirements, select Trust Store.

      Caution:

      SPS checks if the certificate revocation list (CRL) has expired and that the CRL has been signed by the same certificate authority (CA).

      Caution:

      If you connect to the LDAP server over a TLS-encrypted connection with certificate verification, you must fill the Address field with a name or IP address, which must be present in the certificate.

    • If the LDAP server requires mutual authentication, that is, it expects a certificate from SPS, enable Authenticate as a client. Generate and sign a certificate for SPS, upload the certificate and its private key, and click Save.

    TIP: One Identity recommends using 2048-bit RSA keys (or stronger).

  7. To save your modifications, click Commit.

    NOTE: You must configure the usergroups in SPS, and possibly in your LDAP database. For details on using usergroups, see Using usergroups.

Related Documents

The document was helpful.

Select Rating

I easily found the information I needed.

Select Rating