You can configure date and time-related settings of syslog-ng Store Box (SSB) on the Date & Time tab of the Basic page.
NOTE: Configuring Date & Time and NTP simultaneously is not possible. Either configure the local date and time manually, or synchronize system time with a time server.
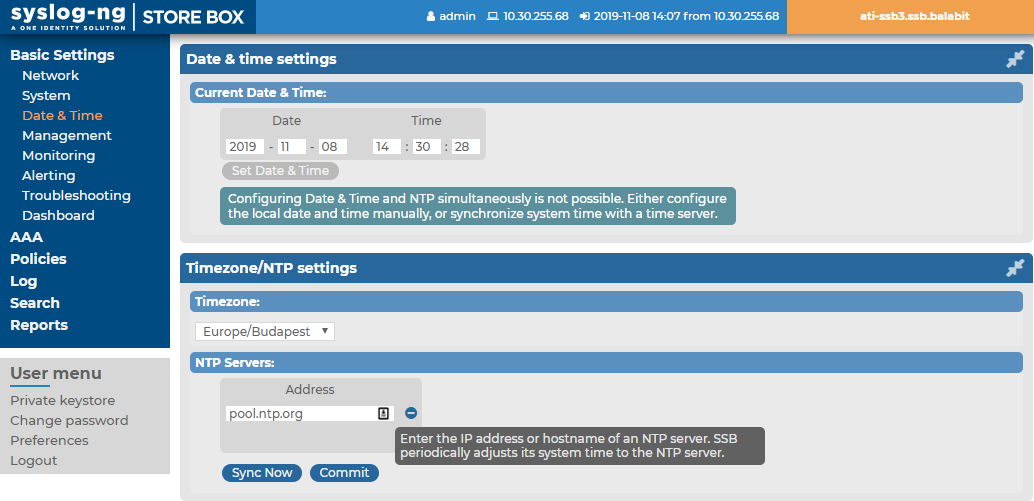
Figure 45: Basic Settings > Date & Time — Set date and time
|

|
Caution:
It is essential to set the date and time correctly on SSB, otherwise the date information of the logs will be inaccurate.
SSB displays a warning on this page and sends an alert if the time becomes out of sync. |
To explicitly set the date and time on SSB, enter the current date into respective fields of the Date & Time Settings group and click Set Date & Time.
NOTE: If the time of SSB is very inaccurate (that is, the difference between the system time and the actual time is great), it might take a long time to retrieve the date from the NTP server. In this case, click Sync now to sync the time immediately using SNTP.
This section describes how to retrieve the date automatically from a time server.
|
|
Caution:
One Identity recommends not changing the timezone, because logspace rotation is based on your currently configured local timezone. If you change the timezone, you will not be able to search in your previously stored logs. Before changing the timezone, contact our Support Team. |
To retrieve the date automatically from a time server
-
Select your timezone in the Timezone field.
-
Enter the IP address of an NTP time server into the Address field.
To add new servers or delete existing ones, click  (Add row) and
  Delete row, respectively.
NOTE: Use an NTP server of high time accuracy. SSB needs high time accuracy for processing its logs with as exact timestamps as possible. Any inaccuracy will be detected by SSB, and the server will be rejected.
-
Click  .
.
-
To sync the time immediately using SNTP, click Sync now.
NOTE: If your local system time is different from the NTP server time, it can result in a time gap in the time stamp of the logs before synchronization and the logs after synchronization. The time gap may appear longer than the time that has actually passed. Therefore, logs collected before the synchronization might have time stamps that do not correspond to the NTP server time.
The following sections describe how you can configure email and SNMP alerts on syslog-ng Store Box (SSB).
Topics:
This section describes how to configure email alerts.
To configure email alerts
-
Navigate to Basic Settings > Management > Mail settings.
-
Enter the IP address or the hostname of the mail server into the SMTP server address field.
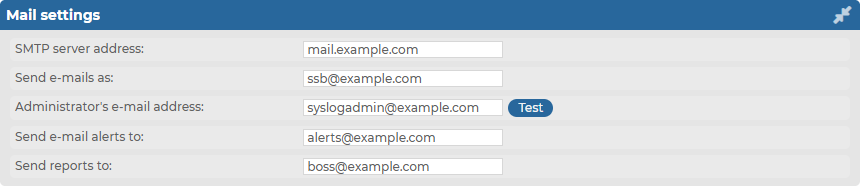
Figure 46: Basic Settings > Management > Mail settings — Configure email sending
-
Enter the email address where you want to receive emails from into the Send emails as field. This can be useful for email filtering purposes. syslog-ng Store Box (SSB) sends emails from the address provided here. If no email address is entered, emails will be sent from the default email address.
-
Enter the email address of the administrator into the Administrator's email address field. SSB sends notifications related to system-events (but not alerts and reports) to this address.
-
Enter the email address of the administrator into the Send email alerts to field. SSB sends monitoring alerts to this address.
-
Enter the email address the person who should receive traffic reports from SSB into the Send reports to field. For details on reports, see Reports.
|
|
Caution:
To get alert emails, provide an email address in this field. Sending alerts fails if these settings are incorrect, since the alerting email address does not fall back to the administrator's email address by default. |
-
Click .
-
Click Test to send a test message.
If the test message does not arrive to the server, check if SSB can access the server. For details, see Troubleshooting SSB.
-
Select in which situations SSB should send an email alert. For details, see Configuring system monitoring on SSB.
-
Click .
