Adding a new custom cloud service provider data disk to your SSB configuration on the SSB side
If you need more disk space than the disk size of your default data disk available in syslog-ng Store Box (SSB), from version 6.9.0, you can also add a custom cloud service provider data disk to your configuration. From 6.9.0, SSB supports adding a Microsoft Azure-managed disk and from 6.10.0, SSB supports adding additional disks in VMware ESXi to your SSB configuration as a custom cloud service provider data disk, and assigning the SSB logspace of your choice to it.
This section describes how you can add a new custom cloud service provider data disk to your syslog-ng Store Box (SSB) configuration on the SSB side.
For more information about how you can add a custom cloud service provider data disk on the cloud service provider side, see Adding a new custom cloud service provider data disk on the cloud service provider side.
For more information about assigning the SSB logspace of your choice to a custom cloud service provider data disk, see Assigning the SSB logspace of your choice to a custom cloud service provider data disk.
For more information about the data disk information for your custom cloud service provider data disks, see Data disk information for your custom cloud service provider data disks.
Prerequisites
When adding a new custom cloud service provider data disk to your SSB configuration on the SSB side, consider the following prerequisites in advance:
-
If you want to add a custom cloud service provider data disk to your SSB configuration, you must add a new custom cloud service provider data disk on your cloud service provider side before you can add it to your configuration on the SSB side.
-
If you want to add custom cloud service provider data disks to your configuration in SSB, you must add the custom cloud service provider data disk under Log > Disks > <your-custom-data-disk>, and commit your changes. After that, the newly added custom cloud service provider data disk will be available for selection in the dropdown list under Log > Logspaces > <your-new-logspace-with-custom-data-disk> > Storage > Disk.
Limitations
When adding a new custom cloud service provider data disk to your SSB configuration on the SSB side, consider the following limitations in advance:
-
|

|
Caution:
HAZARD OF DATA LOSS!
Although it is possible to decrease the size of Microsoft Azure and VMware ESXi managed disks, One Identity does not support decreasing the size of custom cloud service provider data disks already added to your SSB configuration. One Identity only supports increasing the size of such custom cloud service provider data disks after adding them to your SSB configuration. |
-
NOTE: Resizing your custom cloud service provider data disk on the Microsoft Azure or VMware ESXi side may be quick, depending on your infrastructure, but your SSB configuration must resize the file system on your SSB side to match the resizing on the Microsoft Azure or VMware ESXi side. As a result, depending on the original size of the custom cloud service provider data disk and on the size you will expand it to, starting the virtual machine for your SSB device after you expand the size of your custom cloud service provider data disk may take a long time.
-
NOTE: If you fail to assign the newly created SSB logspace of your choice to the new custom cloud service provider data disk, SSB will not automatically detect and use the new custom cloud service provider data disk to store messages on it.
-
You can only configure custom cloud service provider data disks for logspaces that you newly create. One Identity does not support configuring custom cloud service provider data disks in logspaces that you configured and committed earlier.
-
In version 7.3.0, SSB supports adding Microsoft Azure managed disks of up to 32,767 GB storage space to your SSB device. For more information about managed data disks in Microsoft Azure, see Disk type comparison in the Microsoft Azure online documentation.
-
If you want to add custom cloud service provider data disks to your configuration in SSB, you must add the custom cloud service provider data disk under Log > Disks > <your-custom-data-disk>, and commit your changes. After that, the newly added custom cloud service provider data disk will be available for selection in the dropdown list under Log > Logspaces > <your-new-logspace-with-custom-data-disk> > Storage > Disk.
-
Transporting custom cloud service provider data disks between SSB devices is not supported.
-
|
|
CAUTION: Hazard of data loss!
One Identity does not support decreasing the size of an additional VMware ESXi hard disk added to your SSB configuration as a custom cloud service provider data disk. |
You can only add, remove, or resize a custom cloud service provider data disk in your configuration after shutting your SSB device down first. Hot swaps are not supported.
-
You can only add an Azure managed disk as a custom cloud service provider data disk to your SSB on the Microsoft Azure portal side.
-
SSB only accepts and detects empty disks as custom cloud service provider data disks. As a result, you can only add a newly created Azure managed disk or VMware ESXi disk as a custom cloud service provider data disk to your SSB configuration. Adding an already existing Azure managed disk (by clicking Attach existing disks on the Microsoft Azure portal) or already existing VMware ESXi disk is not supported.
-
One Identity does not support adding Microsoft Azure or VMware ESXi managed disks to your SSB logspaces as a shared disk.
-
The number of managed disks you can add on the Microsoft Azure portal depends on the type of Microsoft Azure subscription you are using.
After adding a new custom cloud service provider data disk on your cloud service provider side, you can add the new custom cloud service provider data disk on the SSB side.
To add a new custom cloud service provider data disk to your SSB configuration,
- On the SSB side, shut down your SSB device
-
Navigate to Basic Settings > System.
-
Under System control, click Shutdown.
-
On the cloud service provider side, complete the following steps depending on which cloud service provider you want to use:
- In the virtual machine for your SSB device, complete the following steps on the SSB web interface:
-
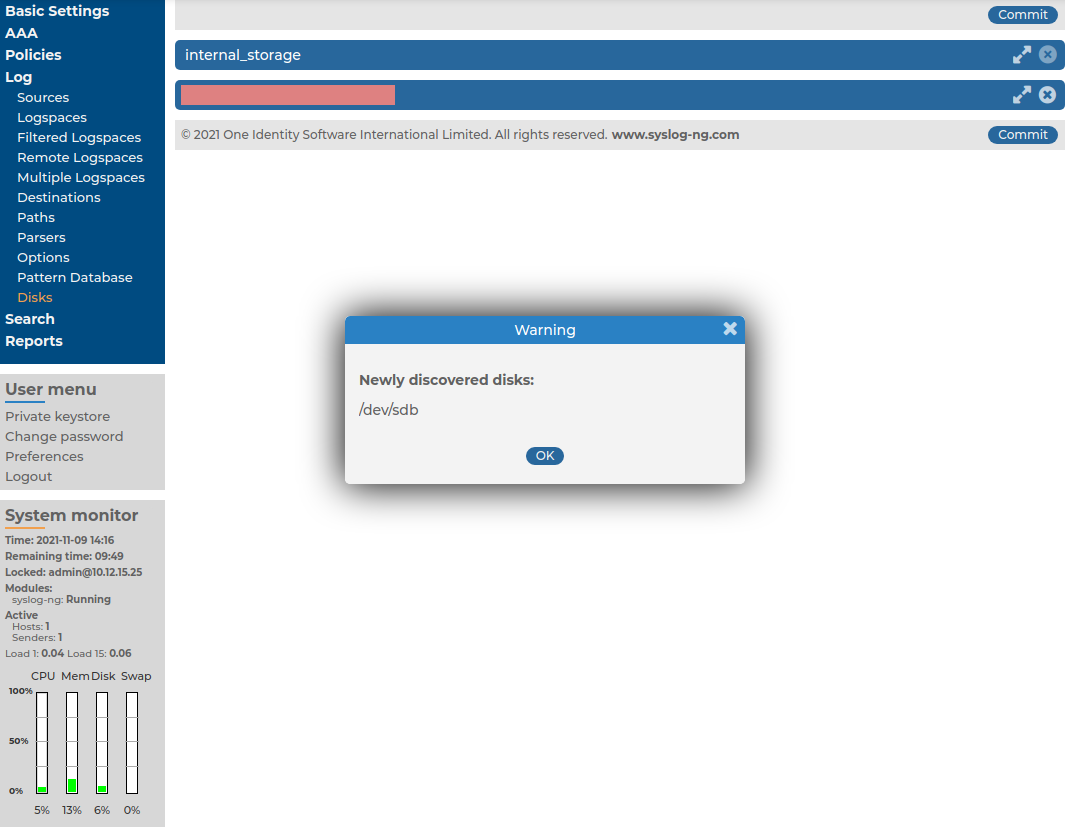
Navigate to Log > Disks.
SSB will automatically detect newly added custom cloud service provider data disks and display them:
Figure 165: Log > Disks - New disks detected
-
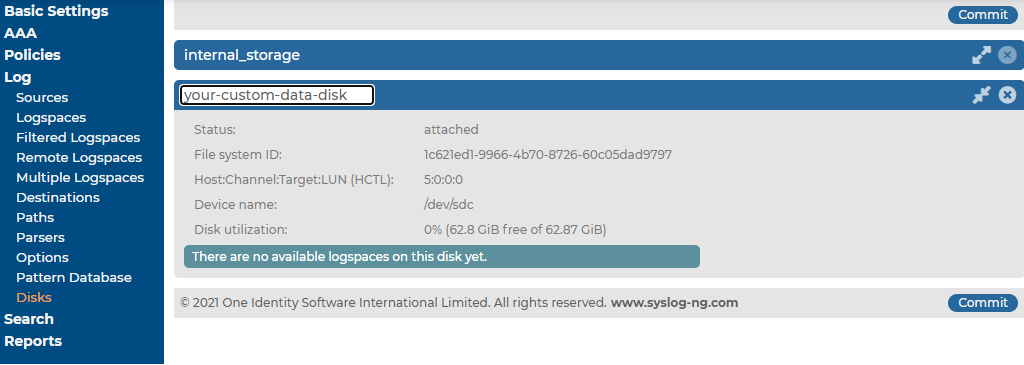
Enter a name for your new custom cloud service provider data disk, and click  .
.
Figure 166: Log > Disks > <your-custom-data-disk >
-
Navigate to Log > Logspaces, and assign the SSB logspace of your choice to the custom cloud service provider data disk.
NOTE: If you fail to assign the newly created SSB logspace of your choice to the new custom cloud service provider data disk, SSB will not automatically detect and use the new custom cloud service provider data disk to store messages on it.
NOTE:After adding a newly created custom cloud service provider data disk to your SSB configuration, and assigning the SSB logspace of your choice to it, removing the custom cloud service provider data disk from your SSB configuration has a strict order, especially if there are referenced objects tied to the custom cloud service provider data disk. For more information about the process to remove such custom cloud service provider data disks from your SSB configuration, see Removing a custom cloud service provider data disk from your SSB configuration.
NOTE: For newly created logspaces, selecting a data disk for your logspace is required.
Data disk information for your custom cloud service provider data disks
If you need more disk space than the disk size of your default data disk available in syslog-ng Store Box (SSB), from version 6.9.0, you can also add a custom cloud service provider data disk to your configuration. From 6.9.0, SSB supports adding a Microsoft Azure-managed disk and from 6.10.0, SSB supports adding additional disks in VMware ESXi to your SSB configuration as a custom cloud service provider data disk, and assigning the SSB logspace of your choice to it.
In version 7.3.0, SSB supports adding Microsoft Azure managed disks of up to 32,767 GB storage space to your SSB device. For more information about managed data disks in Microsoft Azure, see Disk type comparison in the Microsoft Azure online documentation.
This section describes the data disk information available for custom cloud service provider data disks on the web interface.
For more information about custom cloud service provider data disks on the cloud service provider side, see Adding a new custom cloud service provider data disk on the cloud service provider side.
For more information about custom cloud service provider data disks on the side, see Adding a new custom cloud service provider data disk to your SSB configuration.
For more information about assigning the SSB logspace of your choice to a custom cloud service provider data disk, see Assigning the SSB logspace of your choice to a custom cloud service provider data disk.
Data disk information for your custom cloud service provider data disks
After adding the new custom cloud service provider data disk to your SSB configuration, the following data disk information will be displayed under Log > Disks > <your-custom-data-disk>:
Figure 167: Log > Disks > <your-custom-data-disk> — Data disk information for your custom cloud service provider data disks

-
Status: The connectivity status of the custom cloud service provider data disk between the SSB side and the cloud service provider side.
The possible status states are the following:
-
attached: The custom cloud service provider data disk is successfully attached to the virtual machine for your SSB device on the cloud service provider (in this case, Microsoft Azure) side.
-
missing: The custom cloud service provider data disk is committed to your SSB configuration, but the SSB device can not detect or access it on the cloud service provider side for some reason (for example, it was removed on the Microsoft Azure side earlier, or there is a connectivity issue with the Microsoft Azure portal).
-
File system ID: The unique identifier for your file system on the SSB side.
-
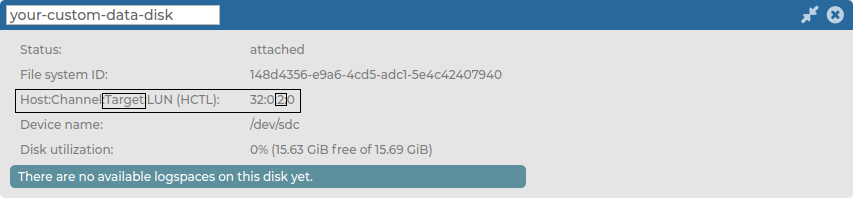
Host:Channel:Target:LUN (HCTL): The locally unique identifier for your custom cloud service provider data disk, which consists of the colon-separated data of the Host, the Channel, the Target, and the LUN (Logical Unit Number) value.
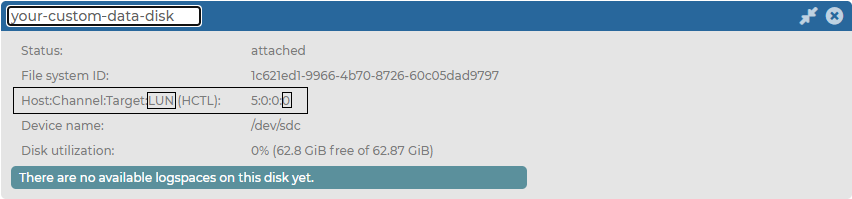
The last digit of the custom cloud service provider data disk's Host:Channel:Target:LUN (HCTL) corresponds to the attached custom cloud service provider data disk's LUN value on the Microsoft Azure portal:
Figure 168: Log > Disks > <your-custom-data-disk> — Data disk information for your newly added custom cloud service provider data disks (Microsoft Azure)
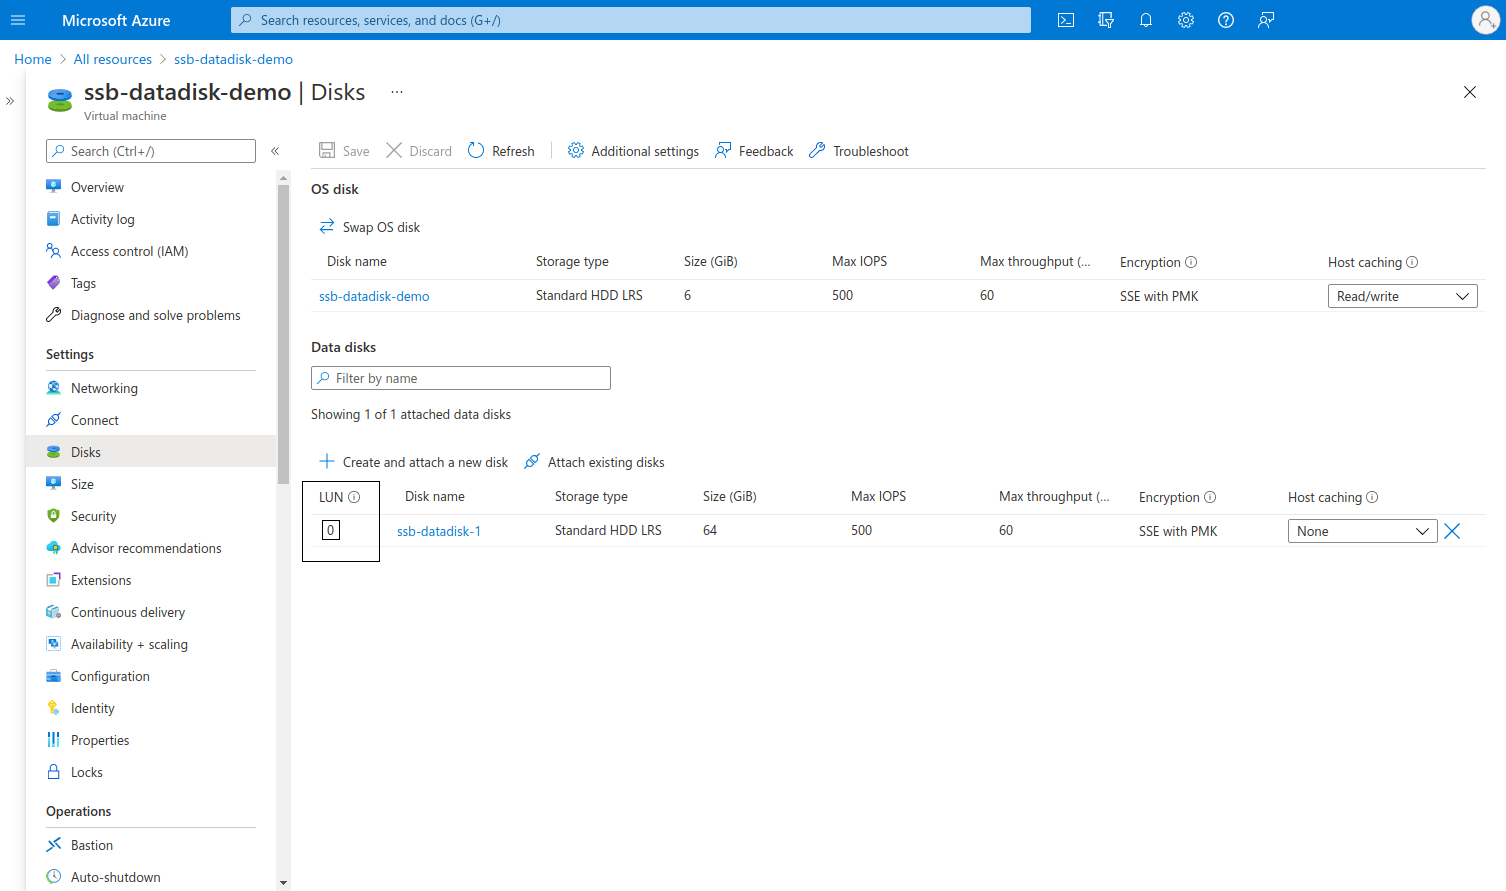
Figure 169: Log > Disks > <your-custom-data-disk> — Data disk information for your custom cloud service provider data disks, with no SSB logspace assigned to them yet (Microsoft Azure)
The second to last digit of the custom cloud service provider data disk's Host:Channel:Target:LUN (HCTL) corresponds to the attached custom cloud service provider data disk's Target value in VMware ESXi:
Figure 170: Log > Disks > <your-custom-data-disk> — Data disk information for your newly added custom cloud service provider data disks (VMware ESXi)
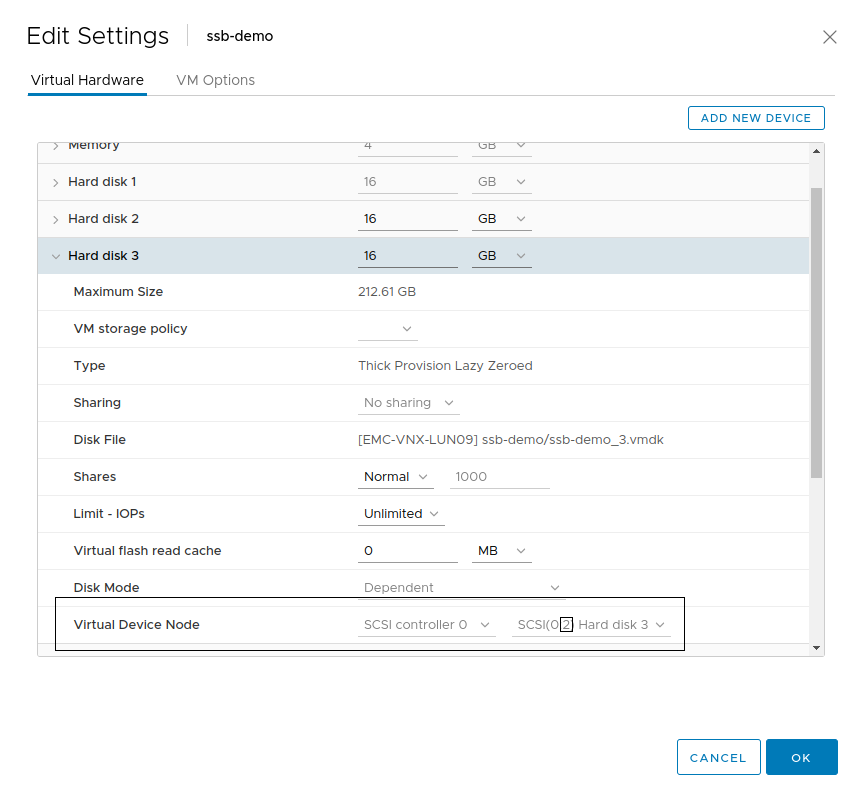
Figure 171: Log > Disks > <your-custom-data-disk> — Data disk information for your custom cloud service provider data disks, with no SSB logspace assigned to them yet (VMware ESXi)
-
Device name: The navigation path to your device on the SSB side.
-
Disk utilization: The utilization ratio of your custom data disk (in percentage), followed by the exact amount of free space, and the full size of the disk, in brackets.
-
(Optional) Onscreen information about logspaces assigned to the data disk: When you have not assigned the SSB logspace of your choice to the custom cloud service provider data disk yet, you will see the There are no available logspaces on this disk yet. onscreen information displayed on the SSB web interface.
-
(Optional) Logspaces available on this disk: When you have already assigned the SSB logspace of your choice to the custom cloud service provider data disk, the assigned logspaces will be listed here.
Figure 172: Log > Disks > <your-custom-data-disk> — Data disk information for your custom cloud service provider data disks, with the SSB logspace of your choice assigned to them

Removing a custom cloud service provider data disk from your SSB configuration
This section describes the required procedure if you want to remove a previously added custom cloud service provider data disk (for example, a Microsoft Azure managed disk) from your syslog-ng Store Box (SSB) configuration.
For more information about adding a custom cloud service provider data disk to your SSB configuration, see Adding a new custom cloud service provider data disk to your SSB configuration.
Prerequisites
When removing a custom cloud service provider data disk from your SSB configuration, consider the following prerequisites in advance:
-
One Identity recommends that you archive or backup all data from the logspaces that you want to delete from your custom cloud service provider data disk.
-
If there are any referenced objects (for example, logspaces, filtered logspaces, multiple logspaces, remote logspaces, and logpaths) connected to your custom cloud service provider data disk, you must disconnect them from your custom cloud service provider data disk before removing it from your SSB configuration.
Limitations
When removing a custom cloud service provider data disk from your SSB configuration, consider the following limitations in advance:
-
NOTE: After adding a newly created custom cloud service provider data disk to your SSB configuration, and attaching it to a logspace, removing the custom data disk from your SSB configuration has a strict order, especially if there are referenced objects connected to the custom cloud service provider data disk. One Identity recommends that you always complete the following steps in this particular order when removing a custom cloud service provider data disk from your SSB configuration.
- You can not remove a custom cloud service provider data disk from your SSB configuration if there are any referenced objects connected to it. In these cases, you must disconnect them from your custom cloud service provider data disk before removing it from your SSB configuration.
Removing a custom cloud service provider data disk from your SSB configuration in the Microsoft Azure Portal
If you have carefully considered the prerequisites and limitations, complete the following steps in this exact same order.
To remove a custom cloud service provider data disk from your SSB configuration,
-
On the SSB side, archive or backup your logspace data, remove the logspaces from your configuration, then shut down your SSB device.
-
Navigate to Log > Logspaces.
-
(Optional) Archive or backup all data from the logspaces that you want to delete from your custom cloud service provider data disk.
-
Delete all logspaces on your custom cloud service provider data disk and click .
-
Navigate to Log > Disks, delete the custom cloud service provider data disk of your choice, and click .
-
Navigate to Basic Settings > System.
-
Under System control, click Shutdown.
-
On the Microsoft Azure side, stop, deallocate, and detach your custom cloud service provider data disk, then restart the virtual machine for your SSB device.
-
Log in to your cloud service provider's portal (in this case, the Microsoft Azure portal).
-
Wait until the power state of your SSB device's virtual machine is Stopped.
For more information about power states in Microsoft Azure, see VM power states in the Microsoft Azure online tutorial documentation.
-
Deallocate the virtual machine for your SSB device, then wait until its power state is Stopped (deallocated).
-
Follow the instructions of the Microsoft Azure online tutorial documentation to detach your custom data disk from the virtual machine for your SSB device.
-
Restart the virtual machine for your SSB device.
Removing a custom cloud service provider data disk from your SSB configuration in VMware ESXi
If you have carefully considered the prerequisites and limitations, complete the following steps in this exact same order.
To remove a custom cloud service provider data disk from your SSB configuration,
-
On the SSB side, archive or backup your logspace data, remove the logspaces from your configuration, then shut down your SSB device.
-
Navigate to Log > Logspaces.
-
(Optional) Archive or backup all data from the logspaces that you want to delete from your custom cloud service provider data disk.
-
Delete all logspaces on your custom cloud service provider data disk and click .
-
Navigate to Log > Disks, delete the custom cloud service provider data disk of your choice, and click .
-
Navigate to Basic Settings > System.
-
Under System control, click Shutdown.
-
On the VMware vSphere Client side, remove your custom cloud service provider data disk, then restart the virtual machine for your SSB device.
-
Wait until the power state of your SSB device's virtual machine is Stopped.
-
Edit your virtual machine's hardware settings.
-
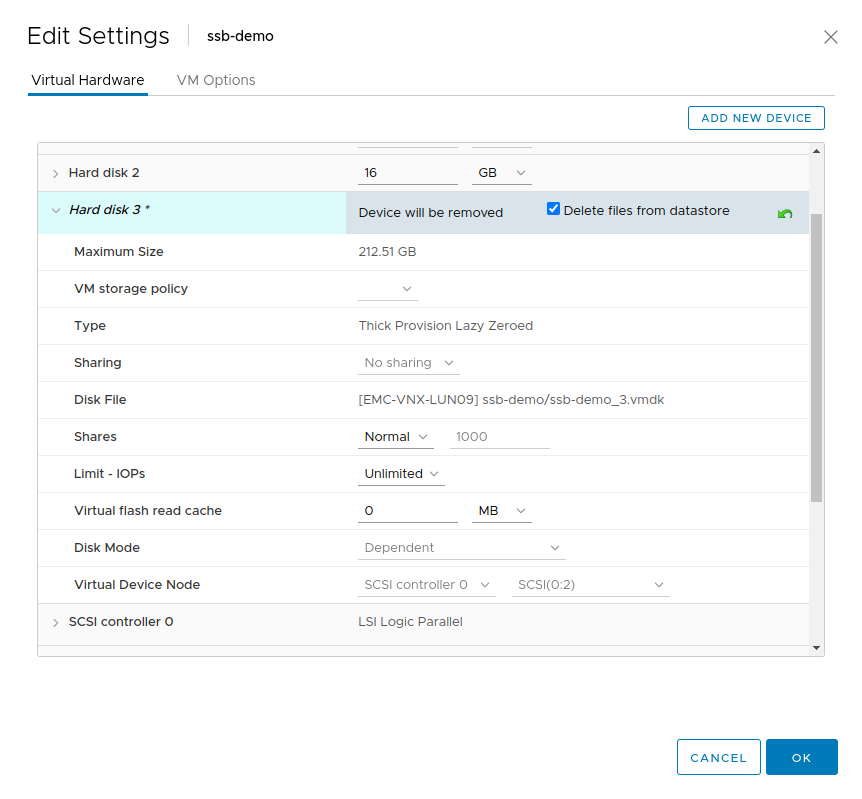
Locate your custom cloud service provider data disk and delete it.
Figure 173: <your-virtual-machine-in-vmware-esxi> > VM Hardware > Edit settings…
-
Restart the virtual machine for your SSB device.
Increasing the size of a custom cloud service provider data disk that you use in your SSB configuration
This section describes how you can increase the size of a custom cloud service provider data disk that you use in your syslog-ng Store Box (SSB) configuration.
Prerequisites
When increasing the size of a custom cloud service provider data disk that you use in your SSB configuration, consider the following prerequisites in advance:
Limitations
When increasing the size of a custom cloud service provider data disk that you use in your SSB configuration, consider the following limitations in advance:
-
|
|
Caution:
HAZARD OF DATA LOSS!
Although it is possible to decrease the size of Microsoft Azure and VMware ESXi managed disks, One Identity does not support decreasing the size of custom cloud service provider data disks already added to your SSB configuration. One Identity only supports increasing the size of such custom cloud service provider data disks after adding them to your SSB configuration. |
If the custom cloud service provider data disk that you recently added to your SSB configuration does not have enough disk space, you can increase its size on the cloud service provider side.
To increase the size of a custom cloud service provider data disk in Microsoft Azure that you use in your SSB configuration,
- On the SSB side, shut down your SSB device
-
Navigate to Basic Settings > System.
-
Under System control, click Shutdown.
- On the cloud service provider side, complete the following steps:
-
Log in to your cloud service provider's portal (in this case, the Microsoft Azure portal).
-
Wait until the virtual machine of your SSB device is in the Stopped power state.
For more information about the power states of virtual machines in Microsoft Azure, see VM power states in the Microsoft Azure online tutorial documentation.
-
Deallocate the virtual machine for your SSB device, then wait until it is in the Stopped (deallocated) power state.
-
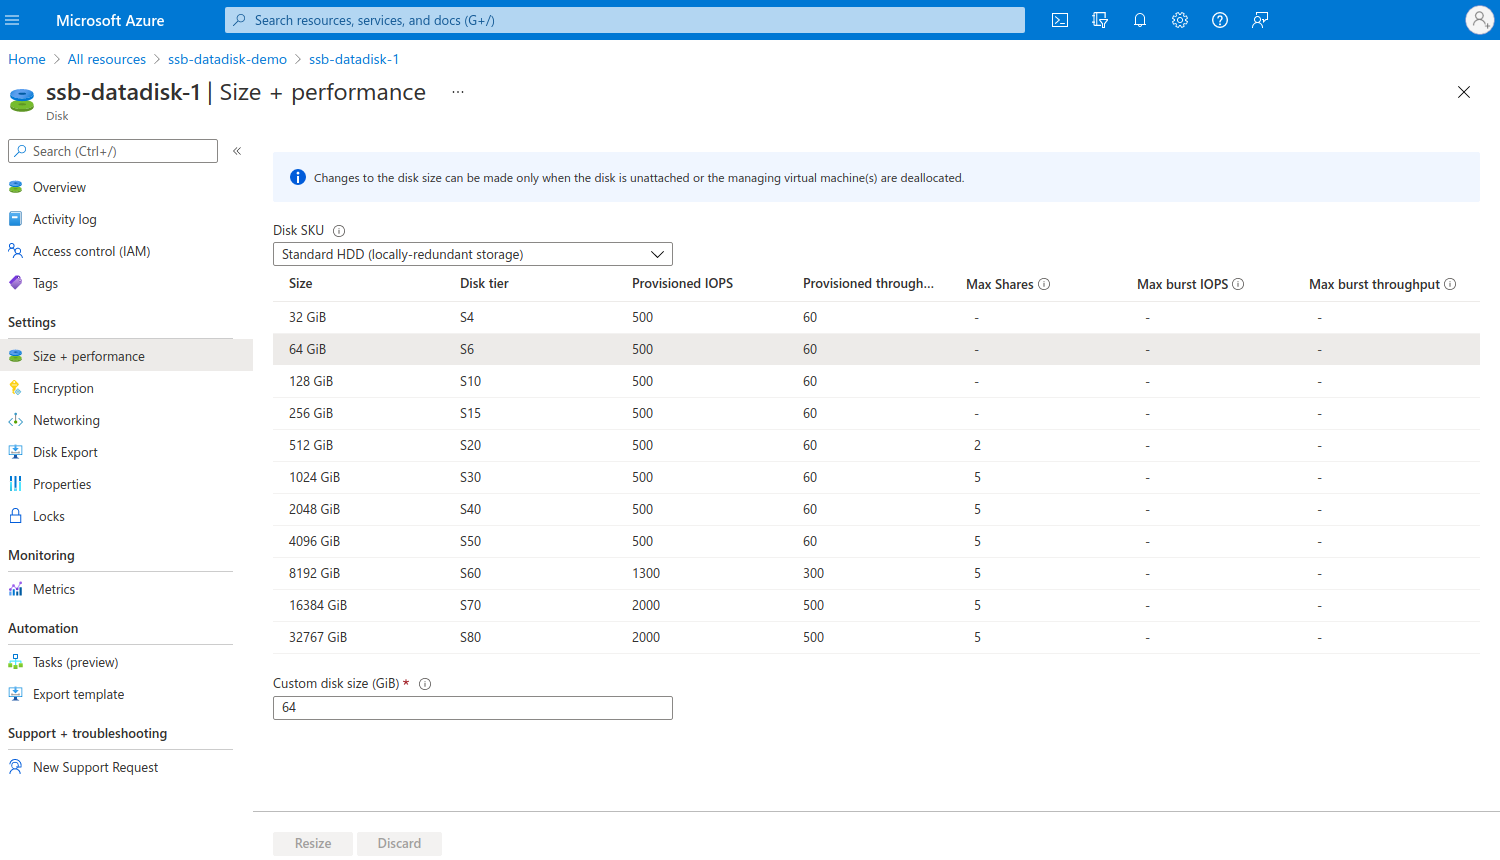
Follow the instructions of Resize a managed disk in the Azure portal in the Microsoft Azure online tutorial documentation to increase the size of your custom cloud service provider data disk.
Figure 174: Home > All resources > your-virtual-machine-in-microsoft-azure > your-data-disk-in-microsoft-azure - The Size + performance page for your managed disk in Microsoft Azure
-
Start the virtual machine for your SSB device.
NOTE: Resizing your custom cloud service provider data disk on the Microsoft Azure or VMware ESXi side may be quick, depending on your infrastructure, but your SSB configuration must resize the file system on your SSB side to match the resizing on the Microsoft Azure or VMware ESXi side. As a result, depending on the original size of the custom cloud service provider data disk and on the size you will expand it to, starting the virtual machine for your SSB device after you expand the size of your custom cloud service provider data disk may take a long time.
To increase the size of a custom cloud service provider data disk in VMware ESXi that you use in your SSB configuration,
- On the SSB side, shut down your SSB device
-
Navigate to Basic Settings > System.
-
Under System control, click Shutdown.
- On the cloud service provider side, complete the following steps:
-
Wait until the virtual machine of your SSB device is Stopped .
-
Edit your virtual machine's hardware settings.
-
|
|
CAUTION: Hazard of data loss!
One Identity does not support decreasing the size of custom cloud service provider data disks already added to your SSB configuration. One Identity only supports increasing the size of such custom cloud service provider data disks after adding them to your SSB configuration. |
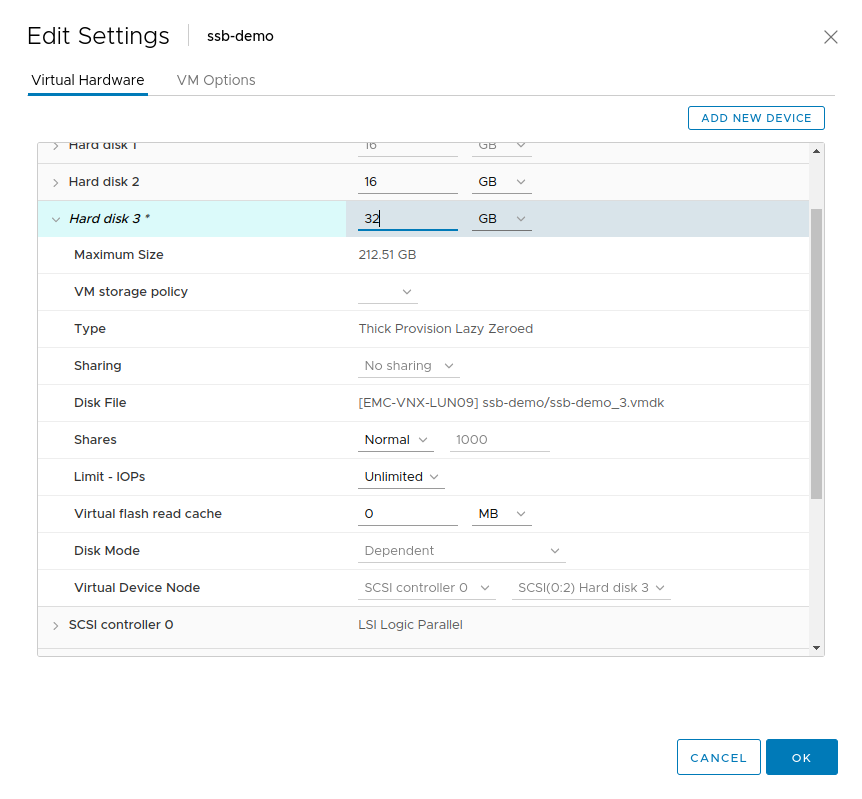
Locate the hard disk whose size you want to increase and enter the new value of the size of the hard disk.
Figure 175: your-virtual-machine-in-vmware-esxi > VM Hardware > Edit settings – Increasing disk size in VMware ESXi
-
Start the virtual machine for your SSB device.
NOTE: Resizing your custom cloud service provider data disk on the Microsoft Azure or VMware ESXi side may be quick, depending on your infrastructure, but your SSB configuration must resize the file system on your SSB side to match the resizing on the Microsoft Azure or VMware ESXi side. As a result, depending on the original size of the custom cloud service provider data disk and on the size you will expand it to, starting the virtual machine for your SSB device after you expand the size of your custom cloud service provider data disk may take a long time.
