Redundant heartbeat interfaces
To avoid unnecessary takeovers and to minimize the chance of split-brain situations, you can configure additional heartbeat interfaces in syslog-ng Store Box (SSB). These interfaces are used only to detect that the other node is still available, they are not used to synchronize data between the nodes (only heartbeat messages are transferred). For example, if the main HA interface breaks down, or is accidentally unplugged and the nodes can still access each other on the redundant HA interface, no takeover occurs, but no data is synchronized to the secondary node until the main HA link is restored. Similarly, if connection on the redundant heartbeat interface is lost, but the main HA connection is available, no takeover occurs.
If a redundant heartbeat interface is configured, its status is displayed in the Basic Settings > High Availability > Redundant Heartbeat status field, and also in the HA > Redundant field of the System monitor. For a description of each possible status, see Understanding SSB cluster statuses.
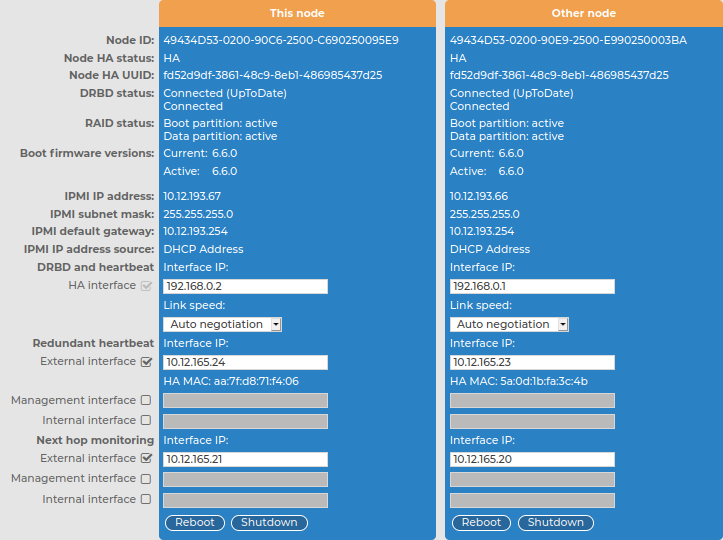
The redundant heartbeat interface is a virtual interface with a virtual MAC address that uses an existing interface of SSB (for example, the external or the management interface). The MAC address of the virtual redundant heartbeat interface is displayed as HA MAC.
The MAC address of the redundant heartbeat interface is generated in a way that it cannot interfere with the MAC addresses of physical interfaces. Similarly, the HA traffic on the redundant heartbeat interface cannot interfere with any other traffic on the interface used.
If the nodes lose connection on the main HA interface, and after a time the connection is lost on the redundant heartbeat interfaces as well, the secondary node becomes active. However, as the primary node was active for a time when no data synchronization was possible between the nodes, this results in a split-brain situation which must be resolved before the HA functionality can be restored. For details, see Recovering from a split brain situation.
NOTE: Even when redundant HA links are configured, if the dedicated HA link fails, the secondary node will not be visible on the Basic Settings > High Availability > High availability & Nodes page anymore.
SSB nodes use UDP port 694 to send each other heartbeat signals.
The following describes how to configure a redundant heartbeat interface.
To configure a redundant heartbeat interface
-
Navigate to Basic Settings > High Availability > Redundant heartbeat.
-
Enable the interface you want to use as redundant heartbeat interface (for example, External interface). Using an interface as a redundant heartbeat interface does not affect the original traffic of the interface.
Figure 86: Basic Settings > High Availability > Redundant heartbeat — Configuring redundant heartbeat interfaces
-
Specify an IP address in the This node > Redundant heartbeat > Interface IP field of the selected interface.
NOTE: Consider the following:
-
The two nodes must have different Interface IP.
-
If you do not use next hop monitoring on the redundant interface, you can use any Interface IP (even if otherwise it does not exist on that network).
-
If you use next hop monitoring on the redundant interface, the Interface IP address must be a real IP address that is visible from the other node.
-
If you use next hop monitoring on the redundant interface, the Interface IP must be accessible from the next-hop address, and vice-versa. For details on next hop monitoring, see Next-hop router monitoring.
-
Specify an IP address in the Other node > Redundant heartbeat > Interface IP field of the selected interface.
NOTE: Consider the following:
-
The two nodes must have different Interface IP.
-
If you do not use next hop monitoring on the redundant interface, you can use any Interface IP (even if otherwise it does not exist on that network).
-
If you use next hop monitoring on the redundant interface, the Interface IP address must be a real IP address that is visible from the other node.
-
If you use next hop monitoring on the redundant interface, the Interface IP must be accessible from the next-hop address, and vice-versa. For details on next hop monitoring, see Next-hop router monitoring.
-
Repeat the previous steps to add additional redundant heartbeat interfaces if needed.
-
Click  .
.
-
To apply your changes, restart the nodes by clicking Reboot Cluster.
Next-hop router monitoring
By default, HA takeover occurs only if the primary node (This node) stops working or becomes unreachable from the secondary node (Other node). However, this does not cover the scenario when the primary node becomes unaccessible to the outside world (for example its external interface or the router or switch connected to the external interface breaks down) while the secondary node would be still accessible (for example because it is connected to a different router).
To address such situations, you can specify IP addresses (usually next hop routers) to continuously monitor from both the primary and the secondary nodes using ICMP echo (ping) messages. One such address can be set up for every interface.
When setting up next hop monitoring, you have to make sure that the primary and secondary nodes can ping the specified address directly. You can either:
-
Choose the addresses of the redundant-HA syslog-ng Store Box (SSB) interfaces so that they are on the same subnet as the next-hop address
-
Configure the next-hop device with an additional IP-address that is on the same subnet as the redundant-HA SSB interfaces facing it
If any of the monitored addresses becomes unreachable from the primary node while being reachable from the secondary node (in other words, more monitored addresses are accessible from the secondary node), then it is assumed that the primary node is unreachable and a forced takeover occurs — even if the primary node is otherwise functional.
Naturally, if the secondary node is not capable of taking over the primary node (for example, because there is data not yet synchronized from the current primary node), no takeover is performed.
The following describes how to configure next hop monitoring.
To configure next hop monitoring
-
Navigate to Basic Settings > High Availability > Next hop monitoring.
-
Select the interface to use for monitoring its next-hop router.
Figure 87: Basic Settings > High Availability > Next hop monitoring — Configuring next hop monitoring
-
Enter the IP address to monitor from the current primary node (for example, the IP address of the router or the switch connected to the interface) into the This node > Next hop monitoring > Interface IP field of the selected interface. This IP address must be a real IP address that is visible from the interface, and must be on the same local network segment.
-
Enter the IP address to monitor from the current secondary node (for example, the IP address of the router or the switch connected to the interface) into the Other node > Next hop monitoring > Interface IP field of the selected interface. This IP address must be a real IP address that is visible from the interface, and must be on the same local network segment.
-
Repeat the previous steps to add IP addresses to be monitored from the other interfaces if needed.
-
Click .
|

|
Caution:
To apply the changes, you must restart both nodes. To restart both nodes, click Reboot Cluster. |
Upgrading SSB
The syslog-ng Store Box (SSB) appliances are preinstalled with the latest available Long Term Support (LTS) release.
Feature Releases provide additional features which are not yet consolidated to an LTS release. To gain access to these features, you may install a supported Feature Release on the appliance, with the following condition:
Feature Releases are released and supported in a timeline of 6 (+2) months. You have to keep upgrading SSB to the latest Feature Release to ensure that your appliance is supported.
For both LTS and Feature Releases, One Identity regularly incorporates security patches and bugfixes, and issues updated Revisions of the released product. We strongly recommend always installing the latest Revision of the used software Release.
|
|
Caution:
Downgrading from the latest feature release, even to an LTS release, voids support for SSB. |
The following sections describe how to keep SSB up to date, and how to install a new license:
Upgrade checklist
The following list applies to all configurations:
-
The firmware of your SSB appliance is not tainted (that is, none of its files were modified locally). If the firmware is tainted, a warning appears on the Basic Settings > System > Version details page.
Upgrading is not supported if the firmware is tainted. If your firmware is tainted, contact our Support Team.
-
You have created a configuration backup of syslog-ng Store Box (SSB).
For detailed instructions, refer to Exporting the configuration of SSB.
-
You have a valid support portal account.
To download the required .ISO file and the license, you need a valid support portal account. Note that the registration is not automatic, and might require up to two working days to process.
-
You have downloaded the latest .ISO file from the Downloads page. For further information, see Firmware in SSB.
-
You have read the Release Notes of the firmware(s) before updating. The Release Notes might include additional instructions specific to the firmware version.
The Release Notes are available here on the Downloads page.
If you have a high availability cluster:
-
You have IPMI access to the slave node. You can find detailed information on using the IPMI interface in the following documents:
For syslog-ng Store Box (SSB) Appliance 3000, 3500 and 4000, see Knowledge Base Article Latest IPMI firmware for Syslog-ng Store Box 3000/3500/4000 and One Identity Safeguard for Privileged Sessions 3000/3500/4000 appliances.
-
You have verified on the Basic Settings > High Availability page that the HA status is not degraded.
-
If you have a high availability cluster with geoclustering enabled:
Perform the firmware upload steps an hour before the actual upgrade. Geoclustering can introduce delays in master-slave synchronization, and the slave node might not be able to sync the new firmware from the master node on time.
If you are upgrading SSB in a virtual environment:
During the upgrade, SSB displays information about the progress of the upgrade and any possible problems to the console, which you can monitor with IPMI (ILOM) or console access.
We recommend that you test the upgrade process in a non-productive (virtual, etc.) environment first.
Upgrading SSB requires a reboot. We strongly suggest that you perform the upgrade on the productive appliance during maintenance hours only, to avoid any potential data loss.
