Microsoft 365 user license management
-
From the Web Interface, assign, or modify the Microsoft 365 license for an Azure AD User.
The Policy is triggered for any Azure AD user in the Organization Unit for which the M365 and Azure Tenant selection policy is applied.
If the policy conditions are not satisfied while assigning or modifying Azure AD User licenses, the following policy violation error is displayed:
Provisioning policy failure. The 'O365 and Azure Tenant Selection' policy encountered an error. Exception in Azure Tenant Management Policy violation: The Azure user License(s) O365_BUSINESS_ESSENTIALS-PROJECTWORKMANAGEMENT, cannot be assigned. The policy prescribes that this Azure User requires only the specified license in the policy object to be assigned.
-
To check whether there are any policy violations, right-click and select Check Policy
For a container object, this displays the Check Policy dialog.
-
Review the options in the Check Policy dialog and click OK.
The Policy Check Results window is displayed.
IMPORTANT: Office 365 user license management now allows Administrator to select a subset of the licenses selected in policy during user creation or modification.
Microsoft 365 user roles management through provisioning policy
From the Web Interface, assign or modify the Microsoft 365 roles for an Azure AD User.
If the policy conditions are not satisfied while assigning Azure AD User roles while creating an Azure AD user from the Active Roles Web Interface, the following policy violation error is displayed:
Provisioning policy failure. The 'O365 and Azure Tenant Selection' policy encountered an error. Exception in Azure Tenant Management Policy violation: The Azure user Role(s) cannot be assigned. The policy prescribes that this Azure User requires only the specified role in the policy object to be assigned.
Figure 164: OneDrive folder management wizard

Provisioning OneDrive for Azure AD users
-
From the Web Interface, create an Azure AD User, and assign a valid SharePoint Online license.
-
After the user is created, the OneDrive provisioning process is performed in the background and after some time the process is completed.
NOTE: Consider the following when provisioning OneDrive for Azure AD users
-
If the SharePoint Admin URL is incorrect then the OneDrive provisioning is not successful.
-
For an existing Azure AD user, during modification of user properties:
-
If OneDrive is not provisioned, then OneDrive provisioning is triggered.
-
If OneDrive is provisioned, and any changes are made to the OneDrive provisioning policy, then the policy changes are applied on the user.
-
To check the provisioning result, open the Azure Properties window for the user from the Web Interface, navigate to OneDrive tab.
On successful provisioning of the user, the OneDrive URL, the used storage size, and the total storage size are displayed.
NOTE: The storage size indicated in the policy gets synchronized to the Azure AD user's OneDrive.
Active Roles 7.4.4 introduced support for cloud-only Azure objects: Azure users, guest users and contacts. To support the management of these cloud-only Azure objects, the existing Active Roles policies received the following updates:
-
The Property Generation and Validation policy now supports specifying object property rules for cloud-only Azure objects. To get started with provisioning cloud-only Azure properties, Active Roles contains a new built-in policy for provisioning cloud-only Azure properties. Find the policy in the following node of the Active Roles MMC console:
Configuration > Policies > Administration > BuiltIn > Azure CloudOnly Policy - Default Rules to Generate Properties
-
The Group Membership AutoProvisioning policy now supports specifying group membership rules to automatically assign (or unassign) cloud-only Azure users and guest users to (or from) O365 Groups located in the same Azure tenant as the provisioned Azure objects.
In the New Provisioning Policy Wizard of the Active Roles MMC console, the cloud-only Azure objects supported for provisioning are listed in the Object Type Selection > Select Object Type dialog, while the O365 Groups can be selected in the Group Selection > Browse for Container dialog.
-
Script Execution policies now also support PowerShell and other custom scripts for provisioning cloud-only Azure objects. As part of this change, Active Roles contains a new built-in script module that you can use to configure policies for generating cloud-only Azure user passwords complying with Azure AD password generation policies. This built-in script module is available at the following node of the Active Roles MMC console:
Configuration > Script Modules > BuiltIn > Generate User Password - Azure only
Managing the configuration of Active Roles
To manage the configuration of Active Roles, you must have the necessary permissions. It is sufficient to be a member of the Active Roles Admin group. The Active Roles Admin account is specified when configuring the Administration Service. It defaults to the Administrators group on the computer running the Administration Service.
The authority to modify the Active Roles configuration can be delegated by applying the Manage Configuration Access Template to the Server Configuration container.
To configure a particular Administration Service using the Active Roles Console, you need to manually specify the Administration Service to connect to. Otherwise, the Console automatically selects the Administration Service.
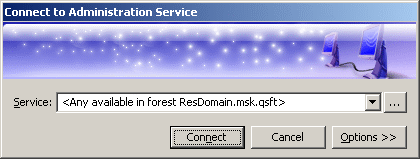
You can use the Connect to Administration Service dialog to select the appropriate Administration Service. To display this dialog, right-click Active Roles in the Console tree and click Connect. The dialog looks as shown in the following figure.
Figure 165: Connect to Administration Service

In the Service box, type or select the name of the computer running the Administration Service to connect to, then click Connect. The Service box provides a list of names that were specified for previous connection sessions. The last selected name is displayed by default.
To select the Administration Service that is not in the list, click Select next to the Service box:

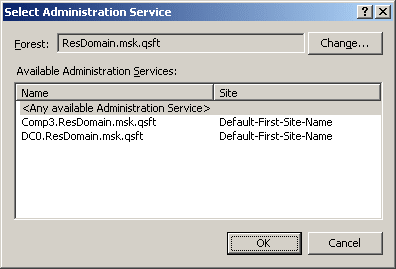
This displays the Select Administration Service dialog, shown in the following figure.
Figure 166: Select Administration Service

The Select Administration Service dialog lists the Administration Services that are available in the specified forest. You can choose a different forest by clicking Change. The list items are sorted according to priority, considering site location and service load (less loaded Administration Services are displayed at the top of the list). To add a certain Service to the Connect to Administration Service dialog, click that Service and then click OK.
If you have connected to a specific Service, the Console will attempt to automatically connect to that Service on every subsequent start. If you have selected <Any available Administration Service>, the Console will attempt to connect to the nearest, least loaded Service in the specified forest, giving preference to the Services that belong to the same replication group as the Service to which the console was connected in the previous session.
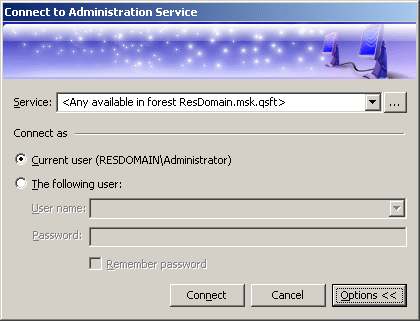
By default, the Console connects to the Administration Service in the security context of your logon account (that is, the user account to which you have logged on). This means that you can only use the Console to perform the tasks that are delegated to your user account. You have the option to establish a connection using a different account, in order to change the scope of the allowed tasks. Click Options to expand the Connect to Administration Service dialog, as shown in the following figure.
Figure 167: Connect to Administration Service

Click The following user and specify the user logon name and password of the account to be used for connection. By selecting the Remember password check box you can have the Console automatically use the specified user name and password in the future connection sessions. Otherwise, on a subsequent start, the Console will prompt you for a password.


