How the Property Generation and Validation policy works
When creating or modifying an object, Active Roles checks whether the property values satisfy the criteria defined in the policy. If they do not, Active Roles prevents you from creating or modifying the object.
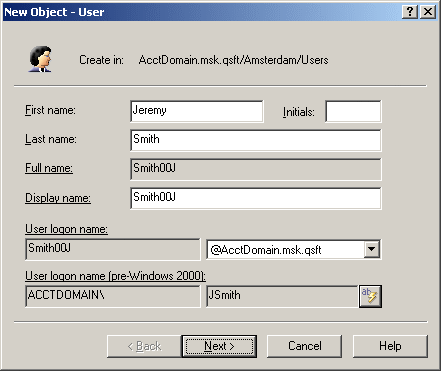
In the Object Creation Wizard and Properties dialogs, the properties that are controlled by the policy are displayed as hyperlinks. If you have a policy configured to populate a property with a certain value (generate the default value), the edit box for the property is unavailable for editing, as shown in the following figure.
Figure 32: Object creation
You can click a hyperlink to display the policy details.
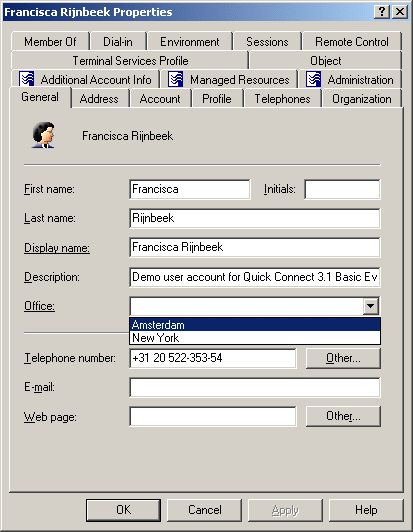
With a policy configured to define a set of acceptable values for a given property, the Active Roles Console provides a drop-down list to select a value when modifying that property. The user of the Active Roles Console can choose an acceptable value from the list instead of having to type a value in the edit box. This feature is illustrated in the following figure, where the Office box provides a list of acceptable values that are prescribed by policy.
Figure 33: Acceptable values for a policy
Configuring a Property Generation and Validation policy
To configure a Property Generation and Validation policy via the Active Roles Console (also known as the MMC interface), perform the following procedure.
To configure a Property Generation and Validation policy
-
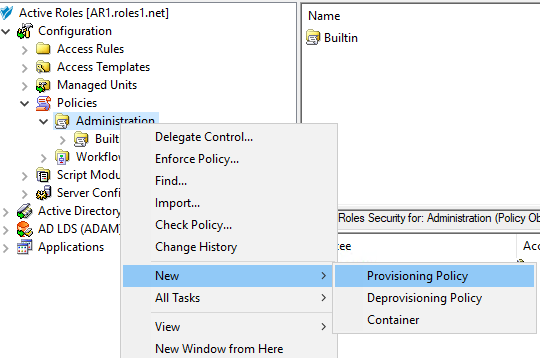
Navigate to Configuration > Policies > Administration.
-
To open the New Provisioning Policy Object Wizard dialog, right-click in the middle pane to open the context menu, and then select New > Provisioning Policy.
-
On the Name and Description page, provide a unique Name for the new Policy Object. Optionally, also provide a Description. To continue, click Next.
-
On the Policy to Configure page, select Property Generation and Validation, and then click Next.
-
On the Controlled Property page, click Select to open the Select Object Type and Property dialog.
-
To select the object type and its object property you want the policy to control, use the settings of the Select Object Type and Property dialog:
-
Use the Object type drop-down menu to select the object type whose property you want to provision.
-
Use either the Look for Property search box to manually search for the object property you want to provision, or browse it in the Object Property list.
TIP: If you do not see the object type you need, expand the list by selecting Show all possible object types.
NOTE: Policy Object settings specific to Azure cloud-only objects (such as cloud-only Azure users, guest users, or contacts) are available only if your Active Roles deployment is licensed for managing cloud-only Azure objects. Contact One Identity support for more information.
Also, Policy Objects specific to Azure cloud-only objects will work correctly only if an Azure tenant is already configured in the AD of the organization, and Active Roles is already set as a consented Azure application for that Azure tenant. For more information on these settings, see Configuring a new Azure tenant and consenting Active Roles as an Azure application.
-
Once you selected the object and property, click OK to continue.
-
On the Configure Policy Rule page, specify the condition(s) you want to configure for the policy by selecting them in the Select conditions to configure policy rule list. The selected conditions then appear in the Edit policy rule text box.
-
(Optional) If the selected condition supports editing, then click the underlined part of the condition to open the Add Value dialog and edit its settings.
To specify additional configuration for the condition, enter a variable into the Value field, then click OK to close the Add Value dialog.
Alternatively, click Configure Value, then click Add, and configure an entry manually in the Add Entry dialog. For more information on manual configuration, see Configuring entries. To close the Add Value dialog, click OK.
-
(Optional) If multiple conditions are selected, switch between the AND and OR logic of the condition relations by clicking and or or.
-
After selecting and configuring the condition(s), click Next.
-
(Optional) On the Policy Description page, modify the default description of the policy generated by the wizard. To do so, select Modify this policy description to make the description editable. Modify the description, then click Next.
-
On the Enforce Policy page, specify the objects to which the configured Policy Object will be applied. Click Add, and then use the Select Objects dialog to locate and select the objects.
TIP: When provisioning cloud-only Azure users or guest users, you can either select the respective object category (such as the Azure user or Azure guest user node) in this step, or the Azure tenant that contains the Azure objects.
-
To complete creating the Policy Object, click Next, then Finish.
Entry type: Text
When you select Text under Entry type in the Add Entry window, the Entry properties area displays the Text value box.
In the Text value box, type the text you want to include in the value, and then click OK.
Entry type: <Object> Property
When you select <Object> Property under Entry type in the Add Entry window, the Entry properties area looks as follows.
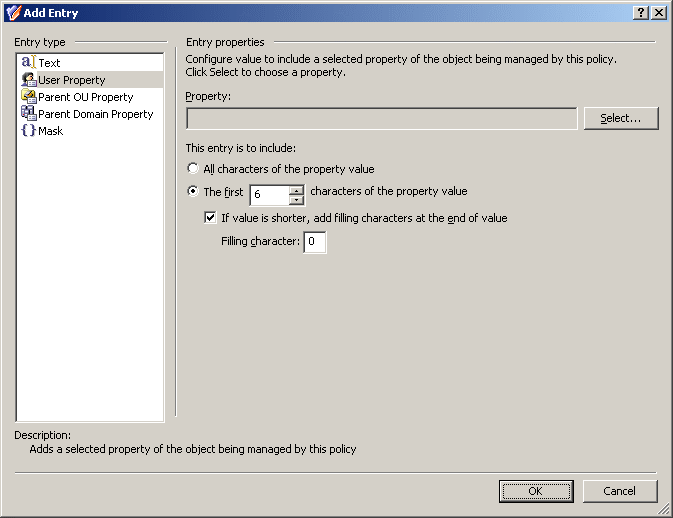
Using this entry type, you can configure a value based on a property of the object itself. To choose a property, click Select.
If you want the entry to include the entire value of the property, click All characters of the property value. Otherwise, click The first, and specify the number of characters to include in the entry.
In the latter case, you can select the If value is shorter, add filling characters at the end of value check box, and type a character in the Filling character box. This character will fill the missing characters in the value of the object property if the value is shorter than specified in the box next to the option The first.
When you are done configuring an entry, click OK to close the Add Entry window. The entry is added to the Configure Value dialog.
