You can configure an O365 and Azure Tenant Selection policy in the Active Roles Console (also known as the MMC Interface) to:
- Validate the selected Azure tenants for Azure users, guest users, O365 groups, Azure security groups, and contacts.
- Select O365 Licenses for Azure users and guest users.
- Select O365 Roles for Azure users and guest users.
- Preprovision OneDrive for Azure users.
Prerequisites
Consider the following before configuring an O365 and Azure Tenant Selection policy:
-
The OneDrive settings of this policy are applicable to hybrid Azure users only, and will work only if you have already enabled OneDrive for your Azure tenant in the Azure AD Configuration > Modify (Tenant details) window of the Active Roles Configuration Center. For more information on enabling OneDrive for Azure users in an Azure tenant, see Enabling OneDrive in an Azure tenant.
-
To configure an O365 and Azure Tenant Selection policy, your Organizational Unit (OU) must already have the Azure - Default Rules to Generate Properties built-in policy configured. For more information on configuring the policy, see Configuring the Azure - Default Rules to Generate Properties policy.
To configure an O365 and Azure Tenant Selection policy
-
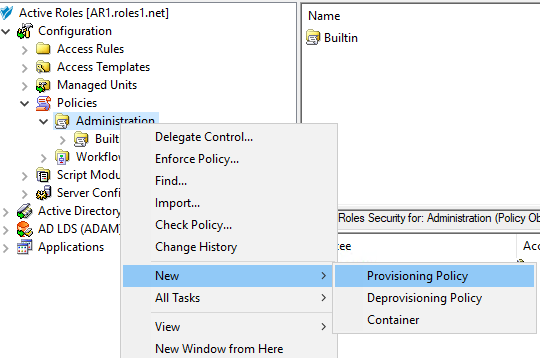
Navigate to Configuration > Policies > Administration.
-
To open the New Provisioning Policy Object Wizard dialog, right-click in the middle pane to open the context menu, and then select New > Provisioning Policy.
-
On the Name and Description page, provide a unique Name for the new Policy Object. Optionally, also provide a Description. To continue, click Next.
-
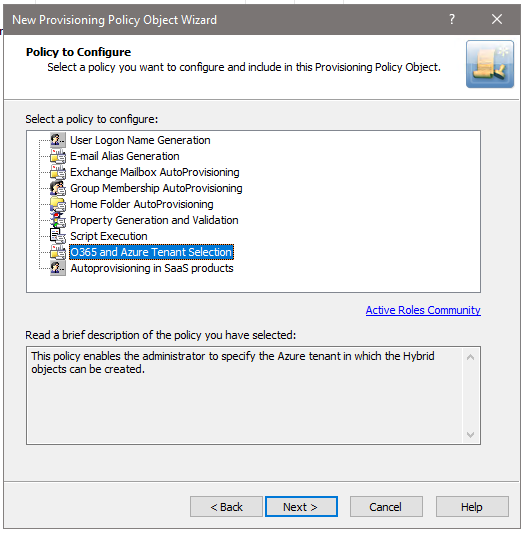
On the Policy to Configure page, select O365 and Azure Tenant Selection, and click Next.
-
On the Object Type Selection page, to specify the type of object you want the policy to provision, click Select, then click OK.
TIP: If you do not see the object type you need, expand the list by selecting Show all possible object types.
NOTE: If you want to assign and validate Office 365 licenses and roles, or provision OneDrive storage as part of the configured policy, select the User (user) object type in this step. Office 365 license and role validation, and OneDrive provisioning are not applicable to Azure Groups and Azure Contacts.
-
On the Policy Conditions page, select your Azure tenant for which you want to set up the policy. To continue, click Next.

-
(Optional) On the next Policy Conditions page, select the licenses to validate and assign to new Azure users in the Azure tenant. To continue, click Next.
NOTE: If OneDrive storage is planned to be provisioned in the selected Azure tenant for Azure users, make sure that you select the SharePoint Online license in this step. Otherwise, the configured OneDrive storage cannot be provisioned for Azure users created later. For more information, see Creating a new cloud-only Azure user in the Active Roles Web Interface User Guide.
-
(Optional) On the next Policy Conditions page, select the Office 365 roles to validate and assign to new Azure users in the Azure tenant. To continue, click Next.
-
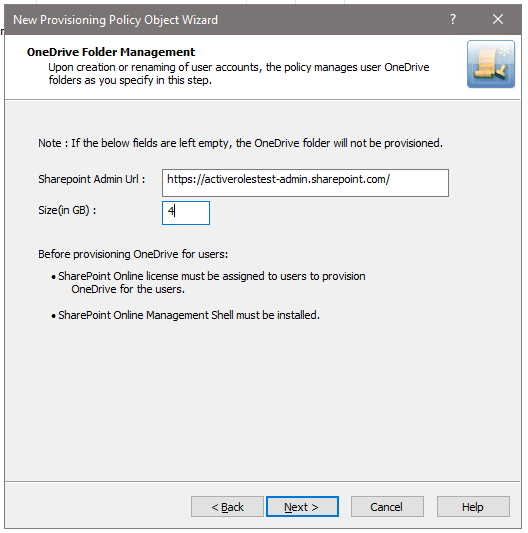
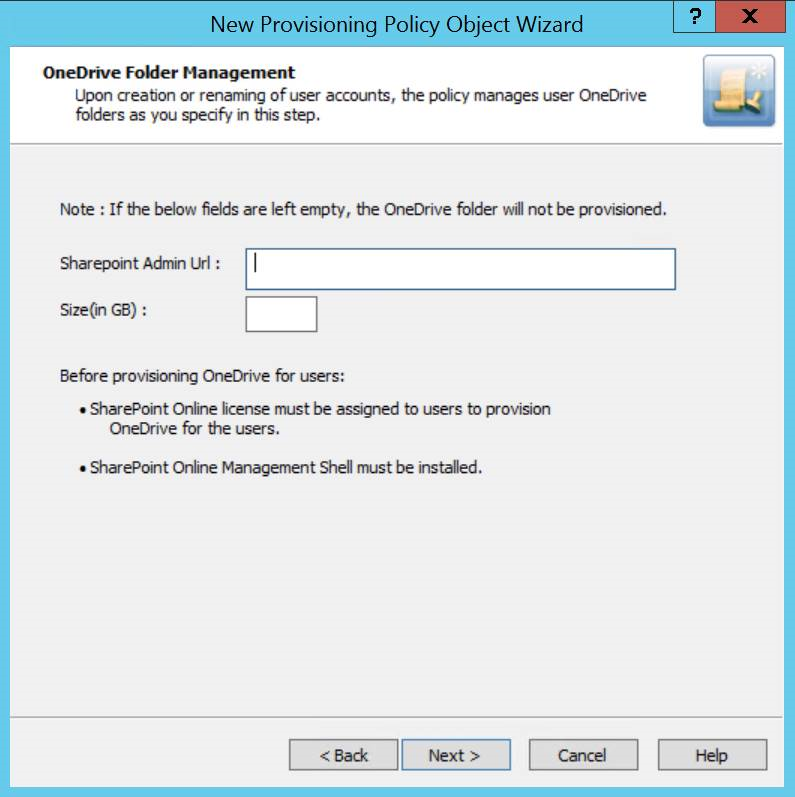
(Optional) To configure OneDrive storage for the Azure users of the Azure tenant, configure the following attributes on the OneDrive Folder Management page:
-
SharePoint Admin URL: Specify the URL of the SharePoint administration site of your Azure tenant. The URL has the following syntax: <azure-tenant-name>-admin.sharepoint.com
-
Size (in GB): Specify the default OneDrive storage size allocated for each Azure user in the Azure tenant.
If you do not need to provision OneDrive storage for users in the Azure tenant, leave the settings empty and click Next.
NOTE: If the wizard shows an error when clicking Next after configuring the OneDrive settings:
-
Check that the specified SharePoint Admin URL is correct.
-
Make sure that the specified OneDrive storage size is correct (that is, it is within the range of the individual cloud storage allowed for users in your organization).
-
On the Enforce Policy page, select the Organizational Unit (OU) for which the policy will be applied. To do so, click Add to open the Select Objects window, then select the OU from the list. To continue, click OK then Next.
-
To complete the wizard, click Finish.
To manage Office 365 user licenses
-
From the Web Interface, assign, or modify the Office 365 license for an Azure AD User.
The Policy is triggered for any Azure AD user in the Organization Unit for which the O365 and Azure Tenant selection policy is applied.
If the policy conditions are not satisfied while assigning or modifying Azure AD User licenses, the following policy violation error is displayed:
Provisioning policy failure. The 'O365 and Azure Tenant Selection' policy encountered an error. Exception in Azure Tenant Management Policy violation: The Azure user License(s) O365_BUSINESS_ESSENTIALS-PROJECTWORKMANAGEMENT, cannot be assigned. The policy prescribes that this Azure User requires only the specified license in the Policy Object to be assigned.
-
To check if there are any policy violations, right-click and click Check Policy.
For a container object, this displays the Check Policy dialog.
-
Review the options in the Check Policy dialog and click OK.
The Policy Check Results window is displayed.
IMPORTANT: Office 365 user license management now allows Administrator to select a subset of the licenses selected in policy during user creation or modification.
Office 365 user roles management through provisioning policy
From the Web Interface, assign or modify the Office 365 roles for an Azure AD User.
While creating an Azure AD user from the Active Roles Web Interface, if the policy conditions are not satisfied while assigning Azure AD User roles, the following policy violation error is displayed:
Provisioning policy failure. The O365 and Azure Tenant Selection policy encountered an error. Exception in Azure Tenant Management Policy violation: The Azure user Role(s) cannot be assigned. The policy prescribes that this Azure User requires only the specified role in the Policy Object to be assigned.
Figure 56: OneDrive folder management wizard
Provisioning OneDrive for Azure AD users
-
From the Web Interface, create an Azure AD User, and assign a valid SharePoint Online license.
-
After the user is created, the OneDrive provisioning process is performed in the background and after some time the process is completed.
NOTE: Consider the following when provisioning OneDrive:
-
If the SharePoint Admin URL is incorrect then the OneDrive provisioning is not successful.
-
For an existing Azure AD user, during modification of user properties:
-
If OneDrive is not provisioned, then OneDrive provisioning is triggered.
-
If OneDrive is provisioned, and any changes are made to the OneDrive provisioning policy, then the policy changes are applied on the user.
-
To check the provisioning result, open Azure Properties window for the user from the Web Interface, navigate to the OneDrive tab.
On successful provisioning of the user, the OneDrive URL, the used storage size, and the total storage size are displayed.
NOTE: The storage size indicated in the policy gets synchronized to the Azure AD user's OneDrive.
Policies in this category are intended to automate the assignment of the email alias when designating a user as mailbox-enabled on Microsoft Exchange Server. By default, Microsoft Exchange Server provides for the following recipient email address format: <email-alias>@<domain-name>
You can use predefined rules to generate email aliases, or configure custom rules. For example, you can configure a policy to compose the email alias of the first initial followed by the last name of the user. Custom rules provide for the addition of an incremental numeric value to ensure uniqueness of the alias. You can also specify whether the alias can be modified by the operator who creates or updates the user account.
When making a user mailbox-enabled, Active Roles relies on this policy to assign a certain email alias to the user account. The policy generates the alias based on user properties, such as the pre-Windows 2000 user logon name, first name, initials, and last name. A custom rule can be configured to use other properties.
A custom rule can also be configured to add so-called uniqueness number. A uniqueness number is a numeric value the policy includes into the alias, incrementing that value in the event of an alias naming conflict. For example, the policy can automatically change the generated alias from John.Smith to John1.Smith if a mailbox with the alias John.Smith already exists. If the alias John1.Smith is also in use, the new alias will be changed to John2.Smith, and so on.
The policy configuration provides the option to allow or disallow manual edits of policy-generated aliases. Permission to modify a policy-generated alias can be restricted to the case where the alias is in use by another mailbox.
Some specific features of the policy behavior are as follows:
-
With a rule that does not use a uniqueness number, Active Roles simply attempts to assign the generated alias to the user account. The operation may fail if the generated alias is not unique, that is, the alias is already assigned to a different user account. If the policy allows manual edits of policy-generated aliases, the alias can be corrected by the operator who creates the user account.
-
With a custom rule that uses a uniqueness number, Active Roles adds a button at the client side, next to the Alias field on the user creation and modification forms.
To generate an alias, the client user (operator) must click that button, which also applies if the generated alias is in use. Clicking Generate increases the uniqueness number by one, thereby allowing the alias to be made unique.
-
With a custom rule configured to include user properties that are normally not displayed on the user creation forms, an extra page is added to the New Object - User Wizard in the Active Roles Console, making it possible to specify the user properties required to generate the alias.
-
The policy defines a list of characters that are unacceptable in e-mail aliases. Space characters and the following characters are not accepted:
@ * + | = \ ; : ? [ ] , < > /
-
The policy denies processing of operation requests that assign the empty value to the e-mail alias.
-
When checking user accounts for Active Roles policy compliance, Active Roles detects, and reports on, the aliases that are not set up as prescribed by the alias generation policy.
