This scenario describes how to configure a policy that forces the user phone number to conform to the format (###) ###-##-##.
To implement this scenario, you must perform the following actions:
-
Create and configure a Policy Object that defines the appropriate policy.
-
Apply the Policy Object to a domain, OU, or Managed Unit.
As a result, when creating or modifying a user object in the container you selected in Step 2, Active Roles checks whether the phone number conforms to the stated format. If not, the policy disallows the creation or modification of the user object.
The following two sections elaborate on the steps to implement this scenario.
You can create and configure the Policy Object you need by using the New Provisioning Policy Object Wizard. For more information about the wizard, see Creating a Policy Object.
To configure the policy, click Property Generation and Validation on the Policy to Configure page of the wizard. Then, click Next.
On the Controlled Property page, click Select. Then, in the Select Object Type and Property dialog, select User from the Object type list, and click Telephone number in the Object property list, as shown in the following figure.
Figure 37: Select Object type and property

Click OK, then click Next.
On the Configure Policy Rule page, in the upper box, select the following check boxes:
-
‘Telephone Number’ must be specified: This makes the phone number a required property, that is, requires that a phone number be specified in every user account.
-
‘Telephone Number’ must be <value>: This allows you configure a mask for the telephone number by adding the appropriate entry to the value for this condition.
At this stage, the Configure Policy Rules page looks like the following figure.
Figure 38: Configure policy rules

The next phase is to configure the value.
Click <click to add value>. In the Add Value dialog, click Configure. In the Configure Value dialog, click Add. In the Add Entry window, under Entry type, click Mask.
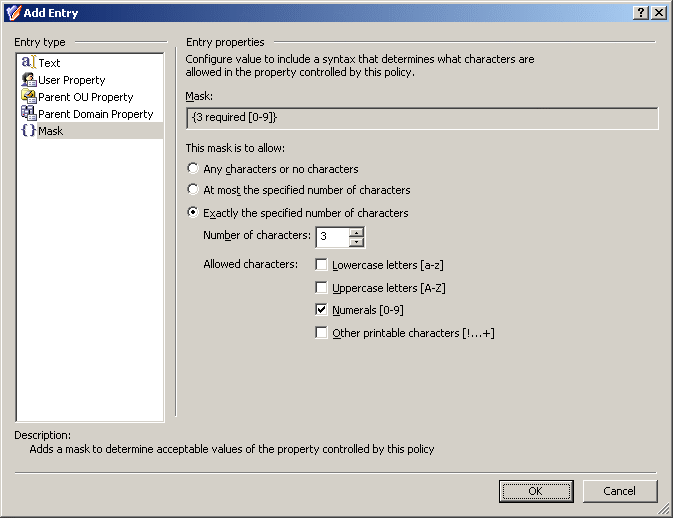
Now you can use the Entry properties area in the Add Entry window to configure a mask.
The format consists of four groups of numerals divided by certain characters: spaces, hyphens, and brackets. First, configure a mask that requires the first three characters to be numerals:
-
Select Exactly the specified number of characters.
-
In the Number of characters box, enter 3.
-
Under Allowed characters, select the Numerals check box.
The Add Entry window should look as shown in the following figure.
Figure 39: Add entry
Click OK to close the Add Entry window. Then, click OK to close the Configure Value dialog. As a result, the Add Value dialog looks as shown in the following figure.
Figure 40: Add value dialog
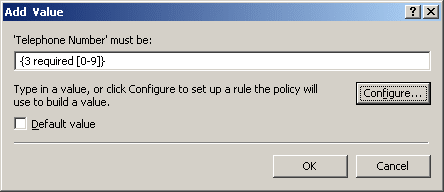
Taking into consideration the mask you have configured, you can guess that the mask for the phone number format you need is as follows:
({3 required [0-9]}) {3 required [0-9]}-{2 required [0-9]}-{2 required [0-9]}
Type this mask in the ‘Telephone Number’ must be box in the Add Value dialog. Pay attention to the round brackets enclosing the first three characters, a space character following the group in the round brackets, and two hyphen characters that separate the groups of characters.
Click OK to close the Add Value dialog. Click Next and follow the instructions in the wizard to create the Policy Object.
You can apply the Policy Object by using the Enforce Policy page in the New Provisioning Policy Object Wizard, or you can complete the wizard and then use the Enforce Policy command on the domain, OU, or Managed Unit where you want to apply the policy.
For more information on how to apply a Policy Object, see Applying Policy Objects and Managing policy scope.
This scenario describes how to configure a policy that forces the user phone number to conform to the following format:
-
The first character must be “+”.
-
The second character(s) must be the country code.
(This is 1 in the US and Canada, and 61 in Australia for example.)
-
Use spaces (instead of dashes or braces) to separate area code.
-
Use spaces (instead of dashes) to separate the phone number.
-
Optionally, use a lowercase “x” to indicate an extension.
The following table provides some examples to clarify how the phone number should look in accordance with these formatting requirements.
Table 5: Phone number format
|
+1 949 754 8515 |
949-754-8515 |
The incorrect entry does not begin with + and country code, and uses dashes instead of space. |
|
+44 1628 606699 x1199 |
+44 1628 606699 X1199 |
The incorrect entry uses the upper-case X. |
To implement this scenario, you must perform the following actions:
-
Configure the Policy Object that defines the appropriate policy.
-
Apply the Policy Object to a domain, OU, or Managed Unit.
As a result, when creating or modifying a user object in the container you selected in Step 2, Active Roles checks whether the phone number conforms to the stated format. If not, the policy disallows the creation or modification of the user object.
