This section describes the prerequisites for forwarding messages from syslog-ng Store Box (SSB) to the Microsoft Azure Sentinel cloud (Azure Sentinel).
NOTE: This section and the other Azure Sentinel-related sections in this documentation are based on Azure Sentinel messaging service concepts and terminology. If you do not use the Azure Sentinel messaging service on a regular basis, One Identity recommends that you read the Azure Sentinel quick-start documentation to familiarize yourself with the messaging service's concepts and terminology before you continue reading these sections.
Prerequisites to using the Azure Sentinel destination
This section describes the limitations for forwarding messages from syslog-ng Store Box (SSB) to the Microsoft Azure Sentinel cloud (Azure Sentinel).
-
Messages with HTTP 400 response code will be dropped
If the message sent to Azure Sentinel is invalid, the Azure Sentinel messaging service will reply with an HTTP 400 response code.
The message can be invalid for either of these reasons:
-
A required argument is missing from the message.
-
The message size exceeds limits.
-
The message itself has an invalid format.
In these cases, SSB cannot successfully send the messages to Azure Sentinel. These messages would prevent SSB from sending further messages to the messaging service, therefore SSB must drop them.
-
Proxy limitations
If you use a proxy, consider that only HTTP proxies are supported.
This section describes the first steps of configuring the Azure Sentinel destination of syslog-ng Store Box (SSB), that is, adding the new Azure Sentinel destination on the SSB web interface.
For information about configuring the authentication and workspace settings of your Azure Sentinel destination, see Configuring the Azure Sentinel destination: Authentication and workspace settings.
For information about configuring the advanced message parameters of your Azure Sentinel destination, see Configuring the Azure Sentinel destination: Advanced message parameters.
For information about configuring the performance-related settings of your Azure Sentinel destination, see Configuring the Azure Sentinel destination: Performance-related settings.
NOTE: This section and the other Azure Sentinel-related sections in this documentation are based on Azure Sentinel messaging service concepts and terminology. If you do not use the Azure Sentinel messaging service on a regular basis, One Identity recommends that you read the Azure Sentinel quick-start documentation to familiarize yourself with the messaging service's concepts and terminology before you continue reading these sections.
To create your custom Azure Sentinel destination on the SSB web interface
-
Navigate to Log > Destinations, and select  to create a new destination.
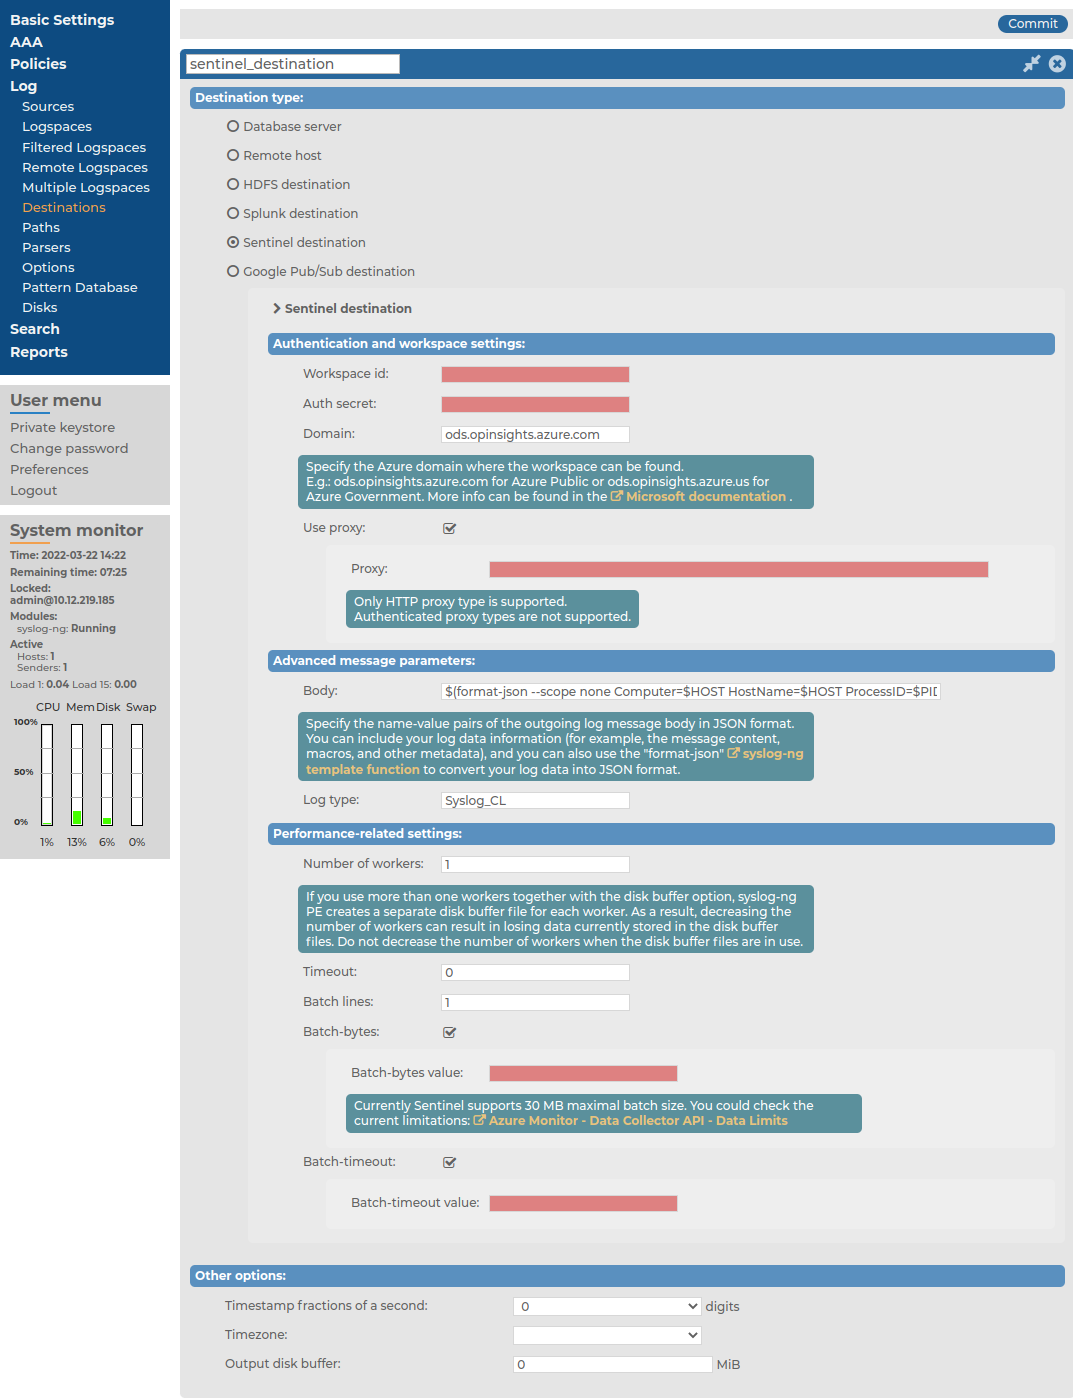
Figure 178: Log > Destinations > <your-sentinel-destination > — Adding a new Sentinel destination
-
Under Destination type, select Sentinel destination.
-
After creating your Azure Sentinel destination, continue customizing it by configuring the following:
This section describes configuring the authentication and workspace settings after Configuring the Azure Sentinel destination: adding a new Azure Sentinel destination.
For information about configuring the advanced message parameters of your Azure Sentinel destination, see Configuring the Azure Sentinel destination: Advanced message parameters.
For information about configuring the performance-related settings of your Azure Sentinel destination, see Configuring the Azure Sentinel destination: Performance-related settings.
NOTE: This section and the other Azure Sentinel-related sections in this documentation are based on Azure Sentinel messaging service concepts and terminology. If you do not use the Azure Sentinel messaging service on a regular basis, One Identity recommends that you read the Azure Sentinel quick-start documentation to familiarize yourself with the messaging service's concepts and terminology before you continue reading these sections.
To configure the authentication and workspace settings of your Azure Sentinel destination
-
Navigate to Log > Destination > <your-sentinel-destination> > Authentication and workspace settings.
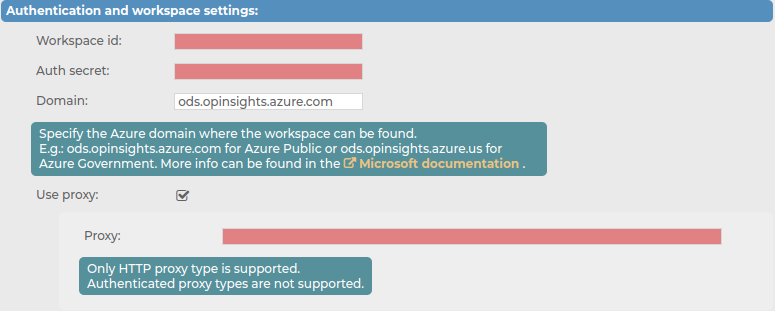
Figure 179: Log > Destinations > <your-sentinel-destination> — Configuring the authentication and workspace settings
-
In the Workspace id field, copy the WORKSPACE ID from your Azure Sentinel side.
NOTE: The workspace ID is a unique hexadecimal number provided by Microsoft, with the purpose of identifying your Sentinel instance.
-
In the Auth secret field, copy the PRIMARY KEY from your Azure Sentinel side.
NOTE: The primary key is a Base64-encoded secret provided by Microsoft, with the purpose of identifying your application.
-
In the Domain field, set the Azure domain of the workspace. For example: ods.opinsights.azure.com for Azure Public, or ods.opinsights.azure.us for Azure Government. For more information, see the related Microsoft documentation.
-
(Optional) Enable Use proxy, and in the Proxy field, enter the HTTP proxy address that you want to use.
NOTE: If you have to use a proxy, consider that only HTTP proxies are supported.
