You can also add wildcards and conditions to a search filter. The following examples show substrings that can be used to search the directory.
Get all entries:
(objectClass=*)
Get entries containing “bob” somewhere in the common name:
(cn=*bob*)
Get entries with a common name greater than or equal to “bob”:
(cn>='bob')
Get all users with an e-mail attribute:
(&(objectClass=user)(mail=*))
Get all user entries with an e-mail attribute and a surname equal to “smith”:
(&(sn=smith)(objectClass=user)(mail=*))
Get all user entries with a common name that starts with “andy”, “steve”, or “margaret”:
(&(objectClass=user) | (cn=andy*)(cn=steve)(cn=margaret))
Get all entries without an e-mail attribute:
(!(mail=*))
If any of the following special characters must appear in the search filter as literals, they must be replaced by the listed escape sequence.
Table 7: Special characters in Search filter
|
* |
\2a |
|
( |
\28 |
|
) |
\29 |
|
\ |
\5c |
|
NUL |
\00 |
In addition, arbitrary binary data may be represented using the escape sequence syntax by encoding each byte of binary data with the backslash (\) followed by two hexadecimal digits. For example, the four-byte value 0x00000004 is encoded as \00\00\00\04 in a filter string.
Members of a Managed Unit are objects that match the criteria specified in the membership rules for the Managed Unit.
To display the members of a Managed Unit, expand Configuration/Managed Units in the Console tree, and then click a Managed Unit in the Console tree. Members of the Managed Unit are displayed in the details pane.
For each Managed Unit, it is possible to preset an individual set of columns to display in the details pane. This allows you to customize administrative views on a per-Managed Unit basis.
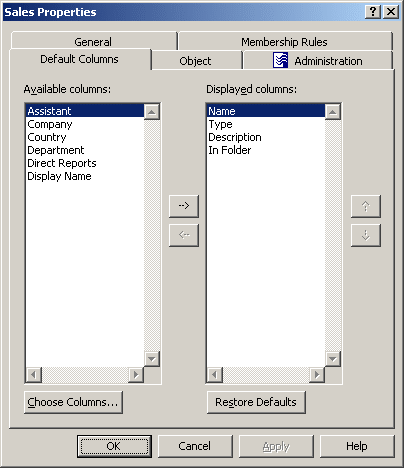
To preset columns in the details pane for a given Managed Unit, right-click the Managed Unit, click Properties, and go to the Default Columns tab. The tab is similar to the following figure.
Figure 3: Managed Unit - Preset columns

You can add a column to display by double-clicking its name in the Available columns list. To add columns to the Available Columns list, click Choose Columns. In the Choose Columns dialog box, you can select columns and, if necessary, modify the names to be displayed in column headings.
Double-clicking a column name in Available Columns adds the name to the Displayed Columns list. Click OK. The new column is displayed in the details pane after refreshing the view. Right-click Managed Units in the console tree and click Refresh; then, select the Managed Unit in the Console tree: the new column appears in the details pane.
To display the members of a Managed Unit
-
In the Console tree, expand Active Roles > Configuration > Managed Units.
-
Under Managed Units, locate and select the Managed Unit.
The members of the Managed Unit are listed in the details pane.
To customize the list of Managed Unit members in the details pane
-
Right-click the Managed Unit, and click Properties.
-
In the Properties dialog box, click the Default Columns tab.
-
On the Default Columns tab, add or remove column names from the Displayed Columns list.
-
Click OK.
NOTE:
-
For each Managed Unit, it is possible to configure an individual list of the default columns to display in the details pane, so you can perform the customization on a per-Managed Unit basis.
-
You can populate the Displayed columns list by double-clicking column names in the Available columns list on the Default Columns tab. You can remove columns by double-clicking column names in the Displayed columns list.
-
To add column items to the Available Columns list, click Choose Columns. In the Choose Columns dialog box, you can select columns and, if necessary, modify column names.
-
For your changes to the Displayed columns list to take effect, the details pane needs to be refreshed: Right-click Managed Units in the console tree and click Refresh.

