
Creating a new content policy
The following describes how to create a new content policy that performs an action if a predefined content appears in a connection.
|
|
NOTE:
Using content policies significantly slows down connections (approximately 5 times slower), and can also cause performance problems when using the indexer service. |

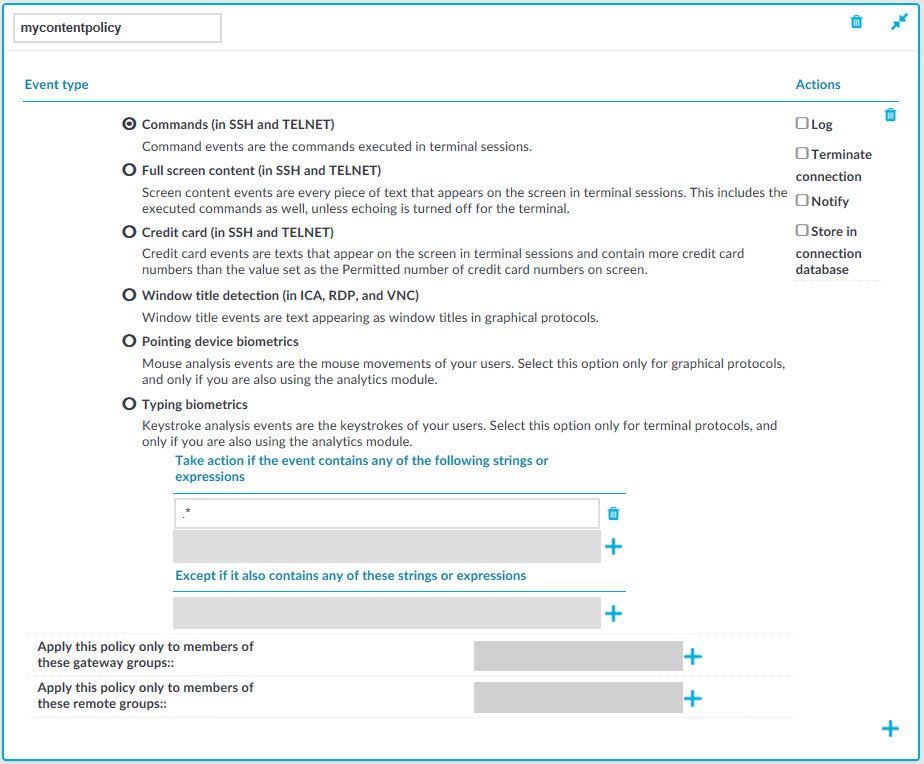
Figure 143: Policies > Content Policies — Content policies
To create a new content policy that performs an action if a predefined content appears in a connection
-
Navigate to Policies > Content Policies, click
and enter a name for the policy.
-
Select the type of event that you want to monitor:
-
Commands: The commands executed in the session-shell channel of SSH connections, or in Telnet connections.
Caution: During indexing, if a separate certificate is used to encrypt the upstream traffic, command detection works only if the upstream key is accessible on the machine running the indexer.
NOTE: Command detection is case-insensitive.
-
Screen content: Every text that appears on the screen. For example, every text that is displayed in the terminal of SSH or Telnet connections. This includes the executed commands as well, unless echoing is turned off for the terminal.
-
Credit card: Process every text that appears on the screen and attempt to detect credit card numbers in SSH or Telnet connections. One Identity Safeguard for Privileged Sessions (SPS) performs an action if the number of detected credit card numbers exceeds the value set as Permitted number of credit card numbers.
Credit card number detection is based on the Luhn algorithm and lists of known credit card number prefixes.
-
Window title detection: Text appearing as window titles in case of RDP, Citrix ICA, and VNC connections. Note the following points.
Supported themes
-
Windows Classic at 96 and 120 DPI
-
Windows 2012 at 96 and 120 DPI (metro)
-
Windows 7 Normal at 96 and 120 DPI (not aero)
-
Windows 8 at 96 and 120 DPI (metro)
Limitations
-
Windows 10, Windows 2016 Server, and Windows 2019 Server themes are not supported
-
Windows Aero themes are not supported.
-
Windows that do not have an X (close window) button in the top-right corner (or it is not visible) are not detected.
-
Use window title detection for sessions that use a single monitor. The feature works in multi-monitor environments as well, but becomes very slow, therefore it is not recommended.
The configuration JSON file contains the most common window title color schemes.
NOTE: Window title detection is case-insensitive.
NOTE: Do not adjust or modify the following settings unless you know exactly what you are doing. Misconfiguring them will severely decrease the performance of SPS.
-
If a special color is used, open /opt/scb/etc/window-title-default on the server, and add the color scheme in RGB. In case of a single color, enter "to": null. After adding a new color, temporarily disable all traffic going through SPS. Navigate to Basic Settings > System > Traffic control and click Stop in the All services field. Login to SPS as root locally (or remotely using SSH) to access the Console menu. Select Shells > Core Shell, and issue the systemctl restart zorp-core.service command.
-
The minimum and maximum height and the minimum width of the window title are determined in pixels, as "minheight", "maxheight" and "minwidth".
-
-
Pointing device biometrics: Select this option only for graphical protocols, and only if you are also using One Identity Safeguard for Privileged Analytics (SPA). SPA can analyze mouse movement patterns of your users as a biometric identity verification method to protect against account theft. For details, see the One Identity Safeguard for Privileged Analytics website.
-
Typing biometrics: Select this option only for terminal-based protocols, and only if you are also using One Identity Safeguard for Privileged Analytics (SPA). SPA can analyze the typing patterns of your users as a biometric identity verification method to protect against account theft. For details, see the One Identity Safeguard for Privileged Analytics website.
-
-
Select Take action if the event contains any of the following strings or expressions, click
-
Use Perl Compatible Regular Expressions (PCRE).
-
The following characters must be escaped using a backslash character: '(single-quote). For example, instead of .*' use .*\'
-
SPS uses substring search to find the expression in the content. That is, SPS finds the expression even if there is more content before or after the matching part. For example, the conf pattern will match the following texts: conf, configure, reconfigure, arcconf, and so on.
-
Using complicated regular expressions or using many regular expressions will affect the performance of SPS.
-
If the multiple expressions are set, SPS processes them one after the other, and stops processing the content if the first match is found, even if other expressions would also match the content. Therefore, when using multiple expressions, start with the most specific one, and add general expressions afterward.
Example: Sample regular expressions for content policies
The following simple regular expressions are samples to demonstrate what kinds of events that can be detected using content policies.
-
The enable command on Cisco devices: the user enters privileges mode.
-
The conf term command on Cisco devices: the user configures the networking parameters of the device.
-
The sudo and su - commands: the user enters privileged mode Linux and other UNIX platforms.
-
-
To add an exception to the Take action if the event contains any of the following strings or expressions rule, select Except if it also contains any of these strings or expressions, click
Example: Sample content policies using Ignore rules
The following expressions can be used to perform an action if any SQL command is used in MySQL, except for the select and help commands:
-
Into the Take action if the event contains any of the following strings or expressions expression, enter mysql>.*
-
Add two Except if it also contains any of these strings or Except if it also contains any of these strings or Except if it also contains any of these strings or expressions expressions: mysql> select.* and mysql> help.*
-
-
Select the action to perform.
-
Log: Send a log message into the system logs. The log message includes the expression that matched the content. On log level 6, the message includes the matching content as well.
-
Terminate connection: Immediately terminate the connection. When using the Terminate connection action for the Command event type, and a command matches an expression, the connection is terminated before the command is executed. When using the Terminate connection action, note the following points.
-
Select the Log or Notify action as well so that it is easy to find out why a connection was terminated.
-
If the connection is terminated by a content policy, the Verdict of the connection becomes ACCEPT-TERMINATED.
-
-
Notify: Send an e-mail or SNMP alert about the event. To configure the alerts, navigate to Basic Settings > Alerting & Monitoring and set the required alerts for the Real time audit event detected (scbAuditRealTime) event.
-
Store in connection database: Add the event to the SPS connection database. These events are displayed in the Alerts column of the Search page. If the column is not visible, click Customize columns....
-
-
To apply the content policy only for users belonging to specific groups, select Apply this policy only to members of these gateway groups or Apply this policy only to members of these remote groups,
-
To add a new rule to the policy, click
Note that if you have more than one rules in a policy, SPS evaluates them as follows.
-
SPS evaluates the first (top) rule.
-
If the rule contains Apply this policy only to members of these gateway groups or Apply this policy only to members of these remote groups restrictions, SPS checks if the current user belongs to any of the specified groups. If the groups do not match, SPS skips the rule.
-
If the content matches any entry of the Except if it also contains any of these strings or expressions list, SPS skips the rule.
-
If the content matches any entry of the Take action if the event contains any of the following strings or expressions list, SPS performs the action configured for the rule. Otherwise, SPS skips the rule.
-
If the current rule did not match the content, SPS evaluates the next rule of the policy (if any).
-
-
Click
. A new content policy is created.
-
To use the content policy created in the previous steps, select the policy in the channel policy that is used to control the connections.
NOTE: It is not required to enable auditing to use content policies.

Configuring time policies
The time policy determines the timeframe when the users are permitted to access a particular channel. By default, there is no time-based restriction, all channels are available 7x24.
Figure 144: Policies > Time Policies — Configuring time policies
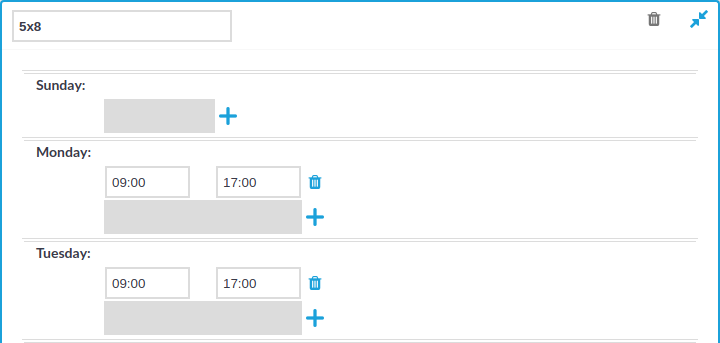
To create a time policy or edit an existing one
-
Navigate to the Time Policies tab of the Policies menu item and click
-
Click
to display the days of the week and the allowed intervals.
-
Enter the intervals for each day when the users are allowed to access the connection. Use the hh:mm format (for example from 08:00 to 16:00).
-
To add multiple intervals for a day, click
-
Click
-
To actually restrict access to a connection or a channel based on the policy created in the previous steps:
-
Select this policy in the Time Policy field of the channel policy.
-
Click
-
Creating and editing user lists
User lists are white- or blacklists of usernames that allow fine-control over who can access a connection or a channel.
|
|
Caution:
User Lists are white- or blacklists of usernames that determine who can access the server remotely. However, this cannot prevent a user from accessing the server from a local terminal. |
Figure 145: Policies > User Lists — Configuring user lists
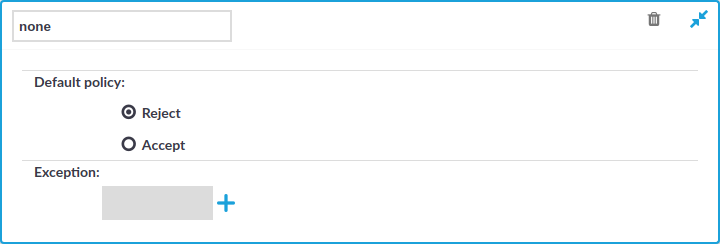
To create a new user list or edit an existing one
-
Navigate to the User Lists tab of the Policies menu and click
Caution: Usernames, the names of user lists, and the names of usergroups are case sensitive.
-
Click
-
Select the default policy of the user list. Select Reject for a whitelist, that is, to allow access only to the members of the list. Select Accept for a blacklist, that is, to allow access to everyone except the members of the list.
-
Click
and enter a username into the displayed field. Repeat this step until all required usernames are listed.
Caution: Usernames, the names of user lists, and the names of usergroups are case sensitive.
-
Click
-
To actually restrict access to a channel based on the user list created in the previous steps:
-
Navigate to the Channel Policies tab of the type of connection you want to control and click
-
Click
Caution: Usernames, the names of user lists, and the names of usergroups are case sensitive.
NOTE: When listing more groups, users of any of the listed groups can access the channel. For details, see Creating and editing channel policies.
When listing both a whitelist and blacklist in the Group section and a username appears on both lists, the user will be able to access the channel.
-
Click
-
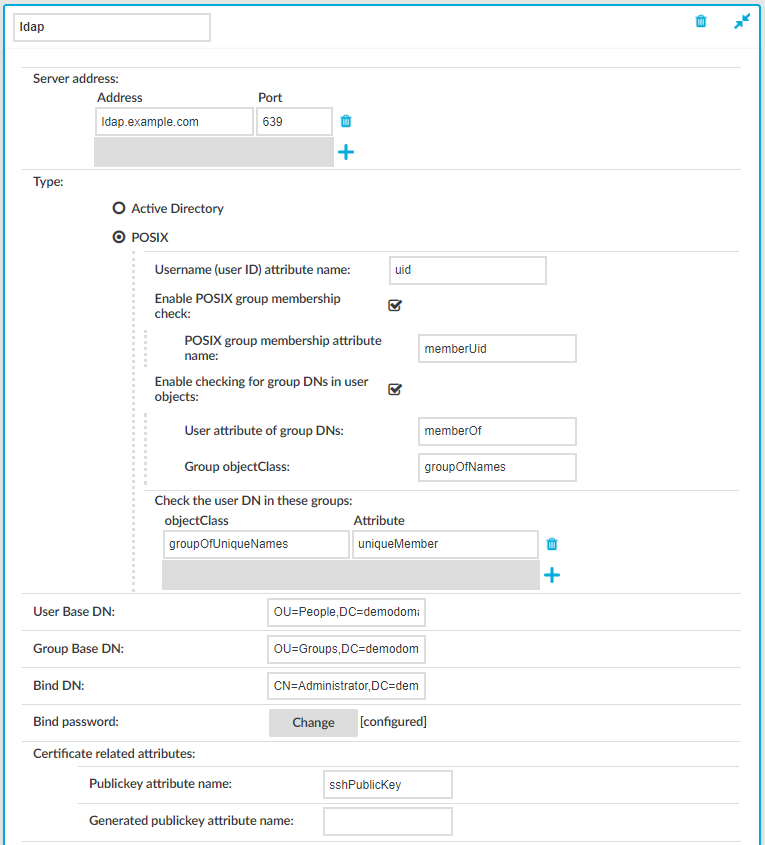
Authenticating users to an LDAP server
You can use the LDAP policy to set the details of the LDAP server you wish to use to:
- authenticate gateway users (available in SSH and Telnet as Authentication Policy)
- query gateway groups (available for RDP, Telnet, SSH, and ICA)
- query remote groups (available for RDP, Telnet, SSH, ICA, and HTTP)
|
|
NOTE: This feature is not available for Virtual Network Computing (VNC). |
To configure an LDAP policy for a connection
-
Navigate to Policies > LDAP Servers and click
Figure 146: Policies > LDAP Servers — Configuring LDAP Server policies
-
Enter a name for the policy (for example ldapservers).
-
Enter the IP address or hostname and port of the LDAP server into the Server Address field. If you want to encrypt the communication between SPS and the LDAP server, in case of TLS, enter 636 as the port number, or in case of STARTTLS, enter 389 as the port number.
Use an IPv4 address.
To add multiple servers, click and enter the address of the next server. If a server is unreachable, SPS will try to connect to the next server in the list in failover fashion.
Caution: If you will use a TLS-encrypted with certificate verification to connect to the LDAP server, use the full domain name (for example ldap.example.com) in the Server Address field, otherwise the certificate verification might fail. The name of the LDAP server must appear in the Common Name of the certificate.
-
Select the type of your LDAP server in the Type field. Select:
-
Active Directory to connect to Microsoft Active Directory servers.
You can enable nested groups. Select Enable AD group membership check, then Enable nested groups.
Caution: Nested groups can slow down the query and cause the connection to timeout if the LDAP tree is very large. In this case, disable the Enable nested groups option.
To also check group membership based on group DNs in a user attribute, select Enable checking for group DNs in user objects and enter the name of the user attribute, for example, memberOf in the User attribute of group DNs field.
Caution: Using this option significantly slows down log on to the SPS web interface if you have too many groups.
Only use this option if you have an LDAP schema where the user groups can only be determined from a user attribute that contains the group DNs.
To check for group membership based on user DNs in group attributes, use the Check the user DN in these groups options.
For more information, see Active Directory LDAP backend.
-
POSIX to connect to servers that use the POSIX LDAP scheme.
If your LDAP server uses a custom POSIX LDAP scheme, you might need to set which LDAP attributes store the username, or the attributes that set group memberships. For example, if your LDAP scheme does not use the uid attribute to store the usernames, set the Username (user ID) attribute name option.
In addition to the primary group membership checking, you can allow checking for supplementary group memberships by selecting the Enable POSIX group membership check and specifying the POSIX group membership attribute name field.
To also check group membership based on group DNs in a user attribute, select Enable checking for group DNs in user objects and enter the name of the user attribute, for example, memberOf in the User attribute of group DNs field and objectClass, for example, groupOfNames in the Group objectClass field.
Caution: Using this option significantly slows down log on to the SPS web interface if you have too many groups.
Only use this option if you have an LDAP schema where the user groups can only be determined from a user attribute that contains the group DNs.
To check for group membership based on user DNs in group attributes, use the Check the user DN in these groups options.
For more information, see POSIX LDAP backend.
For an overview about LDAP user and group resolution in SPS, see Overview.
-
-
In the User Base DN field, enter the name of the DN to be used as the base of queries regarding users (for example: OU=People,DC=demodomain,DC=exampleinc).
NOTE: You must fill in this field. It is OK to use the same value for User Base DN and Group Base DN.
However, note that specifying a sufficiently narrow base for the LDAP subtrees where users and groups are stored can speed up LDAP operations.
-
In the Group Base DN field, enter the name of the DN to be used as the base of queries regarding groups (for example: OU=Groups,DC=demodomain,DC=exampleinc).
NOTE: You must fill in this field. It is OK to use the same value for User Base DN and Group Base DN.
However, note that specifying a sufficiently narrow base for the LDAP subtrees where users and groups are stored can speed up LDAP operations.
-
In the Bind DN field, enter the Distinguished Name that SPS should use to bind to the LDAP directory (for example: CN=Administrator,DC=demodomain,DC=exampleinc).
NOTE: SPS accepts both pre-win2000-style and Win2003-style account names (User Principal Names), for example administrator@example.com is also accepted.
-
To configure or change the password to use when binding to the LDAP server, click Change and enter the password. Click Update. Click .
NOTE: One Identity Safeguard for Privileged Sessions (SPS) accepts passwords that are not longer than 150 characters. The following special characters can be used: !"#$%&'()*+,-./:;<=>?@[\]^-`{|}
-
Skip this step if you use passwords to authenticate the users.
-
If you use public-key authentication and receive the public key of the users from the LDAP database, enter the name of the LDAP attribute that stores the public keys of the users into the Publickey attribute name field. For details on using public-key authentication with the LDAP database, see Configuring public-key authentication on One Identity Safeguard for Privileged Sessions (SPS).
-
If you use X.509 certificate for authentication and receive the certificates of the users from the LDAP database, enter the name of the LDAP attribute that stores the certificates of the users into the Certificate attribute name field.
-
-
Skip this step if you use passwords to authenticate the users.
-
If you use public-key authentication and want SPS to generate server-side encryption keys on-the-fly and store them in a separate attribute on the LDAP server, enter the name of the attribute into the Generated publickey attribute name field.
-
If you use certificate authentication and want SPS to generate server-side certificates on-the-fly and store them in a separate attribute on the LDAP server, enter the name of the attribute into the Generated certificate attribute name field.
-
-
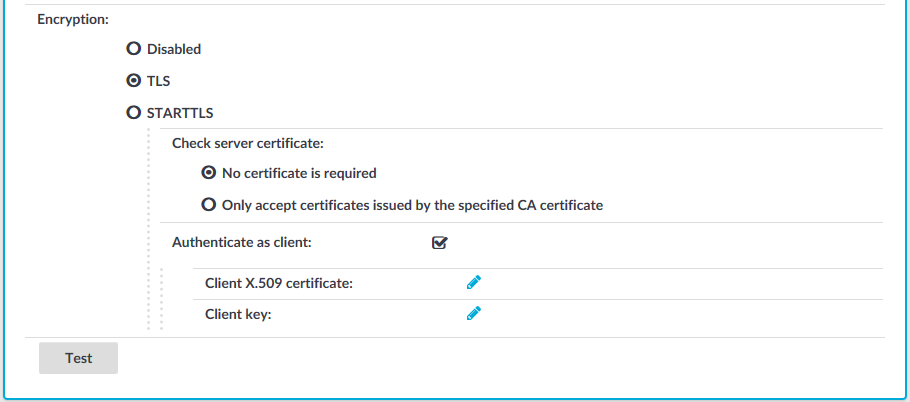
If you want to encrypt the communication between SPS and the LDAP server, in Encryption, select the TLS or the STARTTLS option and complete the following steps:
Figure 147: Policies > LDAP Servers — Configuring encryption
NOTE: TLS-encrypted connection to Microsoft Active Directory is supported only on Windows 2003 Server and newer platforms. Windows 2000 Server is not supported.
-
If you want SPS to verify the certificate of the server, select Only accept certificates issued by the specified CA certificate and click the icon in the CA X.509 certificate field. A pop-up window is displayed.
Click Browse, select the certificate of the Certificate Authority (CA) that issued the certificate of the LDAP server, then click Upload. Alternatively, you can paste the certificate into the Copy-paste field and click Set.
SPS will use this CA certificate to verify the certificate of the server, and reject the connections if the verification fails.
Caution: If you will use a TLS-encrypted with certificate verification to connect to the LDAP server, use the full domain name (for example ldap.example.com) in the Server Address field, otherwise the certificate verification might fail. The name of the LDAP server must appear in the Common Name of the certificate.
-
If the LDAP server requires mutual authentication, that is, it expects a certificate from SPS, enable Authenticate as client. Generate and sign a certificate for SPS, then click in the Client X.509 certificate field to upload the certificate. After that, click in the Client key field and upload the private key corresponding to the certificate.
One Identity recommends using 2048-bit RSA keys (or stronger).
-
-
To commit the changes, click
-
Click Test to test the connection.
NOTE: Testing TLS and STARTTLS-encrypted connections is not supported.