
Using One Identity Safeguard for Privileged Sessions (SPS) as a Remote Desktop Gateway
Remote Desktop Gateway is a Remote Desktop Services server role. This role allows authorized remote users to connect to resources located on an internal or private network from any Internet-connected device. The accessible resources can be terminal servers, remote applications, remote desktops, and so on.
The Remote Desktop Gateway Server Protocol is a remote procedure call (RPC) protocol using HTTPS as the transport mechanism, used primarily for tunneling client to server traffic across firewalls. The One Identity Safeguard for Privileged Sessions (SPS) can act as a Remote Desktop Gateway, receiving connections using the Remote Desktop Gateway Server Protocol and transferring them to the target servers using the RDP protocol.
The Remote Desktop Gateway Server Protocol enables inband destination selection, meaning that SPS can extract the address of the target server from the client connections. This greatly simplifies managing connections on SPS without having to encode the name of the target server in the username, which was problematic as the length of the username is limited on many platforms — especially in non-transparent mode.
Prerequisites
-
To access remote servers using a Remote Desktop Gateway, the clients must use version 6.1 or newer of the Remote Desktop application. Note that officially only version 6.0 is available for the Windows 2003 Server operating system, though it is possible to install a newer version. However, this is a problem only when initiating RDP connections from the Windows 2003 Server host, not when the Windows 2003 Server is the target of the connection.
-
SPS must be a member of a Windows Domain (for details on joining a domain, see Network Level Authentication (NLA) with domain membership), or you must use a Local User Database (for details, see Creating a Local User Database).
-
Ensure that the system times of the Domain Controller, the target servers, the clients, and SPS are synchronized.
-
Gateway authentication on the SPS web interface cannot be used for connection policies that use SPS as a Remote Desktop Gateway. However, the Remote Desktop applications of the clients can be configured to perform two separate authentications, one on the Remote Desktop Gateway (that is, on SPS), and one on the target server. For details on configuring the Remote Desktop applications of the clients to perform gateway authentications, see Configuring Remote Desktop clients for gateway authentication.
-
The Remote Desktop Gateway Server Protocol supports various authentication methods. SPS acting as a Remote Desktop Gateway supports only NTLM authentication.
-
SPS can be used as a Remote Desktop Gateway. The terminal service clients must be configured to use SPS as the Remote Desktop Gateway. SPS will connect the server (selected inband) after authentication.
-
Remote Desktop Gateway will require a certificate. Decide whether you want to use a fix certificate, or an on-the-fly generated certificate before performing the steps below and prepare the certificate.
-
You may also need to adjust the port settings of the connections. The default port for RDP connections is 3389, but the Remote Desktop Gateway Server Protocol uses port 443. However, the SPS web interface uses port 443 as well, and other connection policies might already use port 443. Therefore, if administrator or user login is enabled on the interface that receives the Remote Desktop Services connections, add a new alias IP address to the interface of SPS and use this alias in your connection policy and the client configurations. For details on creating IP aliases on SPS, see Managing logical interfaces.
To use SPS as a Remote Desktop Gateway
-
Navigate to RDP Control > Connections and create a new connection policy that will handle the incoming client connections that use the Remote Desktop Gateway Server Protocol.
-
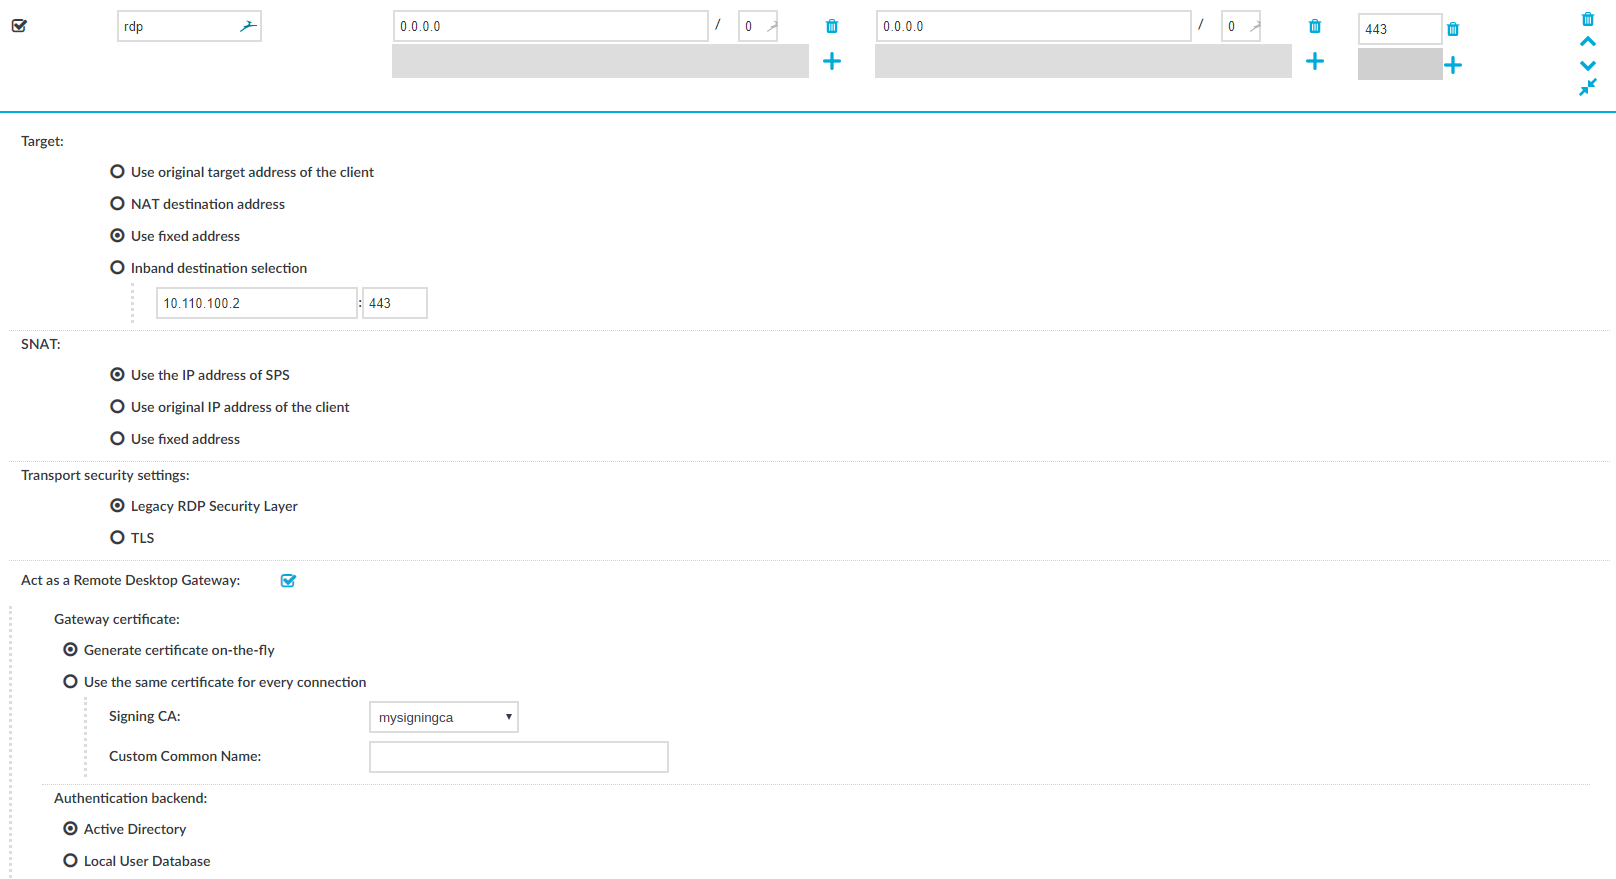
Enable the Act as a Remote Desktop Gateway option.
Figure 179: RDP Control > Connections — Configuring SPS as a Remote Desktop Gateway (or RD Gateway)
-
Set the target of the connections.
-
To direct every incoming connection to a single target server, select Use fixed address and specify the address of the target server.
-
To extract the destination address from the Remote Desktop Gateway Server Protocol, select Inband destination selection and set the address of the servers the clients are allowed to access in the Target > Domain fields. For details on using inband destination selection, see Modifying the destination address.
NOTE: In non-transparent mode, enter the IP address generated for the Remote Desktop Gateway service into the To field. Do not enter the IP address configured for administrator or user login.
-
-
To act as a Remote Desktop Gateway, SPS needs to display a certificate to the clients.
-
To display always the same certificate, select Use the same certificate for every connection and upload the X.509 certificate and the matching private key.
One Identity recommends using 2048-bit RSA keys (or stronger).
Caution: The Common Name (CN) of the certificate must be the FQDN of SPS, which is the address of the Remote Desktop Gateway specified in the client applications. Otherwise the clients will reject the connections.
-
To automatically create new certificates on SPS for every client, select Generate certificate on-the-fly, then select the Certificate Authority (CA) to sign the generated certificates with from the Signing CA field. For details on creating a signing CA, see Signing certificates on-the-fly.
By default, the Common Name (CN) of the generated certificate is <SPS-hostname.domainname>. You can set a custom Common Name in the Custom Common Name field.
NOTE: Save the CA certificate used to sign the certificate that SPS shows into DER format and import it to the clients into the Local Computer > Trusted Root Certificate store of the clients so that the clients can verify the identity of SPS.
-
-
Under Authentication backend:
-
To use Active Directory for authentication, select Active Directory.
-
To use a Local User Database for authentication, select Local User Database, enter the Domain, and select the Local User Database from the list.
-
-
Configure other parameters of the connection policy as needed for your environment.
-
Click
.


Configuring Remote Desktop clients for gateway authentication
To configure the Remote Desktop applications of the clients to perform two separate authentications. One of these authentications is on the Remote Desktop Gateway, that is, on One Identity Safeguard for Privileged Sessions (SPS). The other authentication is on the target server. For details on configuring SPS to act as a Remote Desktop Gateway (or RD Gateway), see Using One Identity Safeguard for Privileged Sessions (SPS) as a Remote Desktop Gateway.
Prerequisites
-
SPS must be configured to act as a Remote Desktop Gateway. For details, see Using One Identity Safeguard for Privileged Sessions (SPS) as a Remote Desktop Gateway.
-
The client must use version 6.1 or newer of the Remote Desktop application.
-
The target server must be member of a domain.
-
The logical interface of SPS must be accessible from the client. You might have to add the address of the logical interface to the Windows/System32/Drivers/etc/hosts file to accomplish this.
To configure Remote Desktop clients for gateway authentication
-
On your Windows client, start the Remote Desktop Connection application and select Advanced > Settings.
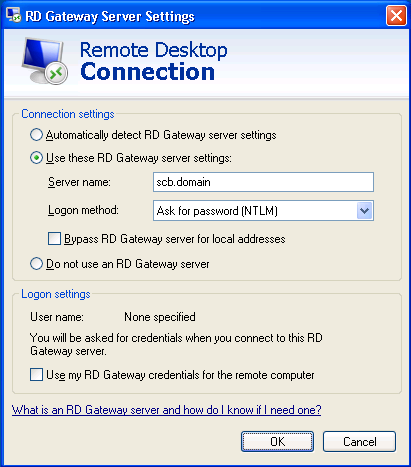
Figure 180: Configuring Remote Desktop clients to use SPS as a Remote Desktop Gateway (or RD Gateway)
-
Configure the client to use SPS as its Remote Desktop Gateway. Select Connection settings > Use these RD Gateway settings.
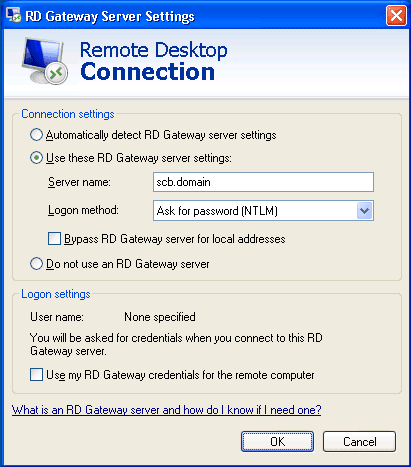
Figure 181: Configuring Remote Desktop clients to use SPS as a Remote Desktop Gateway (or RD Gateway)
-
Enter the address of SPS into the Server name field. Use the address of the SPS's logical interface that you have configured to accept RDP connections.
-
Select Logon method > Ask for password (NTLM).
-
Uncheck the Bypass RD Gateway server for local addresses and Use my RD Gateway credentials for the remote computer options.
NOTE: Technically, gateway authentication is performed even if the Use my RD Gateway credentials for the remote computer option is selected, but the same credentials are used on the gateway and on the remote server.
-
Click OK.
-
Into the Username enter the domain username (for example, exampledomain\exampleusername).
-
Click Connect.
NOTE: Depending on your network environment, it might take up to a minute until the connection is established.
Inband destination selection in RDP connections
To use inband destination selection with RDP connections, it is recommended to use One Identity Safeguard for Privileged Sessions (SPS) as a Remote Desktop Gateway (or RD Gateway). For details, see Using One Identity Safeguard for Privileged Sessions (SPS) as a Remote Desktop Gateway.
To use inband destination selection with RDP connections without using One Identity Safeguard for Privileged Sessions (SPS) as a Remote Desktop Gateway (or RD Gateway), you must use SSL-encrypted RDP connections (see Enabling TLS-encryption for RDP connections).
Configure your RDP clients so SPS can record the username of client uses in the connection. If you do not configure these settings on the clients, SPS will automatically display a login screen for the users to enter their usernames and passwords. Note that although SPS automatically displays a login screen if it cannot determine the username used in the connection, currently you cannot specify the destination address in this login screen, only in your RDP client application.
-
On Windows Vista SP1 and newer platforms (Remote Desktop Protocol 6.1 or newer):
Navigate to Local Group Policy Editor > Computer Configuration > Administrative Templates > Windows Components > Remote Desktop Services > Remote Desktop Connection Client and enable the Prompt for credentials on the client computer option in the clients. For details, see the Microsoft Documentation.
-
On Windows Vista and older platforms (Remote Desktop Protocol 6.0 or older):
Configure your RDP clients to save the credentials, or make sure that the Allow me to save credentials option is selected in the RDP client.
Also, your users have the option to encode the address of the destination server in their username, in the username field of their client application. Note that SPS automatically displays a login screen if it cannot determine the username used in the connection, or you have not encoded a destination server in the username field. You can specify the destination address in the login screen when prompted.
When encoding the address of the destination server in the username, there are a few points to keep in mind. Since most RDP client applications limit which special characters can be used in usernames, this is not always intuitive. For the Microsoft Remote Desktop application (mstsc) and the login screen that SPS displays, note the following points:
-
Use % character to separate the fields, for example: username%my-targetserver
-
To specify the port number of the server (if it does not use the default port), use the caret ^ character, for example: username%my-targetserver^6464
-
To specify an IPv6 address, replace the colons with carets, and enclose the address in parentheses. For example, to target the ::1 IP address, use username%(^^1). To target port 6464 of the same server, use username%(^^1)^6464.
Usernames in RDP connections
When processing RDP connections, One Identity Safeguard for Privileged Sessions (SPS) attempts to extract the username from the connection. For example, you need the username to:
-
Use gateway authentication for the connection. For details on gateway authentication, see "Configuring gateway authentication" in the Administration Guide.
-
Use usermapping policies. In this case, SPS compares the username on the server with the username on the gateway. For details on usermapping policies and gateway authentication, see "Configuring usermapping policies" in the Administration Guide and "Configuring gateway authentication" in the Administration Guide, respectively.
NOTE: In certain cases, SPS receives an empty username from the server, and the connection will be denied by the usermapping policy unless a policy is set for the connection that allows every user for the given group. To add such a policy, specify * in the Username on the server field of the usermapping policy. For a list of cases when SPS receives empty username, see Windows settings that interfere with username extraction.
-
Search or filter connections by the username on the SPS search interface, or create automatic statistics based on the username.
-
Find the connection of the user on the Four Eyes and Active Connections pages.
-
Usernames are also essential if you want to use One Identity Safeguard for Privileged Analytics. If you are interested in One Identity Safeguard for Privileged Analytics, contact our Sales Team, or your One Identity representative.
SPS can record the username automatically if the RDP connection is using Network Level Authentication (CredSSP), and usually in other scenarios as well. If SPS cannot automatically extract the username, it displays the following login screen to the user (note that SPS can display this login screen only in TLS-encrypted connections).
The known scenarios that interfere with RDP usernames are listed in Windows settings that interfere with username extraction.
Figure 182: Server-side login in RDP
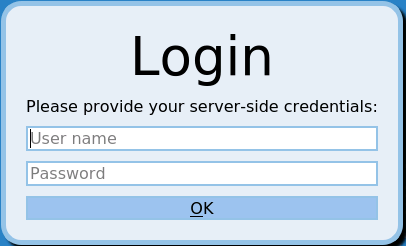
To ensure that your users can access the target servers only when their username is recorded, you can configure SPS to terminate RDP connections if it cannot reliably extract the username. To terminate such connections, clear the RDP Control > Settings > Permit unreliable usernames option.
Windows settings that interfere with username extraction
The following settings on the Windows client or server can prevent SPS from correctly extracting the username from the RDP connection. As a result, the username is not visible on the Search, Four Eyes and Active Connections pages.
-
The DontDisplayLastUserName option is enabled on the server. The DontDisplayLastUserName security setting of Windows servers specifies whether the username from the last successful login is displayed on the login screen as a default for the next login. To disable the DontDisplayLastUserName security setting, do one of the following.
-
Disable the HKLM\Software\Microsoft\Windows\CurrentVersion\Policies\System\DontDisplayLastUsername registry setting. For more details, see the DontDisplayLastUserName TechNet article.
NOTE: Registry settings can be overridden by Group Policy settings.
-
Disable this option in the Computer Configuration\Windows Settings\Security Settings\Local Policies\Security Options policy. For details, see Do not display last user name in logon screen TechNet article.
-
-
There is no server-side authentication. To avoid this problem, ensure that your server requires authentication from the users.
-
If the server is Windows 2003 Server or Windows XP and the Allow to save credentials or Remember my credentials options are enabled in the Remote Desktop client application. In this case, disable these options on the client, and delete any credentials that have already been saved on the client.