Using One Identity Safeguard for Privileged Sessions (SPS) across multiple domains
If your users are in a domain (EXAMPLE-DOMAIN), One Identity Safeguard for Privileged Sessions (SPS) is also in that domain (EXAMPLE-DOMAIN), but your users need to access servers that are in a different domain (OTHER-DOMAIN), you must establish a level of trust between the domains. This is summarized in the following table.
| Domain username of the client | Domain of the target server | Result |
|---|---|---|
| EXAMPLE-DOMAIN\myusername | EXAMPLE-DOMAIN | Connection is established |
| EXAMPLE-DOMAIN\myusername | OTHER-DOMAIN | If OTHER-DOMAIN trusts EXAMPLE-DOMAIN, the connection is established |
| OTHER-DOMAIN\myusername | OTHER-DOMAIN | If two-way trust is established between OTHER-DOMAIN and EXAMPLE-DOMAIN, the connection is established |
| OTHER-DOMAIN\myusername | EXAMPLE-DOMAIN | If two-way trust is established between OTHER-DOMAIN and EXAMPLE-DOMAIN, the connection is established |
|
|
NOTE:
If you use an LDAP database when using SPS accross multiple domains, LDAP will only use the username without the domain name to verify the group membership. |

Network Level Authentication without domain membership
There are scenarios when you want to use One Identity Safeguard for Privileged Sessions (SPS) to monitor RDP access to servers that accept only Network Level Authentication (NLA, also called CredSSP), but the client, SPS, and the server are not in the same domain (there is no trust between their domains), or any of them is not in a domain at all. For example, you cannot add SPS to the domain for some reason, or the RDP server is a standalone server that is not part of a domain. The following table shows such a scenario.
| User | Client domain membership | SPS domain membership | Server domain membership |
| local or any domain | any domain | not a domain member, or other than <server-domain> | <server-domain> |
Limitations
-
Server-side redirection may not work.
To use NLA without domain membership
-
Navigate to RDP Control > Settings, and select the RDP settings policy that you use in your connection policies.
-
Clear the Enable Network Level Authentication > Require domain membership option.
-
Click
.
Verifying the certificate of the RDP server in encrypted connections
By default, One Identity Safeguard for Privileged Sessions (SPS) accepts any certificate shown by the server. The following describes how to accept only verified certificates.
To accept only verified certificates
-
Create a list of trusted CA certificates that will be used to verify the certificate of the server. For details, see Verifying certificates with Certificate Authorities.
-
Navigate to RDP Control > Connections and select the connection policy to modify.
-
Select Verify server certificate.
NOTE: This setting has no effect if the session uses Network Level Authentication, because in such cases SPS uses a different method to validate the server certificate.
When using Network Level Authentication (NLA, also called CredSSP), there is no verification performed in the TLS layer due to the TLS session-binding. For more information on TLS session-binding, see section [MS-CSSP]: Credential Security Support Provider (CredSSP) Protocol in the Microsoft documentation.
Figure 177: RDP Control > Connections — Using SSL-encryption in RDP connections
-
Select the CA list to use for verifying the certificate of the server from the Trusted CA list field.
-
Click
-
(Optional) Configure your Windows servers to display a certificate signed with the above Certificate Authority for incoming RDP connections. To accomplish this, complete the following steps:
-
Generate a certificate that contains the IP address or the hostname of the target server in its Common Name (CN) field and sign it with the Certificate Authority whose certificate you added to the Trusted CA list of SPS.
-
Convert the signed certificate of the target server to PKCS12 format that includes the private key.
-
Start the Microsoft Management Console (MMC) on the target server and select Add Snap-in > Certificates > Computer Account.
-
Right-click the Personal store, then select All Tasks > Import, and select the certificate created for the server.
-
Complete the Certificate Import Wizard, but do not select the Extended certificate properties option.
-
Select Start > Administrative tools > Remote Desktop > Remote Desktop Session Host Configuration.
-
Right-click the connection you want to configure and select Properties > General.
-
Set the Security layer to SSL.
-
Click Certificate > Select and select the imported certificate. The server will use this certificate to verify its identity for the incoming RDP connections.
-

Enabling TLS-encryption for RDP connections
To enable TLS-encryption in an RDP connection policy, you have two options:
-
Enable Network Level Authentication (NLA, also called CredSSP). To enable NLA in RDP connections, see Network Level Authentication (NLA) with One Identity Safeguard for Privileged Sessions (SPS). Note that Network Level Authentication uses SSL-encryption with self-signed certificates, so you do not have to configure a signing CA.
-
Complete the following steps to configure TLS-encryption.
Prerequisites
Depending on your requirements, one or more of the following might be needed:
-
To use the same certificate for each session, an X.509 certificate and its private key are required. One Identity Safeguard for Privileged Sessions (SPS) can display this certificate to the peers on the client side. Use your own PKI system to generate these certificates, as they cannot be created on SPS. Note that the Common Name of the certificate must contain the domain name or the IP address of target machine. otherwise the clients might reject the certificate.
-
To generate certificates on-the-fly for a connection, a signing certificate authority is required. For details on creating a signing CA, see Signing certificates on-the-fly.
One Identity recommends using 2048-bit RSA keys (or stronger).
To configure TLS-encryption
-
Navigate to RDP Control > Connections and select the connection policy in which you want to enable TLS.
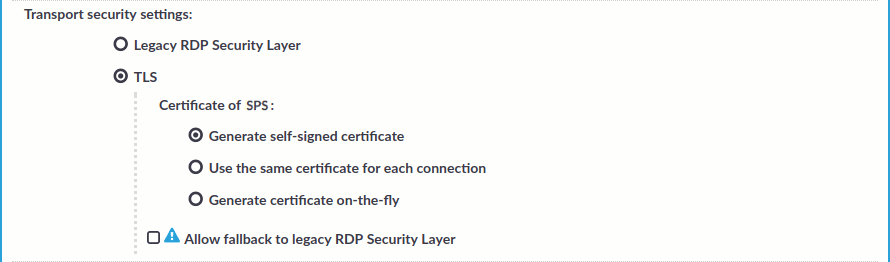
Figure 178: RDP Control > Connections — Enabling TLS-encryption for RDP connections
-
Set the encryption settings used between the client/server and SPS in the Transport security settings section.
To require encryption, select TLS. When the connection is encrypted, SPS has to show a certificate to the peer.
-
Select the certificate to show to the peers.
-
If you want to enable TLS-encryption, but you do not have a certificate that is generated by an external CA, or a signing CA, select Generate self-signed certificate. This option is selected by default.
-
To use the same certificate for every peer, complete the following steps.
-
Generate and sign a certificate for SPS in your PKI system, and export the certificate and its private key.
-
Select Use the same certificate for each connection.
-
Select Private key for host certificate, click
and upload the private key.
-
Select X.509 host certificate, click
-
-
If you want to use your own Signing CA, complete the following steps.
-
Create a certificate authority that will be used to sign the certificates that SPS shows to the peer. For details, see Signing certificates on-the-fly.
-
Select Generate certificate on-the-fly.
-
In the Signing CA field, select the certificate authority to use.
NOTE: Import the certificate of the signing Certificate Authority to your clients. Otherwise, the client applications will display a warning because of the unknown Certificate Authority.
-
-
To disable TLS-encryption for RDP connections completely, select Legacy RDP Security Layer (also known as: Standard RDP Security). You might want to do this if you were using legacy RDP encryption, and you are experiencing compatibility issues. For example, you might experience compatibility issue when you attempt to connect to a very old Windows machine (for example, Windows Server 2003 or older).
-
-
(Optional) Even if you choose TLS-encryption , you have the option to choose using legacy RDP encryption as well. If you experience compatibility issues (for example, when you attempt to connect to a very old Windows machine, such as Windows Server 2003 or older) and want to allow using legacy RDP encryption if TLS-encryption is not possible, select Allow fallback to legacy RDP Security Layer (also known as: Standard RDP Security).
Caution: Security Hazard! Selecting the Legacy RDP Security Layer or the Allow fallback to legacy RDP Security Layer options can significantly reduce the strength of the encryption used.
Selecting these options is only recommended if you cannot overcome compatibility issues in any other way.
To avoid security hazard, we recommend using TLS encryption.
-
Click
Expected result
The encryption settings are applied to the connection policy.