
Connection details
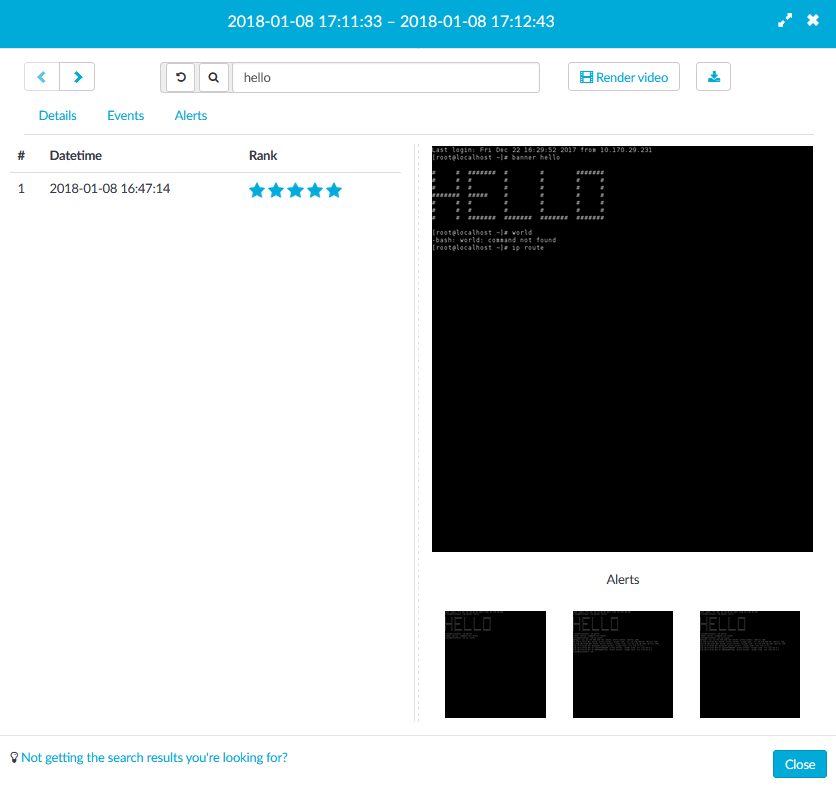
The Details pop-up window provides in-depth information on each of the indexed audit trails stored in the connection database. You can use it to gain contextual insight about the indexed session and its events.
The pop-up window consists of two main parts: the header and the trail details. In the header, you can:
-
Move to the previous / next trail listed on the Search page with the
and
buttons.
-
Search the current trail. Search is performed on the displayed audit trail only. When you move between trails, search is reset to the query you used on the Search page (if you entered one). You can also revert to that query using the
button. For details on using search expressions, see Using the content search.
-
Export / follow the trail. Click the
button to export the trail, or the
button to follow an ongoing connection. The trail data is exported in .srs format, which you can open with the Safeguard Desktop Player application.
Figure 309: Audit trail details
Trail details
The details section is organized into tabs (left) and screenshots (right). The Details tab is always visible. The All results, Events, and Alerts tabs are displayed dynamically, when there is matching content in the trail.
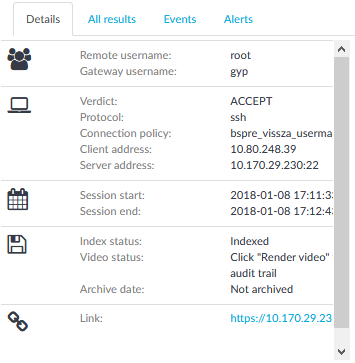
Details tab: Quick summary of the connection details (user, server, time).
-
User information: remote and gateway username. The gateway username corresponds with the Username field of the connection metadata database, so note the following:
-
If the user performed inband gateway authentication in the connection, the field contains the username from the gateway authentication (gateway username).
-
Otherwise, the field contains the username used on the remote server.
-
-
Connection information: connection verdict, protocol, connection policy, client and server address.
-
Session time: start and end time of the connection.
-
Trail information: is the trail indexed, or archived.
-
Link: a link that leads to the Search page filtered to show only this connection. Note that if you share this link, other users can access the audit trail only if they have the required privileges, and can access One Identity Safeguard for Privileged Sessions (SPS) using the IP address in the link (SPS can be configured to be accessible using multiple IP addresses).
Figure 310: Details tab
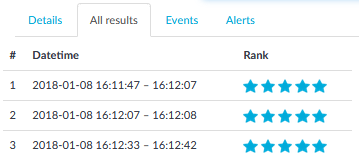
All results tab: Matching results for your search on the Search page (or in the trail contents), in chronological order.
-
Date and time of the matching event.
-
Search rank. The displayed Rank indicates how closely the result matches your search query.
-
Screenshots. If screenshots are available for the trail, you can click each search result to view the corresponding screenshot.
Figure 311: All results tab
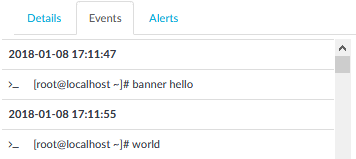
Events tab: Connection events, in chronological order.
-
Date and time of the event.
-
Event type (command, screen content, window title).
-
Event details.
Figure 312: Events tab
Alerts tab: Content policy alerts triggered in the session, in chronological order.
An event is listed as alert only if the Actions > Store in Connection Database option is selected in the Content Policy used to handle the session.
-
Date and time of the alert.
-
The type of the alert (command, screen content, credit card, window title).
-
The matching content.
-
Terminal buffer contents. If the alert is not visible on the screenshot, you can click the
icon to view the contents of the full terminal buffer.
-
Screenshots. If screenshots are available for the trail, you can click each alert to view the corresponding screenshot.
Figure 313: Alerts tab

Screenshots are generated for search results and alerts when the trail is opened, and for subsequent searches. You can scroll between screenshots using the carousel, and view each screenshot in full size. Selecting a screenshot highlights the corresponding search result or alert.
Screenshots are not available for:
-
Ongoing connections.
-
Unindexed trails.
-
Trails of HTTP connections.
-
Encrypted trails (without the necessary certificate).
|
|
NOTE:
For SSH and Telnet trails, trail data is aggregated for each second. The screenshot you see reflects the terminal buffer as it was visible at the end of that second. If data was pushed off-screen during this second, the search still finds it, but it will not be visible on the generated screenshot. |

Replaying audit trails in your browser in Search (classic)
|
|
Caution:
You can replay audit trails in your browser, or using the Safeguard Desktop Player application. Note that there are differences between these solutions.
For details on the Safeguard Desktop Player application, see Safeguard Desktop Player User Guide. |

|
|
Caution:
Even though the One Identity Safeguard for Privileged Sessions (SPS) web interface supports Internet Explorer and Microsoft Edge in general, to replay audit trails you need to use Internet Explorer 11, and install the Google WebM Video for Microsoft Internet Explorer plugin. If you cannot install Internet Explorer 11 or another supported browser on your computer, use the the Safeguard Desktop Player application. For details, see "Replaying audit trails in your browser" in the Administration Guide and Safeguard Desktop Player User Guide. |
To replay an audit trail in your browser
-
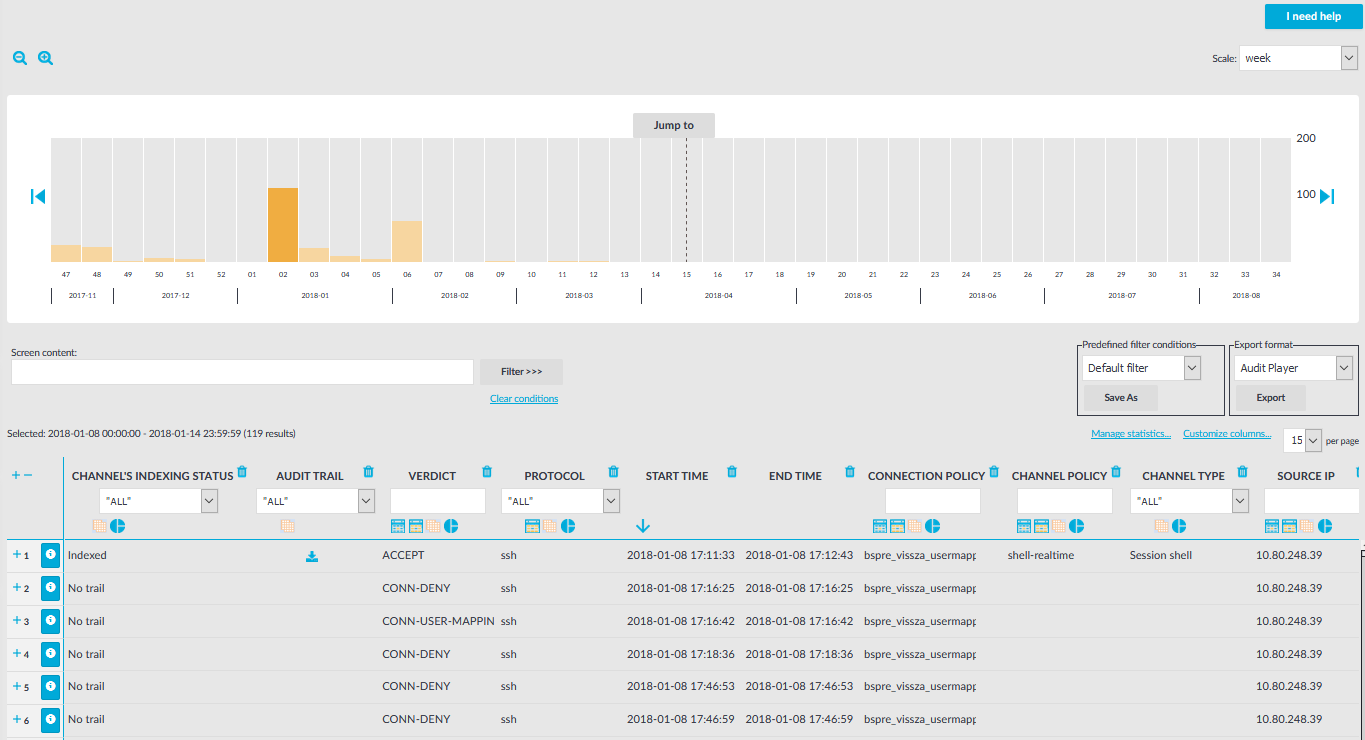
On the Search page, find the audit trail you want to replay.
Figure 314: Search — Browse the connections database
-
(Optional) To replay encrypted audit trails, upload your permanent or temporary keys to the User menu > Private keystore. For more information, see Replaying encrypted audit trails in your browser.
-
Click
to display the details of the connection.
-
Click
to generate a video file from the audit trail that you can replay. Depending on the load of the indexer and the length and type of the audit trail, this can take several minutes (to cancel processing the audit trail, click
). The Video status field shows the progress of the this process.
When the video is available,
.
Figure 315: Search — Audit trail details
-
To replay the video, click
-
The Player window has the following controls.
Figure 316: Replaying audit trails in your browser
-
: Play, Pause
-
,
: Jump to previous event, Jump to next event
-
: Adjust replay speed
-
: Time since the audit trail started / Length of the audit trail. Click on the time to show the date (timestamp) of the audit trail.
-
: List of keyboard events. Special characters like ENTER, F1, and so on are displayed as buttons. If the upstream traffic is encrypted, upload your permanent or temporary keys to the User menu > Private keystore to display the keyboard events.
-
: Active mouse button
-
: Create a screenshot
-
: Show / hide events. Select the types of events to display. Depending on the protocol used and how the audit trail was processed, SPS can display keyboard events, commands, mouse events, and window titles. Commands and window titles are displayed as subtitles at the top of the screen.
-
: Fullscreen mode
-
: Progress bar
-
: Shows the distribution of events. Blue - commands, green - keyboard events, yellow - mouse events, orange - window title.
-
: Close the player, and return to the Connection details page.
-

Replaying encrypted audit trails in your browser
To view screenshots generated for encrypted audit trails, and replay encrypted audit trails in your browser, you have to upload the necessary certificates and corresponding private keys to your private keystore. Depending on the encryption, decrypting the upstream part of an audit trail might require an additional set of certificates and keys.
Only RSA keys (in PEM-encoded X.509 certificates) can be uploaded to the private keystore.
|
|
NOTE:
Certificates are used as a container and delivery mechanism. For encryption and decryption, only the keys are used. |
One Identity recommends using 2048-bit RSA keys (or stronger).
For more information on audit trail encryption, see Encrypting audit trails.
You can upload certificates permanently or temporarily. The temporary certificates are deleted when you log out of One Identity Safeguard for Privileged Sessions (SPS).
The certificates and private keys in your keystore can be protected with a passphrase. To use the certificates and private keys in a passphrase-protected keystore for decrypting audit trails, you have to unlock the keystore first by providing the security passphrase. The keystore then remains unlocked for the duration of your session.
To replay encrypted audit trails in your browser
-
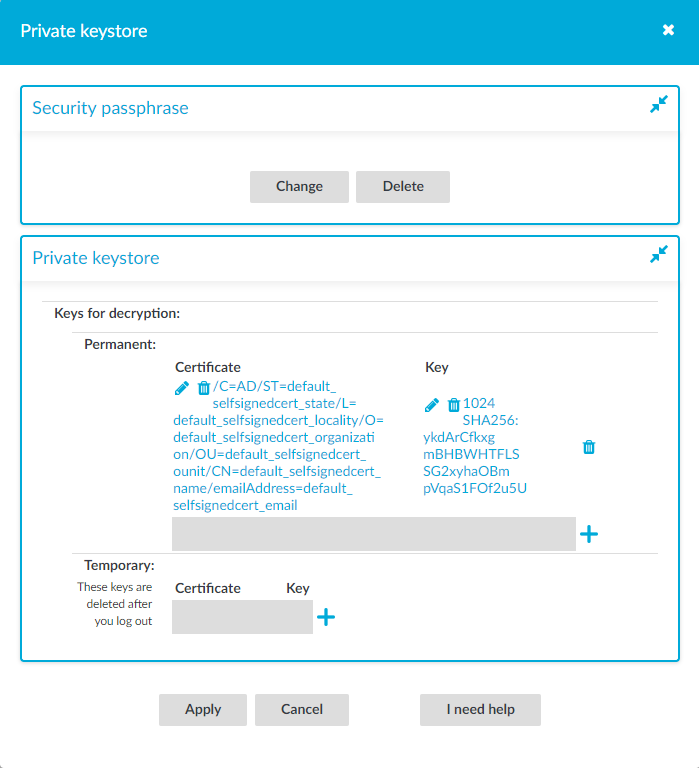
Click on User menu > Private keystore.
Figure 317: User menu > Private keystore — The private keystore
-
(Optional) Create a security passphrase, if you have not configured one yet.
-
In Security passphrase, click Change.
-
In the New field, enter your new security passphrase. Repeat the same passphrase in the Confirm field.
NOTE: One Identity Safeguard for Privileged Sessions (SPS) accepts passwords that are not longer than 150 characters. The following special characters can be used: !"#$%&'()*+,-./:;<=>?@[\]^-`{|}
-
Click Apply.
If you forgot your security passphrase, contact our Support Team.
-
-
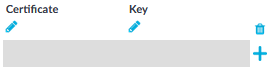
Click
to add a new certificate.
Figure 318: Adding certificates
-
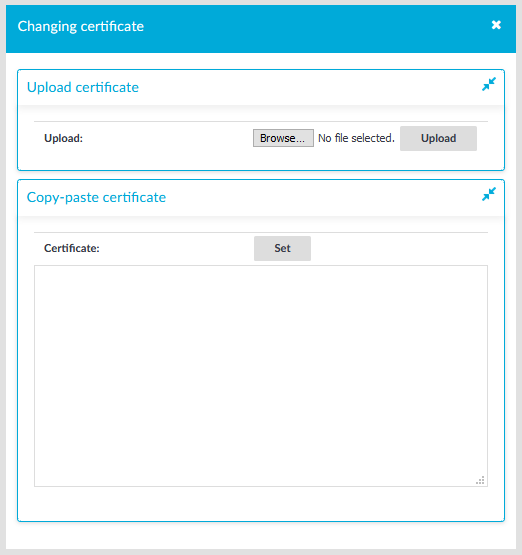
Click the first
to upload the new certificate. A pop-up window is displayed.
Figure 319: Uploading certificates
-
Select Browse, select the file containing the certificate, and click Upload. Alternatively, you can also copy-paste the certificate into the Certificate field and click Set.
-
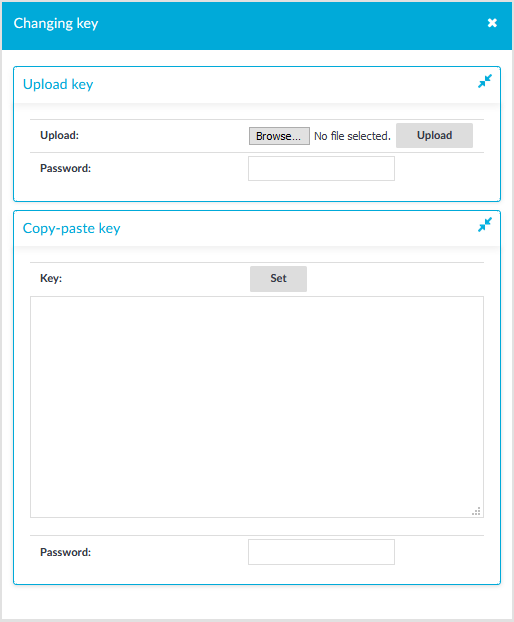
To upload the private key corresponding to the certificate, click the second
Figure 320: Uploading the private key
-
Select Browse, select the file containing the private key, provide the Password if the key is password-protected, and click Upload. Alternatively, you can also copy-paste the private key into the Key field, provide the Password there, and click Set.
-
To add more certificate-key pairs, click
-
To finish uploading certificates and keys to your private keystore, click Apply.
Using the content search
To most effectively search in the contents of the audit trails, make sure that the following prerequisites are met:
-
Indexing was enabled in the connection policy related to the audit trail during the session, and
-
the audit trail has already been indexed.
You can use the following in content search:
-
wildcards
-
boolean expressions
-
search in the commands of terminal connections (for example, command:"sudo su")
-
search in the window titles of graphical connections (for example, title:settings)
The following sections provide examples for different search queries.
-
For examples of exact matches, see Searching for exact matches.
-
For examples of using boolean operators to combine search keywords, see Combining search keywords.
-
For examples of wildcard searches, see Using wildcard searches.
-
For examples of searching with special characters, see Searching for special characters.
-
For examples of fuzzy search that finds words with similar spelling, see Searching for fuzzy matches.
-
For examples of proximity search to find words that appear within a special distance, see Proximity search.
-
For examples of adjusting the relevance of a search term, see Adjusting the relevance of search terms.
For details on how to use more complex keyphrases that are not covered in this guide, see the Apache Lucene documentation.
Searching for exact matches
By default, One Identity Safeguard for Privileged Sessions (SPS) searches for keywords as whole words and returns only exact matches. Note that if your search keywords include special characters, you must escape them with a backslash (\) character. For details on special characters, see Searching for special characters. The following characters are special characters: + - & | ! ( ) { } [ ] ^ " ~ * ? : \ /
Example: Searching for exact matches
| Search expression | example |
| Matches | example |
| Does not match |
examples example.com query-by-example exam |
To search for an exact phrase, enclose the search keywords in double quotes.
| Search expression | "example command" |
| Matches | example command |
| Does not match |
example command example: command |
To search for a string that includes a backslash characters, for example, a Windows path, use two backslashes (\\).
| Search expression | C\:\\Windows |
| Matches |
C:\Windows |
Combining search keywords
You can use boolean operators – AND, OR, NOT, and + (required), – to combine search keywords. More complex search expressions can also be constructed with parentheses. If you enter multiple keywords,
Example: Combining keywords in search
| Search expression | keyword1 AND keyword2 |
| Matches | (returns hits that contain both keywords) |
| Search expression | keyword1 OR keyword2 |
| Matches | (returns hits that contain at least one of the keywords) |
| Search expression | "keyword1 keyword2" NOT "keyword2 keyword3" |
| Matches | (returns hits that contain the first phrase, but not the second) |
| Search expression | +keyword1 keyword2 |
| Matches | (returns hits that contain keyword1, and may contain keyword2) |
To search for expressions that can be interpreted as boolean operators (for example: AND), use the following format: "AND".
Example: Using parentheses in search
Use parentheses to create more complex search expressions:
| Search expression | (keyword1 OR keyword2) AND keyword3 |
| Matches | (returns hits that contain either keyword1 and keyword3, or keyword2 and keyword3) |
Using wildcard searches
You can use the ? and * wildcards in your search expressions.
Example: Using wildcard ? in search
The ? (question mark) wildcard means exactly one arbitrary character. Note that it does not work for finding non-UTF-8 or multibyte characters. If you want to search for these characters, the expression ?? might work, or you can use the * wildcard instead.
You cannot use a * or ? symbol as the first character of a search.
| Search expression | example? |
| Matches |
example1 examples example? |
| Does not match |
example.com example12 query-by-example |
| Search expression | example?? |
| Matches |
example12 |
| Does not match |
example.com example1 query-by-example |
Example: Using wildcard * in search
The * wildcard means 0 or more arbitrary characters. It finds non-UTF-8 and multibyte characters as well.
| Search expression | example* |
| Matches |
example examples example.com |
| Does not match |
query-by-example example* |
Example: Using combined wildcards in search
Wildcard characters can be combined.
| Search expression | ex?mple* |
| Matches |
example1 examples example.com exemple.com example12 |
| Does not match |
exmples query-by-example |
Searching for special characters
To search for the special characters, for example, question mark (?), asterisk (*), backslash (\) or whitespace ( ) characters, you must prefix these characters with a backslash (\). Any character after a backslash is handled as character to be searched for. The following characters are special characters: + - & | ! ( ) { } [ ] ^ " ~ * ? : \ /
Example: Searching for special characters
To search for a special character, use a backslash (\).
| Search expression | example\? |
| Matches |
example? |
| Does not match |
examples example1 |
To search for a string that includes a backslash characters, for example, a Windows path, use two backslashes (\\).
| Search expression | C\:\\Windows |
| Matches |
C:\Windows |
To search for a string that includes a slash character, for example, a UNIX path, you must escape the every slash with a backslash (\/).
| Search expression | \/var\/log\/messages |
| Matches |
/var/log/messages |
| Search expression | \(1\+1\)\:2 |
| Matches |
(1+1):2 |
Searching in commands and window titles
For terminal connections, use the command: prefix to search only in the commands (excluding screen content). For graphical connections, use the title: prefix to search only in the window titles (excluding screen content). To exclude search results that are commands or window titles, use the following format: keyword AND NOT title:[* TO *].
You can also combine these search filters with other expressions and wildcards, for example, title:properties AND gateway.
Example: Searching in commands and window titles
| Search expression | command:"sudo su" |
| Matches |
sudo su as a terminal command |
| Does not match | sudo su in general screen content |
| Search expression | title:settings |
| Matches |
settings appearing in the title of an active window |
| Does not match | settings in general screen content |
To find an expression in the screen content and exclude search results from the commands or window titles, see the following example.
| Search expression | properties AND NOT title:[* TO *] |
| Matches |
properties appearing in the screen content, but not as a window title. |
| Does not match | properties in window titles. |
You can also combine these search filters with other expressions and wildcards.
| Search expression | title:properties AND gateway |
| Matches |
A screen where properties appears in the window title, and gateway in the screen content (or as part of the window title). |
| Does not match |
Screens where both properties and gateway appear, but properties is not in the window title. |
Searching for fuzzy matches
Fuzzy search uses the tilde ~ symbol at the end of a single keyword to find hits that contain words with similar spelling to the keyword.
Example: Searching for fuzzy matches
| Search expression | roam~ |
| Matches |
roams foam |
Proximity search
Proximity search uses the tilde ~ symbol at the end of a phrase to find keywords from the phrase that are within the specified distance from each other.
Example: Proximity search
| Search expression | "keyword1 keyword2"~10 |
| Matches | (returns hits that contain keyword1 and keyword2 within 10 words from each other) |
Adjusting the relevance of search terms
By default, every keyword or phrase of a search expression is treated as equal. Use the caret ^ symbol to make a keyword or expression more important than the others.
Example: Adjusting the relevance of search terms
| Search expression | keyword1^4 keyword2 |
| Matches | (returns hits that contain keyword1 and keyword2, but keyword1 is 4-times more relevant) |
| Search expression | "keyword1 keyword2"^5 "keyword3 keyword4" |
| Matches | (returns hits that contain keyword1 keyword2 and keyword3 keyword4, but keyword1 keyword2 is 5-times more relevant) |