
Prerequisites and limitations
Before starting to use One Identity Safeguard for Privileged Sessions (SPS) with external indexers, consider the following:
-
If there is a firewall between the host of the external indexer and SPS, enable two-way communication between them.
The default port is TCP/12345. To change the port number, you have to modify the indexer settings on SPS, and upload the new configuration to the external indexer(s).
-
To protect the sensitive data in the audit trails, ensure that the audit trails are encrypted. For details on encrypting audit trails, see Encrypting audit trails.
-
Make sure to permit indexer access only to the hosts that really run external indexers on the Basic Settings > Local Services > Indexer service page of the SPS web interface.
-
To process graphical audit trails that contain Asian characters, make sure that you have uploaded a license to SPS that enables indexing Asian characters.
NOTE: The current OCR engine cannot guarantee accurate character recognition for Asian characters smaller than 30 x 30 pixels. If you encounter problems with character recognition for Asian characters, increase resolution settings in your connection.
-
The external indexer can be installed on the following 64-bit operating systems: Red Hat Enterprise Linux Server 6.7, Red Hat Enterprise Linux Server 7, CentOS 6.7, and CentOS 7. The installer is a self-contained package that includes every required dependency of the indexer.

If your security policy does not permit the above limitations, or your environment does not make it possible to fulfill them, do not use external indexers with SPS.
Hardware requirements for the external indexer host
-
CPU: You can configure the number of audit trails that an indexer host processes at the same time. For optimal performance, each indexer process should have a dedicated CPU core.
-
Memory requirements: In addition to the memory requirements of the operating system of the host, the indexer requires about 300 MB memory for each worker process, depending on the protocol of the indexed audit trails. The audit trails of terminal connections require less memory.
-
Disk: The indexer requests the data from One Identity Safeguard for Privileged Sessions (SPS) in small chunks, it does not store the entire audit trail nor any temporary files. You will need only disk space for the operating system, and a few GB to store logs.
For example, if you want to have a host that can process 6 audit trails at the same time, you need 6 CPU cores and 1.8 GB of memory for the indexer service. If you install only a minimal operating system and the external indexer on the host, 6 GB disk space should be enough.
Configuring One Identity Safeguard for Privileged Sessions (SPS) to use external indexers
The following describes how to configure One Identity Safeguard for Privileged Sessions (SPS) to accept connections from external indexer services.
To configure SPS to accept connections from external indexer services
-
Log in to the SPS web interface, and navigate to Basic Settings > Local Services > Indexer service.
-
Select Indexer service.
-
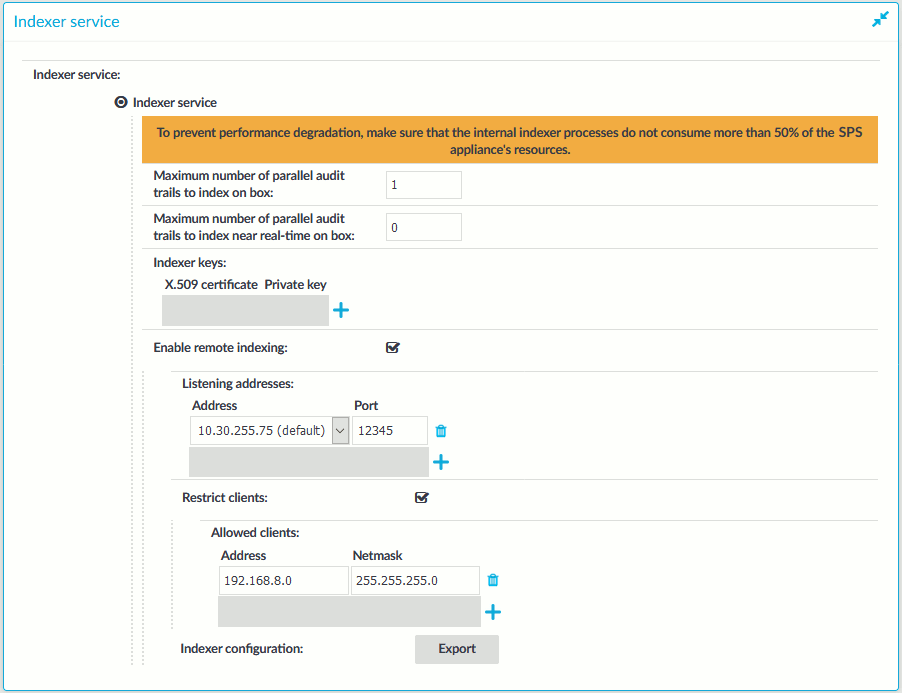
Select Enable remote indexing.
Figure 205: Basic Settings > Local Services > Indexer service > Enable remote indexing — Configure external indexers
-
In the Listening addresses > Address field, select the network interface where SPS should accept external indexer connections. Repeat this step to add other interfaces if needed.
The available addresses correspond to the interface addresses configured in Basic Settings > Network > Interfaces. Only IPv4 addresses can be selected.
-
Select Restrict clients, and list the IP address and netmask of your external indexer hosts.
Use an IPv4 address.
-
Click Commit.
Installing the external indexer
Prerequisites
The external indexer can be installed on the following 64-bit operating systems: Red Hat Enterprise Linux Server 6.7, Red Hat Enterprise Linux Server 7, CentOS 6.7, and CentOS 7. The installer is a self-contained package that includes every required dependency of the indexer.
To install the external indexer
-
Log in as root to the host that you want to use to index your audit trails.
-
Copy the installer package to the host.
-
Install the package using the package manager of the operating system. For example:
yum install external-indexer-standalone-<version-number>.x86_64.rpm
The installer performs the following steps automatically.
-
Unpacks the indexer files into the /opt/external-indexer/ directory.
-
Installs the related init scripts (the /etc/init.d/external-indexer init script, and adds the init script configuration to /etc/sysconfig/external-indexer).
-
Creates the indexer user and usergroup. This is an unprivileged user that is used to run the indexer application.
-
Registers the service to start automatically on system boot. Note that the indexer init script uses bind mount points.
-
-
Edit the firewall rules of the host to accept connections from One Identity Safeguard for Privileged Sessions (SPS) on the TCP/12345 port. For example:
iptables -A INPUT -p tcp --destination-port 12345 --jump ACCEPT
NOTE: If there is a firewall between the indexer host and SPS, enable two-way communication between them on the TCP/12345 port.
-
Configure the indexer. For details, see Configuring the external indexer.