
Connection metadata
One Identity Safeguard for Privileged Sessions (SPS) stores the following parameters about the connections:
-
Additional metadata: Data about the connection recorded by the different plugins of SPS, for example, when using an Authentication and Authorization plugin.
-
Alerting: The list of content policy alerts triggered in the connection. For every alert, the following information is displayed:
-
Time of alert: Date and time of the alert
-
Alerting type: The type of the event (command, screen content, and so on).
-
Matched rule value: The expression that matched the content.
-
Matched context: Click this column to display the context of the matched content, for example, the contents of the screen, or the command line. The value that triggered the alert is highlighted.
For example, a content policy that detects every execution of the sudo command in SSH commands, creates the following entry: 2012-10-05 15:46:17.902004: (adp.event.command) 'sudo'
-
-
Application: The name of the application accessed in a seamless Citrix ICA connection.
-
Archive date: The date when the connection was archived or cleaned up.
-
Archive path: The path where the audit trail was archived on the remote server.
-
Archive server: The hostname or IP address of the remote server where the audit trail was archived.
-
Audit trail downloads: An audit trail has been downloaded.
-
Audit-trail: Name and ID of the audit file storing the traffic of the channel. If the session has an audit trail, a icon is displayed. Note that a the following letters may appear on the download icon:
-
C: The audit trail has been cleaned up and is not available any more.
-
A: The audit trail has been archived. SPS will try to retrieve it from the archive server.
-
X: The audit trail is not available for some reason.
You can filter the Audit-trail column for the following values:
-
no audit trail: Channels that have no audit trails.
-
has audit trail: Channels that have audit trails.
-
online: Channels that belong to an active, ongoing connection. If you are auditing every connection, then this list shows the connections also shown on the Active Connections page.
-
archived: Channels that had their audit trails archived to a remote server, but SPS cannot access the audit trail.
-
-
Authentication method: The authentication method used in the connection. For example, password
-
Channel policy: The Channel policy applied to connection. The Channel policy lists the channels (for example, terminal session and SCP in SSH, or Drawing and Clipboard in RDP) that can be used in the connection, and also determines if the channel is audited or not. The Channel policy can also restrict access to each channel based on the IP address of the client or the server, a user list, user group, or a time policy.
-
Channel type: Type of the channel.
-
Channel's indexing status: Shows if the channel has been indexed. The following values are possible:
-
CHANNEL_OPEN (0): The connection of the channel is still open (indexer is waiting for the connection to close).
-
NOT_INDEXED (1): All channels of the connection have been closed which belong to the connection. The channel is ready for indexing, unless the audit trail was placed in the skipped_connections queue.
-
INDEXING_IN_PROGRESS (2): The channel is being indexed (indexing in progress). Note that SPS will return search results for the parts of the channel are already indexed.
-
INDEXED (3): Indexing the channel is complete.
-
INDEXING_NOT_REQUIRED (4): Indexing not required (indexing is not enabled for the connection).
-
INDEXING_FAILED (5): Indexing failed. The indexer service writes the corresponding error message in the error_message column of the indexer_jobs table. Note that SPS will return search results for the parts of the channel that were successfully indexed before the error occurred. For example, if the error occurred at the end of a long audit trail, you can still search for content from the first part of the audit trail.
-
NO_TRAIL (6): Auditing is not enabled for the channel.
-
-
Client X.509 Subject: The client's certificate in TELNET or VNC sessions. Available only if the Client-side transport security settings > Peer certificate validation option is enabled in SPS.
-
Connection policy ID: The identifier of the connection policy.
-
Connection policy: The connection policy that handled the client's connection request.
-
Destination IP: The IP address of the server as requested by the client.
-
Destination port: The port number of the server as requested by the client.
-
Device name: The name or ID of the shared device (redirect) used in the RDP connection.
-
Duration: The length of the session.
-
Dynamic channel: The name or ID of the dynamic channel opened in the RDP session.
-
End time: Date when the channel was closed.
-
Events: A table that shows the commands that the user issued in a terminal session. These commands are searchable, together with the command prompt itself. Available only for Telnet and SSH session shell connections, if the audit trail has been indexed. For details on configuring indexing, see Indexing audit trails.
-
Exec command: The command executed in a Session exec channel.
-
File operations: The list of file operations (for example, file upload, create directory) performed by the client. Available only for SCP and SFTP sessions (Session exec SCP and Session SFTP SSH channels) if the Log file transfers to database option is enabled in the Channel Policy of the connection.
For both SCP and SFTP connections, the filename is stored in a human-readable way if it only includes UTF-8-encoded characters. If the filename is not a valid UTF-8-encoded filename, the non-ASCII characters are translated into their hexadecimal equivalents. In both cases, the asterisk (*) characters are escaped with another asterisk (*) character.
In case of a valid UTF-8-encoded filename:
-
Filename: ár*víz**
-
Hexadecimal sequence: C3 A1 72 2A 76 C3 AD 7A 2A 2A
-
Stored in connection database as: ár**víz****
In case of a not valid UTF-8-encoded filename:
-
Filename: ár*víz** in ISO-8859-2
-
Hexadecimal sequence: E1 72 2A 76 ED 7A 2A 2A
-
Stored in connection database as: *e1r**v*edz****
NOTE: For SFTP connections, this field includes the path and the filename. For SCP connections, it includes only the filename, the path is available in the SCP Path field.
Windows and UNIX systems use different separator characters in the pathname, backslash (\) and slash (/), respectively. As the SCP and SFTP protocols do not specify the separator character used, SPS uses slash (/), for example, /var/log/messages.
TIP: Use the filter in the header of the column to find sessions containing a specific file (for example, enter .gz to list sessions that accessed files with the .gz extension). Note that currently it is possible to search only in the filename and path, and not in the changed privileges.
-
-
Four-eyes authorizer: The username of the user who authorized the session. Available only if 4-eyes authorization is required for the channel. For details on 4-eyes authorization, see Configuring four-eyes authorization.
-
Four-eyes description: The description submitted by the authorizer of the session.
-
Hits and rank: Available only for indexed trails, when searching the content of the audit trails. This column is displayed automatically.
-
For channels indexed with the indexer service, displays the number of hits (search results) found in the audit trail, and the rank (relevance) of the audit trail regarding the search keywords. Rank is displayed as 1-5 stars. Hits is returned as a number for up to 100 results in the audit trail — the exact number of hits is not displayed if it is higher than 100.
-
For channels indexed with the Audit Player indexer service, rank is not available. The exact number of hits is not displayed, only that the search keywords were found in the trail at least once. In this case, the Hits and rank column displays 1+.
Note that because of performance reasons, the number of hits can be inaccurate and is only an approximation. In this case, SPS displays a tilde (~) sign to mark approximated hit counts.
-
-
Port-forward target IP: The traffic was forwarded to this IP address in Remote Forward and Local Forward channels.
-
Port-forward target port: The traffic was forwarded to this port in Remote Forward and Local Forward channels.
-
Port/X11 forward originator IP: The IP address of the host initiating the channel in Remote Forward and Local Forward channels. Note that this host is not necessarily the client or the server of the SSH connection.
-
Port/X11 forward originator port: The number of the forwarded port in Remote Forward and Local Forward channels.
-
Protocol: The protocol used in the connection (Citrix ICA, HTTP, RDP, SSH, Telnet, or VNC).
-
Rule number: The number of the line in the Channel policy applied to the channel.
-
SCP path: Name and path of the file copied via SCP. Available only for SCP sessions (Session exec SCP SSH channels) if the Log file transfers to database option is enabled in the Channel Policy of the connection.
NOTE: This field includes only the path, the filename is available in the File Operations field.
Windows and UNIX systems use different separator characters in the pathname, backslash (\) and slash (/), respectively. As the SCP and SFTP protocols do not specify the separator character used, SPS uses slash (/), for example, /var/log/messages.
-
Server IP: The IP address of the server connected by SPS.
NOTE: In case of HTTP, this is the target IP of the first request of the session, since it cannot be guaranteed that all page content come from the same server.
-
Server-local IP: The IP address of SPS used in the server-side connection.
-
Server-local port: The port number of SPS used in the server-side connection.
-
Server port: The port number of the server connected by SPS.
-
Session ID:
A globally unique string that identifies the session. This session ID has the following format: svc/<unique-random-hash>/<name-of-the-connection-policy>:<session-number-since-service-started>/<protocol>, for example, svc/5tmEaM7xdNi1oscgVWpbZx/ssh_console:1/ssh.
Log messages related to the session also contain this ID. For example:
2015-03-20T14:29:15+01:00 demo.example
zorp/scb_ssh[5594]: scb.audit(4):
(svc/5tmEaM7xdNi1oscgVWpbZx/ssh_console:0/ssh):
Closing connection; connection='ssh_console',
protocol='ssh', connection_id='409829754550c1c7a27e7d',
src_ip='10.40.0.28', src_port='39183',
server_ip='10.10.20.35', server_port='22',
gateway_username='', remote_username='example-username',
verdict='ZV_ACCEPT'
-
Source IP: The IP address of the client.
-
Source port: The port number of the client.
-
Start time: Date when the channel was started.
-
Subsystem name: Name of the SSH subsystem used in the channel.
-
URLs: The list of URLs accessed in an HTTP session (the list is displayed in a pop-up window).
-
Unique connection ID: The unique identifier of the connection.
-
Username: The username used in the session.
-
If the user performed inband gateway authentication in the connection, the field contains the username from the gateway authentication (gateway username).
-
Otherwise, the field contains the username used on the remote server.
-
-
Username on server: The username used to log in to the remote server. This username can differ from the client-side username if usermapping is used in the connection. For details on usermapping, see Configuring usermapping policies.
-
Verdict: Indicates what SPS decided about the channel.
-
ACCEPT: Accepted.
-
ACCEPT-TERMINATED: Connection was accepted and established, but a content policy terminated the connection. For details on content policies, see Real-time content monitoring with Content Policies.
-
CONN-AUTH-FAIL: User authentication failed.
-
CONN-DENY: Connection rejected.
-
CONN-FAIL: Connection failed, that is, it was allowed to pass SPS but timed out on the server.
-
CONN-GW-AUTH-FAIL: Gatway authentication failed.
-
CONN-KEY-ERROR: Hostkey mismatch.
-
CONN-USER-MAPPING-FAIL: Usermapping failed.
-
DENY: Denied.
-
FOUR-EYES-DEFERRED: Waiting for remote username.
-
FOUR-EYES-ERROR: Internal error during four-eyes authorization.
-
FOUR-EYES-REJECT: Four-eyes authorization rejected.
-
FOUR-EYES-TIMEOUT: Four-eyes authorization timed out.
NOTE: The Verdict column only accepts capital letters.
NOTE: The rejected (CONN-DENY) HTTP requests are collected into a session, to avoid having too many entries in the database (for example when the user visits a forbidden page, and reloads the page several times, only one session will be visible instead of all the separate requests). The denied sessions have timeout and session ID.
-

Using and managing search filters
-
To filter the search results, set the filters you need and click Filter.
-
To apply a predefined filter, select the filter from the Predefined filter conditions field.
-
To create and save a filter, complete Creating and saving filters for later use. Note that filters cannot be modified, only deleted.
-
To delete a predefined filter, select the filter from the Predefined filter conditions field and click Delete.
NOTE: You need the Manage global filters privilege to delete global filters. For more information on managing user rights, see Managing user rights and usergroups.
Creating and saving filters for later use
The following describes how to create and save a filter for later use.
To create and save a filter for later use
-
Navigate to the Search page.
-
Set the filters you need.
-
Select Predefined filter conditions > Save As. A pop-up window is displayed.
-
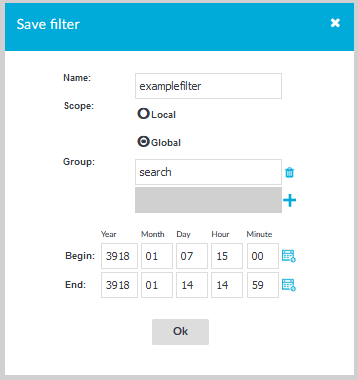
Enter a name for the filter into the Name field.
Figure 321: Search > Save as — Saving filter conditions
-
If you want the filter to be available for other One Identity Safeguard for Privileged Sessions (SPS) users as well, select Global. To restrict the availability of the filter to a set of specific users, select Scope > Global, click
, and enter the name of the group whose members may use the filter. Repeat this step to add other groups if needed. Local filters are visible only for you.
NOTE: Filters cannot be modified later, only deleted. A filter can be deleted by the user who created it, and by users whose group has the Search > Manage global filters privilege.
For more information on managing user rights, see Managing user rights and usergroups.
-
To modify the timeframe of the search, select Interval, and set the beginning and ending date and time of the search. This is useful when you want to display only the connections of a specific event. Note that you must always set an interval for global filters.
-
Click OK.
The search and filter process
The screen content is first indexed, then processed with the search backend, and finally, the filter expressions are applied. This process is described in detail in the following sections.
Figure 228: The search and filter process
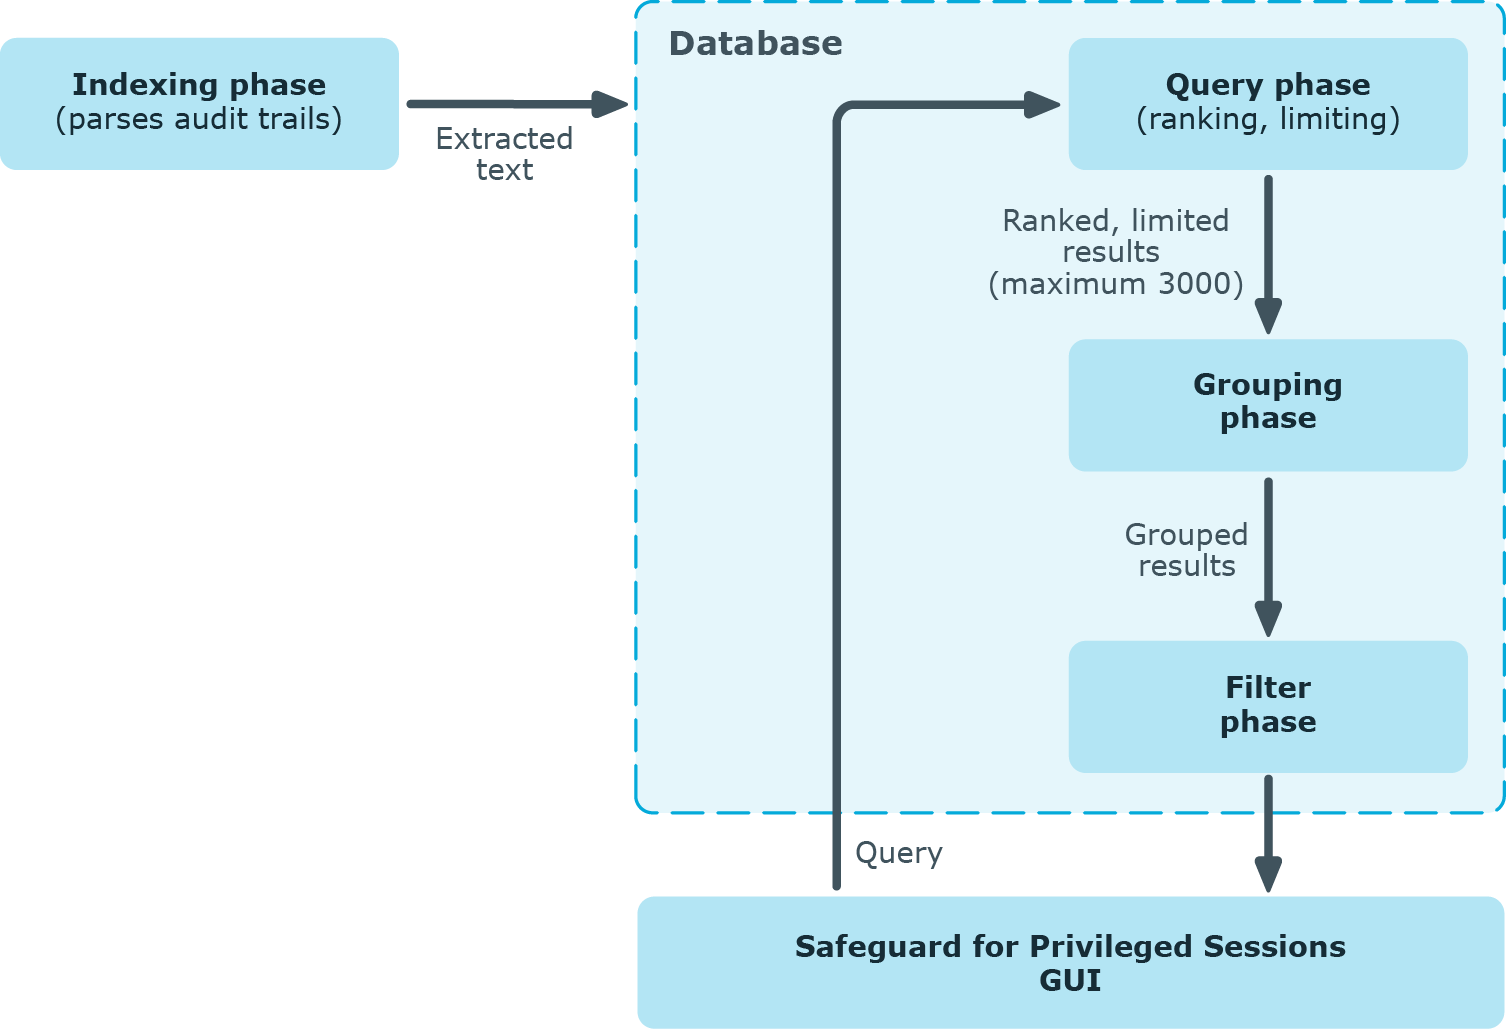
Prerequisites - Indexing phase
First, as a prerequisite of the search process, screen content is indexed. The indexing phase generates a database that the search and filter processes will run on.
The indexer parses the audit trail files, and builds an "inventory" of the privileged user's activity data based on what appeared on their screen.
-
In the case of a terminal session, screen content corresponds to the activity data that is captured in a terminal window. In the case of graphical protocols, screen content is whatever is visible in the graphical user interface of the applications the user is interacting with. In the latter case, the indexer's Optical Character Recognition (OCR) engine extracts text that appeared on the screen (for example, window titles).
NOTE: If a piece of text is displayed for less than 1 second, it is not extracted.
-
The indexer returns the information extracted from the parsed audit trail files to One Identity Safeguard for Privileged Sessions (SPS). In the case of a terminal session, the captured text is put in the backend database as one document per one second of screen content. Because of this, the content that you have searched for might only partially appear in the screenshot. In the case of graphical protocols, the captured text is put in the backend database as one document per screenshot.
-
The queries will be run on this database during the search process.
For details on indexing, see Indexing audit trails.
Search and filter process phases
The search and filter process consists of three major phases:
-
Query phase
-
Grouping phase
-
Filter phase
Query phase
In the query phase, the backend ranks and then limits the number of results.
-
The result of one query is the top 3000 documents, ordered by the default ranking system of the backend.
This means that if there are more than 3000 results, those of the lowest rank will not be passed to the next phase at all.
The ranking system cannot be modified, so there is no way to "upvote" those results of lower ranks.
If you want to ensure that all important results are passed to the grouping phase, use a smaller time range that you run the query on. If there are fewer than 3000 results, it is certain that the events you are interested in will be included in the grouping phase.
-
The grouping phase receives the results.
Grouping phase
The grouping phase groups the results that were passed on from the query phase.
-
First, the results with the same trail IDs are grouped together. A trail ID group contains all search hits that are in that trail.
-
The trail ID groups are then further grouped by seach expression and time range. This group is essentially the time range during which the expression is displayed on the screen (for example, if the text root is displayed from 00:00:12 to 00:01:45, this will be one group).
-
This grouped result is displayed in the search screen as one row.
Filter phase
The filter phase applies filter expressions to these grouped results.
|
|
NOTE:
If there were screen content search results that were excluded during the query phase, the filter expressions will not be applied to them. |
Example: Filtering for search results that were excluded in the query phase
For example, if you want to filter for Telnet connections where the text root was displayed, the following can happen:
You search for the Screen content: root. There are 3100 search results that consist of 3050 SSH connections and 50 Telnet connections. In this example, Telnet connections received the lowest ranks for some reason. 100 results that have received the lowest rank are excluded, and in this example it means all Telnet connections.
If you filter for protocol Telnet now, you will not see any results.
To remedy this situation, try searching in a smaller time range to make sure that there are less than 3000 search results. If you are unsure about the time range, you might want to attempt fine-tuning the backend search manually. For details, see: Fine-tuning the backend search manually.
Fine-tuning the backend search manually
You can fine-tune your search manually with the command line utility lucenectl. To do this, log on to the core shell. For details, see Accessing the One Identity Safeguard for Privileged Sessions (SPS) console.
-
Specify more exact time ranges (use Unix timestamps).
For example, to limit the time range to Thursday, June 30, 2016 11:39:51 AM - Thursday, November 3, 2016 2:44:46 PM, enter the following command:
lucenectl search --from-to 1467286791 1478184286 --text remote --limit 3000 --aggregate-by-trail --normalize-rank
NOTE: For converting timestamps to Unix timestamp, use https://www.epochconverter.com/.
-
Increase the query limit of 3000 to a limit of your choice.
For example, to increase the query limit of 3000 to 4500, enter the following command:
lucenectl search --from-to 1467286791 1478184286 --text <your-screen-content-search-expression> --limit 4500 --aggregate-by-trail --normalize-rank
lucenectl search --from-to 1467286791 1478184286 --text remote --limit 4500 --aggregate-by-trail --normalize-rank
NOTE: If you do not receive more results with a larger query limit, it means that you have found all results with your search expression.
However, the downside of using lucenectl to fine-tune your search is that after the cli search, you have to manually extract the trails that you find interesting with the help of the metadb.
The following example shows the output of a lucenectl search:
{
 "hits": [
   {
     "hits_count": 1,
     "channel_id": 1,
     "trail_id": "58",
     "rank": 0.4068610216585047
   },
   {
     "hits_count": 7,
     "channel_id": 761,
     "trail_id": "12",
     "rank": 1.0
   },
   {
     "hits_count": 2,
     "channel_id": 1,
     "trail_id": "139",
     "rank": 0.5923645275802537
   }
 ]
}
-
rank: the larger the number, the higher the rank
-
hits_count: the number of times the screen content search expression is displayed in the audit trail
-
trail_id: the ID of the trail
-
channel_id: the ID of the channel
The most relevant audit trail will probably be the one with the highest rank.
If you have determined which audit trail you are interested in, enter the following command. The value of _connection_channel_id will be the value of the trail_id from the lucenectl output that you have determined as most relevant.
psql -U scb scb -c "select audit from channels where _connection_channel_id = 12;"
The output of this command will be:
/<audittrailpath>/audit-scb_rdp-1467274538-0.zat:2
/<audittrailpath>/audit-scb_rdp-1467274538-0.zat:1
From this output, the audit trail file name path is as follows: /<audittrailpath>/audit-scb_rdp-1467274538-0.zat
|
|
NOTE:
If you cannot find the file at the path, check whether it has been archived and search for the file in the archive path. Use the following command: psql -U scb scb -c "select audit, _archive_path from channels where _connection_channel_id = 12;" The output of this command will be: audit | _archive_path
---------------------------------------------------------+---------------
/<audittrailpath>/audit-scb_rdp-1467274538-0.zat:2 | /<myarchive/path>/
/<audittrailpath>/audit-scb_rdp-1467274538-0.zat:1 | /<myarchive/path>/
|
If you still cannot find the audit trail, contact our Support Team. |