
Creating and editing protocol-level ICA settings
ICA settings determine the parameters of the connection on the protocol level, including timeout value, and so on.
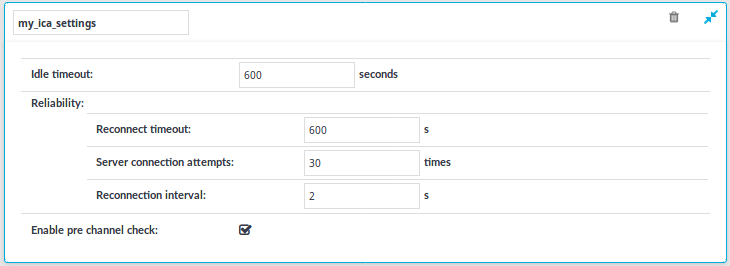
Figure 168: ICA Control > Settings — ICA settings
|
|
Caution:
Modifying the ICA settings is recommended only to advanced users. Do not modify these settings unless you exactly know what you are doing. |

To create a new ICA settings profile or edit an existing one
-
Navigate to the Settings tab of the ICA Control menu item and click
to create an ICA setting profile. Enter a name for the profile (for example ica_special).
-
Click
to display the parameters of the ICA connection.
-
Modify the parameters as needed. The following parameters are available:
-
Idle timeout: Connection timeout value in milliseconds. To avoid early timeout, set it to a larger value, for example a week (604800 seconds).
Caution: Determining if a connection is idle is based on the network traffic generated by the connection, not the activity of the user. For example, if an application or the taskbar of a graphical desktop displays the time which is updated every minute, it generates network traffic every minute, negating the effects of timeout values greater than one minute and preventing One Identity Safeguard for Privileged Sessions (SPS) from closing the connection.
-
Reconnect timeout: How many seconds SPS waits for reconnections when reliable connections are used. Reliable connections use the Common Gateway Protocol (CGP).
-
Server connection attempts: How many times SPS tries to connect to the target server.
-
Reconnection intervals: How many seconds SPS waits between two connection attempts on the server side.
-
Enable pre channel check: Select this option to evaluate the connection and channel policies before establishing the server-side connection. That way if the connection is not permitted at all, SPS does not establish the server-side connection.
NOTE: Reliability settings only apply if you have enabled Reliable connection in ICA Control > Connections.
-
-
Click
.
-
Select this settings profile in the ICA settings field of your connections.

One Identity Safeguard for Privileged Sessions (SPS) deployment scenarios in a Citrix environment
This section enlists the available One Identity Safeguard for Privileged Sessions (SPS) deployment scenarios in a Citrix environment. The text on the arrows are formatted in (<step number>) <target port> format. The target ports define the protocols used in the communication:
-
80: Web service, HTTP: the list of available resources fetched in an XML format from the broker (v12 and v11 with Citrix Virtual Apps (formerly known as Citrix XenApp) only). The broker sends all the necessary information, including secure gateway and server addresses to the client.
-
8080: XML service, HTTP+XML: application discovery, load balancing (v12 and v11 with Citrix Virtual Apps (formerly known as Citrix XenApp) only), used to fetch target to the application/desktop by the client from the broker (used for load balancing, and so on).
-
443: XML service access or SOCKS/ICA or CGP/ICA wrapped in TLS. The client communicates with the secure gateway on this port for everything.
-
1080: SOCKS. The client can be configured to access the target server and the broker using a SOCKS proxy.
-
1494: Plain ICA.
-
2598: CGP/ICA (reliable mode enabled).
|
|
Caution:
Accessing Citrix Virtual Desktops (formerly known as Citrix XenDesktop) is supported only in the following scenarios. Only reliable connections (CGP) are supported. |
Client - SPS - Server (Transparent mode)
The SPS is deployed between the client and the server and the clients use predefined connection files or Program Neighbourhood, without a broker or secure gateway. The clients try to connect to their original ICA/CGP server.
Figure 169: Client - SPS - Server (Transparent mode)

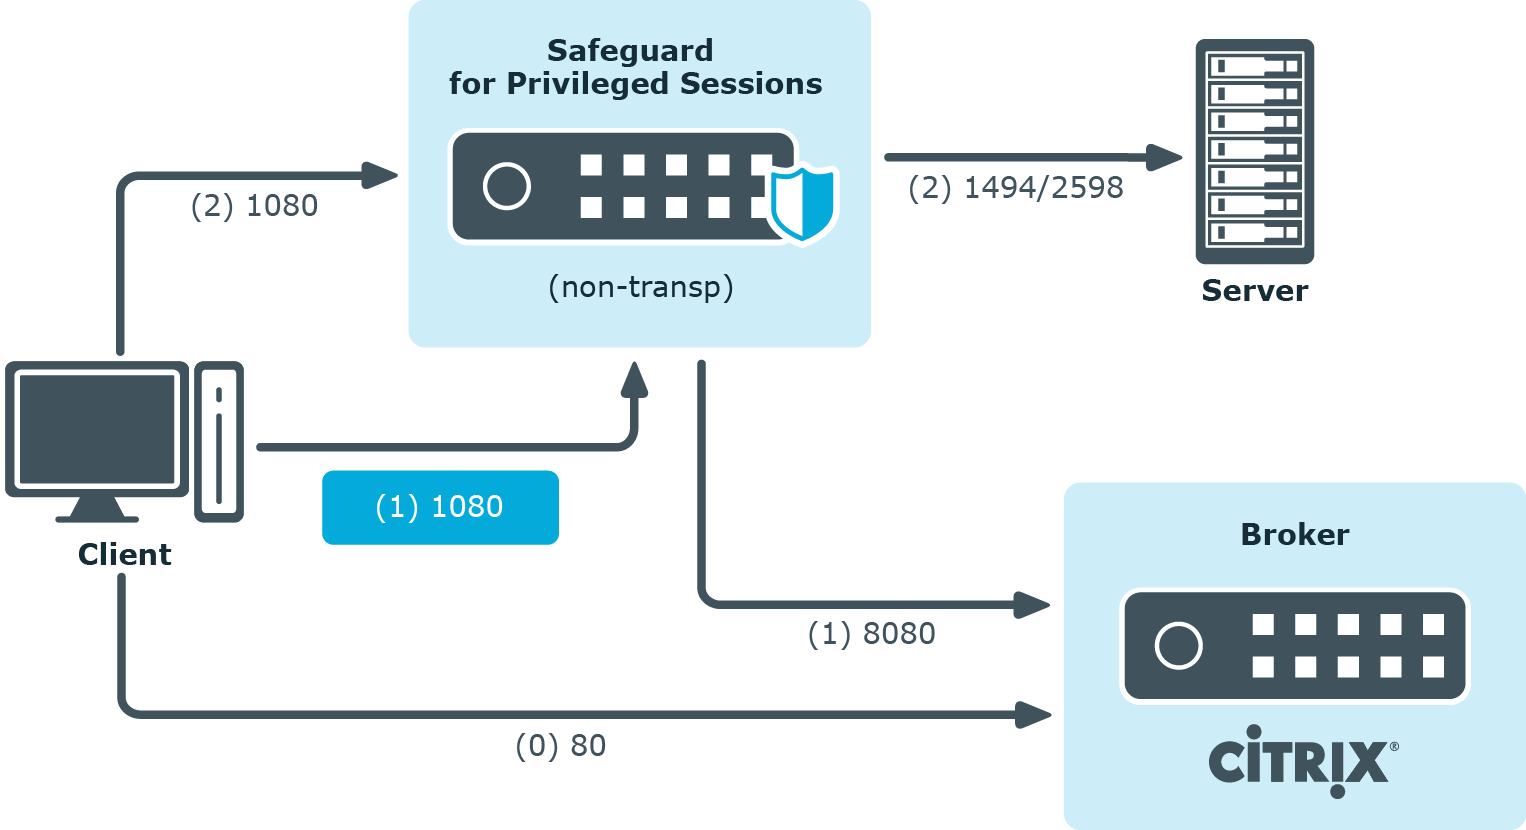
Client - SPS - Server (Non-transparent mode)
The SPS is deployed between the client and the server and the clients use predefined connection files or Program Neighbourhood, without a broker or secure gateway. The clients try to connect to SPS, which can distinguish between the potential targets for example by source IP, or by having multiple IP addresses itself.
Figure 170: Client - SPS - Server (Non-transparent mode)

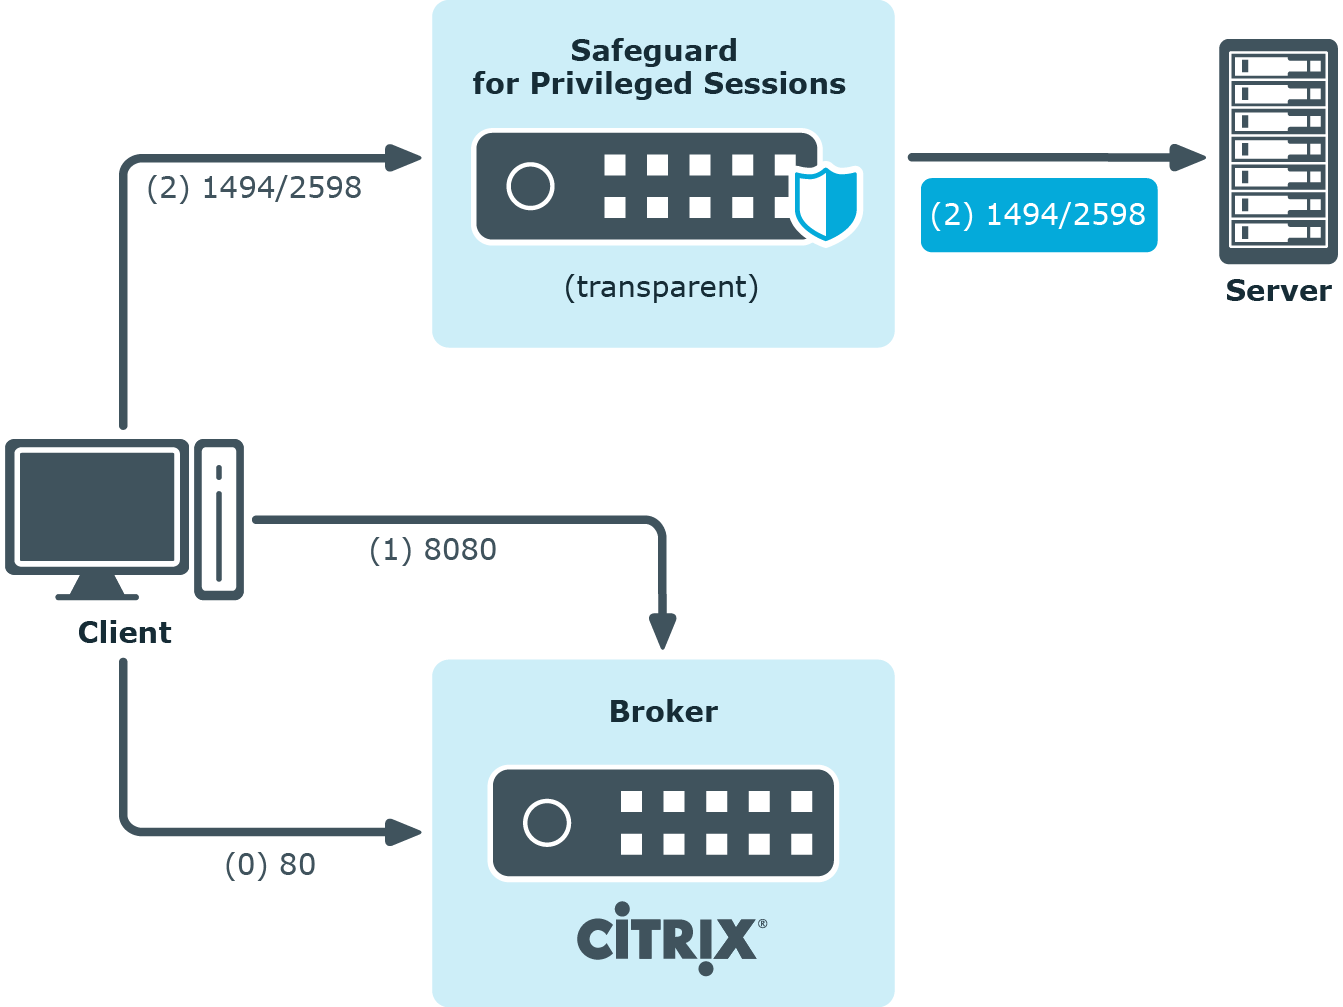
Client - Broker - SPS - Server (Transparent mode)
The clients are using a farm broker which gives them a list of the available applications and servers, but they do not use a secure gateway in the network. The SPS is placed between the clients and the servers in transparent mode, and it catches the connections when the clients try to connect to the server IP addresses they got from the broker.
Figure 171: Client - Broker - SPS - Server (Transparent mode)
Client - Broker - original secure gateway - Secure Ticket Authority (STA) - SPS - Server
In this setup, a secure gateway is used in the network and the SPS is placed between this gateway and the servers in transparent mode. The clients connect to the broker for the list of available applications/servers and then make their further connections through the original secure gateway. That gateway forwards the connections either to the broker or to the CGP/ICA servers, which latter the SPS intercepts and audits/controls.
Figure 172: Client - Broker - original secure gateway - Secure Ticket Authority (STA) - SPS - Server

Client - Broker - SPS as socks proxy - Server
In this setup, the SPS acts as a SOCKS proxy for the client. It can be set either manually or specified by the broker. The client then makes all its connections to the broker or to the server using SPS as a proxy and hence it can audit/control these connections.
Figure 173: Client - Broker - SPS as socks proxy - Server
To configure such a scenario, you must set the ICA Connection Policy as follows:
-
Enter the IP address of SPS into the To field. This must be the public IP address that the clients will target.
-
Select Inband destination selection, and list the IP addresses or networks of target servers in the Targets field. (For details, see Configuring inband destination selection.)
-
Select Act as a SOCKS proxy.
-
Add the IP addresses of your brokers to the Brokers field.
Troubleshooting Citrix-related problems
Accessing Citrix servers using the Remote Desktop Protocol
Accessing Citrix servers using the Remote Desktop Protocol may fail in certain situations, and the connection is terminated with the ERROR: error while decompressing packet error message on the client, or with the Event56, TermDD, The Terminal Server security layer detected an error in the protocol stream and has disconnected the client. message on the server.
To overcome this problem, modify the settings of the network card of the server, and disable the Large Send Offload option.
|
|
NOTE:
The problem is not related to using One Identity Safeguard for Privileged Sessions (SPS) in your environment. |
RDP-specific settings
The following sections describe configuration settings available only for the RDP protocol. Use the following policies to control who, when, and how can access the RDP connection.
-
Channel Policy: The channel policy determines which RDP channels (for example clipboard, file-sharing, and so on) can be used in the connection, and whether they are audited or not. The different channels may be available only under certain restrictions, as set in the channel policy. For details, see Creating and editing channel policies.
-
RDP settings: RDP settings determine the parameters of the connection on the protocol level, including timeout value, display parameters, and the version of RDP permitted. For details, see Creating and editing protocol-level RDP settings.
-
Domain membership: When using Network Level Authentication (CredSSP) One Identity Safeguard for Privileged Sessions (SPS) must be a member of the domain. For details, see Network Level Authentication (NLA) with domain membership.
-
TLS-encrypted connections: For details on how to setup TLS-encrypted RDP connections, see Enabling TLS-encryption for RDP connections and Verifying the certificate of the RDP server in encrypted connections.
-
SPS as a Remote Desktop Gateway: For details on how to configure SPS to accept connections using the Remote Desktop Gateway Server Protocol, see Using One Identity Safeguard for Privileged Sessions (SPS) as a Remote Desktop Gateway.
-
Content Policy: Content policies allow you to inspect the content of the connections for various text patterns, and perform an action if the pattern is found. For example, SPS can send an e-mail alert if a specific window title appears in RDP and VNC connections. For details, see Creating a new content policy.
-
Authentication and Authorization plugin:
One Identity Safeguard for Privileged Sessions (SPS) provides a plugin framework to integrate SPS to external systems to authenticate or authorize the user before authenticating on the target server. Such plugins can also be used to request additional information from the users, for example, to perform multi-factor authentication.
For details, see Integrating external authentication and authorization systems.
Using multiple monitors (Multimon) is supported. To enable Multimon, use one of the following three methods:
-
enable Display > Use all my monitors for the remote session option in the Remote Desktop Client (mstsc.exe) window of the client machine
-
use the /multimon switch on the mstsc.exe command line
-
add the use multimon:i:1 row to the RDP file
|
|
NOTE:
The Maximum display width and Maximum display height options should be high enough to cover the combined resolution of the client monitor setup. Connections that exceed these limits will automatically fail. Make sure to adjust these settings if your clients use multiple monitors. For example, if your clients use two monitors that have a resolution of 1920x1080 pixels each, set Maximum display width to 4000, and Maximum display height to 2200. |
Limitations
The RDP connection fails due to the following Windows-side settings:
- If the target user is a member of the Protected Users security group.
- If Remote Credential Guard is enabled and used.
- If Restricted Admin mode is enabled and used. For more information on how to enable or disable the Restricted Admin mode on Windows, see Remote Desktop Services: Enable Restricted Admin mode.