
Supported encryption algorithms
The following tables contain all the encryption algorithms you can configure One Identity Safeguard for Privileged Sessions (SPS) to recognize. If you use a configuration that is only partially supported, SPS might ignore the connection without warning.
|
|
NOTE:
Do not use the CBC block cipher mode, or the diffie-hellman-group1-sha1 key exchange algorithm. |

Key exchange algorithms
The default SPS configuration for both the client and the server is the following:
diffie-hellman-group-exchange-sha256,diffie-hellman-group-exchange-sha1,diffie-hellman-group14-sha1
The following key exchange (KEX) algorithms are recognized:
| Key exchange (KEX) | Default | Comment |
|---|---|---|
| diffie-hellman-group1-sha1 | – | Not recommended |
| diffie-hellman-group14-sha1 | ✔ | |
| diffie-hellman-group-exchange-sha1 | ✔ | |
| diffie-hellman-group-exchange-sha256 | ✔ |
Cipher algorithms
The default SPS configuration for both the client and the server is the following:
aes128-ctr,aes192-ctr,aes256-ctr
The following cipher algorithms are recognized:
| Cipher algorithm | Default | Comment |
|---|---|---|
| 3des-cbc | – | Not recommended |
| blowfish-cbc | – | Not recommended |
| twofish256-cbc | – | Not recommended |
| twofish-cbc | – | Not recommended |
| twofish192-cbc | – | Not recommended |
| twofish128-cbc | – | Not recommended |
| aes256-cbc | – | Not recommended |
| aes192-cbc | – | Not recommended |
| aes128-cbc | – | Not recommended |
| aes256-ctr | ✔ | |
| aes192-ctr | ✔ | |
| aes128-ctr | ✔ | |
| serpent256-cbc | – | Not recommended |
| serpent192-cbc | – | Not recommended |
| serpent128-cbc | – | Not recommended |
| arcfour | – | Not recommended |
| idea-cbc | – | Not recommended |
| cast128-cbc | – | Not recommended |
| none | – | Means no cipher algorithm; not recommended |
Message authentication code (MAC) algorithms
The default SPS configuration for both the client and the server is the following:
hmac-sha2-256,hmac-sha2-512
The following MAC algorithms are recognized:
| MAC | Default |
|---|---|
| hmac-sha1 | – |
| hmac-sha1-96 | – |
| hmac-md5 | – |
| hmac-md5-96 | – |
| hmac-sha2-256 | ✔ |
| hmac-sha2-512 | ✔ |
SSH compression algorithms
The default SPS configuration for both the client and the server is the following:
none
The following SSH compression algorithms are recognized:
| SSH compression algorithm | Default | Comment |
|---|---|---|
| zlib | – | |
| none | ✔ | Means no compression |
Telnet-specific settings
The following sections describe configuration settings available only for the Telnet protocol. Use the following policies to control who, when, and how can access the Telnet connection. For a list of supported client applications, see Supported protocols and client applications.
-
Channel Policy: The Telnet protocol has only one channel type with no special configuration options. The available channel policy options are the following: Type, From, Target, Time policy, 4 eyes, Record audit trail, Gateway groups, Remote groups, and Content policy. For details on configuring these options, see Creating and editing channel policies.
-
TLS support: To enable TLS-encryption for your Telnet connections, see Enabling TLS-encryption for Telnet connections.
-
Authentication Policy: Authentication policies describe the authentication methods allowed in a connection. Different methods can be used for the client and server-side connections. For details, see Creating a new Telnet authentication policy.
-
Telnet settings: Telnet settings determine the parameters of the connection on the protocol level, including timeout value, and so on. For details, see Creating and editing protocol-level Telnet settings.
-
User lists in Channel Policies: User lists affect Telnet connections only when they are used together with Gateway Authentication. For details, see Configuring gateway authentication.
-
Content Policy: Content policies allow you to inspect the content of the connections for various text patterns, and perform an action if the pattern is found. For example, One Identity Safeguard for Privileged Sessions (SPS) can send an e-mail alert if a specific command is used in a Telnet terminal session. For details, see Creating a new content policy.
-
Authentication and Authorization plugin:
One Identity Safeguard for Privileged Sessions (SPS) provides a plugin framework to integrate SPS to external systems to authenticate or authorize the user before authenticating on the target server. Such plugins can also be used to request additional information from the users, for example, to perform multi-factor authentication.
For details, see Integrating external authentication and authorization systems.
Enabling TLS-encryption for Telnet connections
The following steps describe how to enable TLS-encryption in a Telnet connection policy. Note that when using encryption, One Identity Safeguard for Privileged Sessions (SPS) automatically changes the port number of the connection policy to 992.
Prerequisites
Depending on your requirements, one or more of the following might be needed:
-
An X.509 certificate and its private key. SPS can display the same certificate to the peers on both the client and the server side. You can also use different certificates for the client and server sides. Use your own PKI system to generate these certificates, as they cannot be created on SPS. Note that the Common Name of the certificate must contain the domain name or the IP address of SPS, otherwise the clients might reject the certificate.
-
To generate certificates on-the-fly for a connection, a signing certificate authority is required. For details on creating a signing CA, see Signing certificates on-the-fly.
-
To require the peers of SPS to have an X.509 certificate signed by a specific Certificate Authority, a list of the trusted certificate authorities is needed. For details on creating a trusted CA list, see Verifying certificates with Certificate Authorities.
One Identity recommends using 2048-bit RSA keys (or stronger).
To enable TLS-encryption in a Telnet connection policy
-
Navigate to Telnet Control > Connections and select the connection policy in which you want to enable TLS.
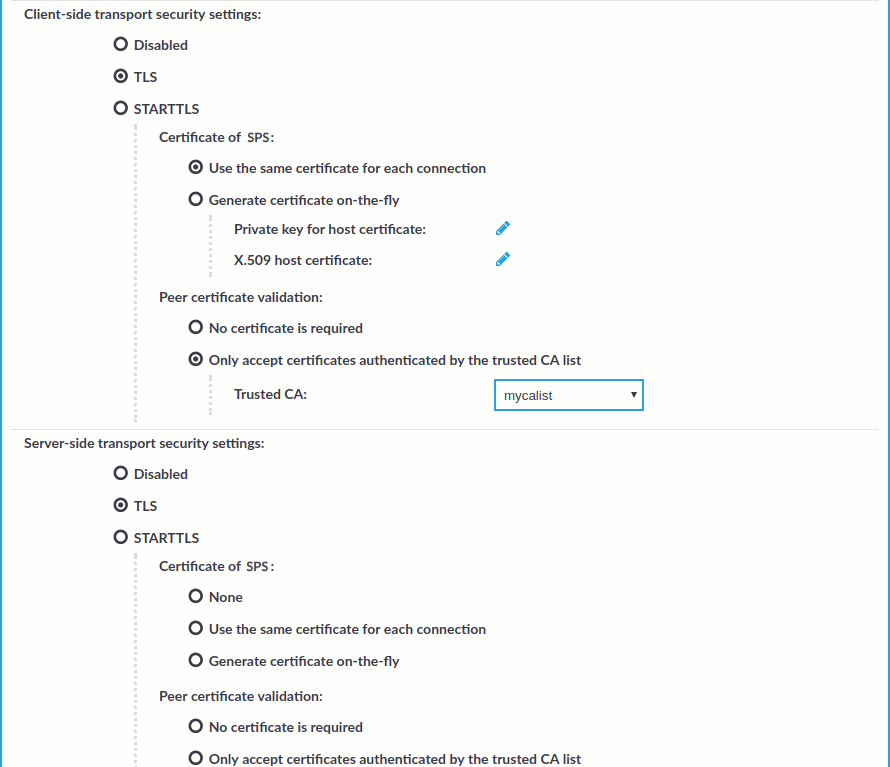
Figure 195: Telnet Control > Connections — Enabling TLS-encryption for Telnet connections
-
Set the encryption settings used between the client and SPS in the Client-side transport security settings section.
-
To require encryption, select TLS. When the connection is encrypted, SPS has to show a certificate to the peer.
-
To enable encrypted connections that use the STARTTLS method, select STARTTLS. Note that the peer must use the STARTTLS method. Unencrypted connections will be terminated after a brief period.
-
-
Select the certificate to show to the peers.
-
To use the same certificate for every peer, complete the following steps.
-
Generate and sign a certificate for SPS in your PKI system, and export the certificate and its private key.
-
Select Use the same certificate for each connection.
-
Select Private key for host certificate, click and upload the private key.
-
Select X.509 host certificate, click and upload the certificate.
-
-
To use a separate certificate for every connection, complete the following steps.
-
Create a certificate authority that will be used to sign the certificates that SPS shows to the peer. For details, see Signing certificates on-the-fly.
-
Select Generate certificate on-the-fly.
-
In the Signing CA field, select the certificate authority to use.
-
-
-
Select how SPS should authenticate the peers.
-
To permit connections from peers without requesting a certificate, select No certificate is required.
-
To permit connections only from peers with a valid certificate that was signed by a specific CA, complete the following steps.
-
Create a list of trusted Certificate Authorities that will be used to validate the certificates of the peers. For details on creating a trusted CA list, see Verifying certificates with Certificate Authorities.
-
Select Only accept certificates authenticated by the trusted CA list.
-
Select the certificate authority list to use in the Trusted CA field.
-
-
-
Set the encryption settings used between SPS and the server in the Server-side transport security settings section.
-
To require encryption, select TLS. When the connection is encrypted, SPS has to show a certificate to the peer.
-
To enable encrypted connections that use the STARTTLS method, select STARTTLS. Note that the peer must use the STARTTLS method. Unencrypted connections will be terminated after a brief period.
-
-
Select the certificate to show to the server.
-
If the server does not require a certificate from SPS, select None.
-
To use the same certificate for every peer, complete the following steps.
-
Generate and sign a certificate for SPS in your PKI system, and export the certificate and its private key.
-
Select Use the same certificate for each connection.
-
Select Private key for host certificate, click and upload the private key.
-
Select X.509 host certificate, click and upload the certificate.
-
-
To use a separate certificate for every connection, complete the following steps.
-
Create a certificate authority that will be used to sign the certificates that SPS shows to the peer. For details, see Signing certificates on-the-fly.
-
Select Generate certificate on-the-fly.
-
Select the certificate authority to use in the Signing CA field.
-
Limitations
NOTE: When using the Use the same certificate for each connection option and the connection policy that allows access to multiple servers using HTTPS, the client applications will display a warning because the certificate used in the connection will be invalid (namely, the Common Name of the certificate will not match the hostname or IP address of the server).
NOTE: Import the certificate of the signing Certificate Authority to your clients. Otherwise, the client applications will display a warning due to the unknown Certificate Authority.
-
-
Select how SPS should authenticate the peers.
-
To permit connections from peers without requesting a certificate, select No certificate is required.
-
To permit connections only from peers with a valid certificate that was signed by a specific CA, complete the following steps.
-
Create a list of trusted Certificate Authorities that will be used to validate the certificates of the peers. For details on creating a trusted CA list, see Verifying certificates with Certificate Authorities.
-
Select Only accept certificates authenticated by the trusted CA list.
-
Select the certificate authority list to use in the Trusted CA field.
-
-
-
Click
.
Expected result
The encryption settings are applied to the connection policy.
Creating a new Telnet authentication policy
An authentication policy is a list of authentication methods that can be used in a connection. Connection definitions refer to an authentication policy to determine how the client can authenticate to the target server. Separate authentication methods can be used on the client and the server-side of the connection.
To create a new authentication policy
-
Navigate to Telnet Control > Authentication Policies, and click
.
Figure 196: Telnet Control > Authentication Policies — Configuring Telnet authentication policies
-
Enter a name for the policy into the Name field.
-
Select the authentication method used on the client-side in the One Identity Safeguard for Privileged Sessions (SPS)Authenticate the client to SPS using field. For the client-side connection, SPS can authenticate the client inband (within the Telnet protocol) using the following authentication methods:
-
LDAP: SPS will authenticate the client to the LDAP database set in the LDAP Server of the connection policy. To use LDAP authentication on the client side, select Authenticate the client to SPS using > LDAP.
NOTE: SPS will authenticate the client-side connection to the LDAP server configured in the connection policy. This is not necessarily the same as the LDAP server used to authenticate the users accessing the SPS web interface.
-
Local user database: Authenticate the client locally on the SPS gateway using a Local user database. Select the database to use in the Local user database field. For details on creating a Local User Database, see Creating a Local User Database.
-
RADIUS: SPS will authenticate the client to the specified RADIUS server. Select Authenticate the client to SPS using > RADIUS, enter the IP address or hostname of the RADIUS server into the Address field, the port number of the RADIUS server into the Port field, and the shared secret of the RADIUS server into the Shared secret field. Only password-authentication is supported (including one-time passwords), challenge-response based authentication is not.
Use an IPv4 address.
To add more RADIUS servers, click
-
None: Do not perform client-side authentication, the client will authenticate only on the target server.
Caution: Hazard of security breach. If the None authentication option is selected on the client side and SPS is configured to use public-key or certificate based authentication on the server, the user will not be authenticated at all unless gateway authentication is required for the connection.
-
-
Click
NOTE: -
The client-side authentication settings apply for authenticating the user inband (that is, within the SSH protocol) to the SPS gateway, and is independent from the gateway authentication performed on the SPS web interface. The web-based gateway authentication is an out-of-band gateway authentication method that can be required by the connection policy. For details on out-of-band gateway authentication, see Configuring out-of-band gateway authentication.
Gateway authentication on the SPS web interface can be used together with authentication policies. In an extreme setting, this would mean that the user has to perform three authentications: a client-side gateway authentication within the SSH protocol to SPS, an out-of-band gateway authentication on the SPS web interface, and a final authentication on the target server.
-
The Connection Policy will ignore the settings for server-side authentication (set under Relayed authentication methods) if a Credential Store is used in the Connection Policy.
-

