
Digitally signing audit trails
One Identity Safeguard for Privileged Sessions (SPS) can digitally sign the audit trails to prevent the manipulation of the audit trail files. This requires an X.509 certificate and also the private key of the certificate. Note that SPS can generate a private key that you can use to create a certificate, but SPS itself cannot create the certificate used to sign the audit trails.
To enable the digital signing of the audit trails
-
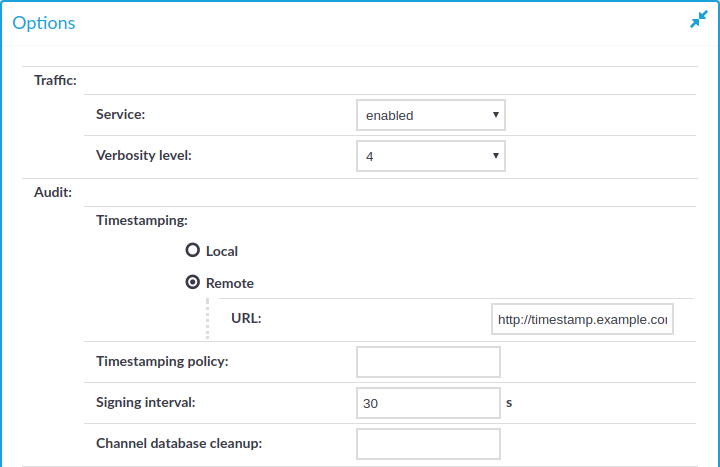
Configure the signing interval. You have to repeat these steps for each protocol (HTTP, ICA, RDP, SSH, Telnet, and VNC) you want to configure:
Figure 153: <Protocol name> Control > Global Options — Configuring the signing interval
-
In the protocol control settings, navigate to Global Options > Timestamping (for example, SSH Control > Global Options > Timestamping).
-
Set the Signing interval. You can choose any value between 10 and 100 000 seconds.
NOTE: The same interval setting applies to timestamping and signing.
-
Click
.
-
-
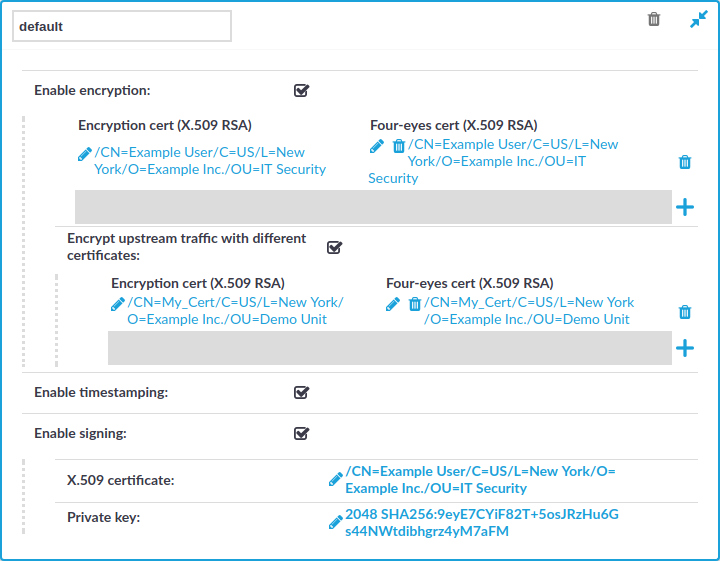
Navigate to Policies > Audit Policies and select the audit policy you will use in your connections.
Figure 154: Policies > Audit Policies — Signing audit trails
TIP: By default, every connection uses the built-in default audit policy. Unless you use a custom audit policy, modifying the default audit policy will affect every audited channel of the connections passing through One Identity Safeguard for Privileged Sessions (SPS).
-
Select the Enable signing option.
-
Upload a certificate and the corresponding private key to SPS.
-
Click
-
Repeat the above steps for other audit policies if needed.

Verifying certificates with Certificate Authorities
One Identity Safeguard for Privileged Sessions (SPS) can check the validity of certificates using the certificates and certificate-revocation lists of the certificate authorities that issued the certificates.
To create a list of CA certificates to use during the certificate validation
-
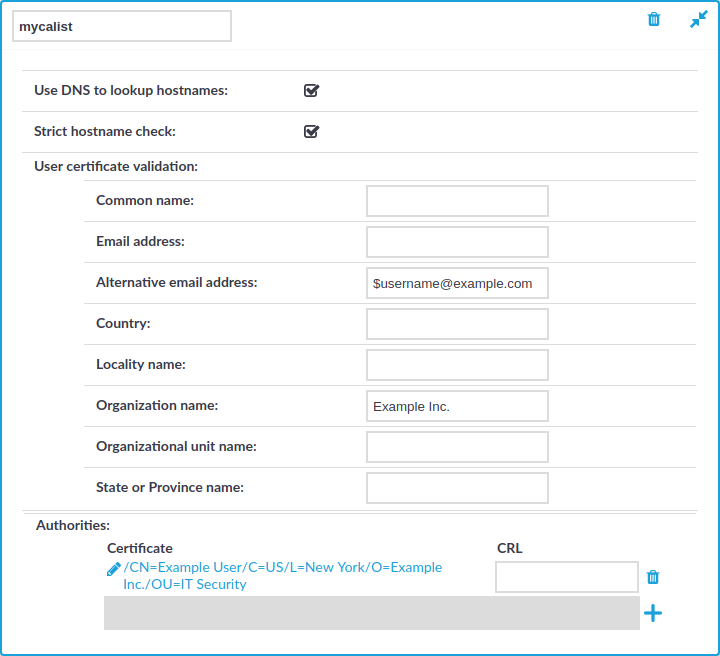
Navigate to Policies > Trusted CA Lists and click
to create a new list.
Figure 155: Policies > Trusted CA Lists — Creating Trusted CA lists
-
Enter a name for the CA list into the topmost field.
-
Click
in the Certificate field, and upload the certificate of the Certificate Authority (CA) that will be used to validate the certificates.
-
Enter the URL of the Certificate Revocation List of the CA into the CRL field. Certificates appearing on the CRL list will be automatically rejected.
NOTE: Note that only .pem format CRLs are accepted. CRLs that are in PKCS7 format (.crl) are not accepted.
-
To further limit which certificates are accepted, you may use the following options:
-
Strict hostname check: Select this option to accept only certificates when the Common Name of the certificate contains the hostname or the IP address of the host showing the certificate.
-
Use DNS to lookup hostnames: Select this option to use the domain name server set on Basic Settings > Network > Naming to resolve the hostnames and IP addresses for certificate validation. If you have enabled the Strict hostname check option, you probably want to enable this option as well.
-
To restrict the accepted certificates based on the content of the certificate, enter the required value into the appropriate field of the User certificate validation section. For example, to accept only certificates that contain Example Inc. in their Organization Name field, enter Example Inc. in to the Organization Name field. In the Common name, E-mail address, and Alternative e-mail address fields you can use the $username macro to refer to the username used in the connection. This macro makes it possible to check that the user is using his own certificate.
-
-
Click
Signing certificates on-the-fly
At a number of places, One Identity Safeguard for Privileged Sessions (SPS) can generate the server certificates on the fly. This technique is used for example in SSL-encrypted RDP sessions, RDP sessions that use Network Level Authentication (CredSSP), or SSH connections that use X.509-based authentication.
|
|
NOTE:
Note the following points about using signing CAs:
|
To create a signing CA
-
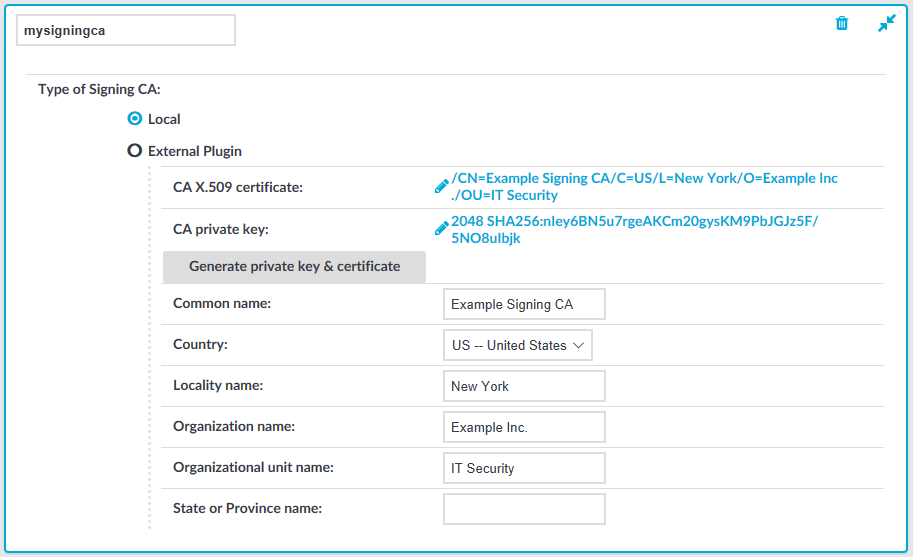
Navigate to Policies > Signing CAs and click
- Select:
- Local to use the built-in signing CA solution, and complete the following steps:
- Enter a name for the CA into the topmost field.
Figure 156: Policies > Signing CAs — Creating Signing CAs - Local
-
To upload a CA certificate and its private key, complete the following steps. Skip this step if you want to generate a CA on SPS.
-
Click Edit in the CA X.509 certificate field and upload the certificate of the certificate authority. Alternatively, you can upload a certificate chain, where one member of the chain is the CA that will sign the certificates.
-
Click Edit in the CA private key field and upload the private key of the certificate authority that will sign the certificates.
-
(Optional) Enter the URL of the Certificate Revocation List (CRL) that you generated using your Certificate Authority in your Public Key Infrastructure (PKI) solution. The URL pointing to this CRL will be included in the certificate. This is the CRL information that will be shown to clients connecting to SPS.
Note that the CRL list is not generated by the internal CA of SPS. The list must come from your own PKI solution.
-
Click
-
-
To generate a CA certificate on SPS, complete the following steps:
-
Enter the Common Name for the CA certificate into the Common Name field. This name will be visible in the Issued By field of the certificates signed by this CA.
-
Fill the other fields as required, then click Generate private key and certificate.
-
Click
-
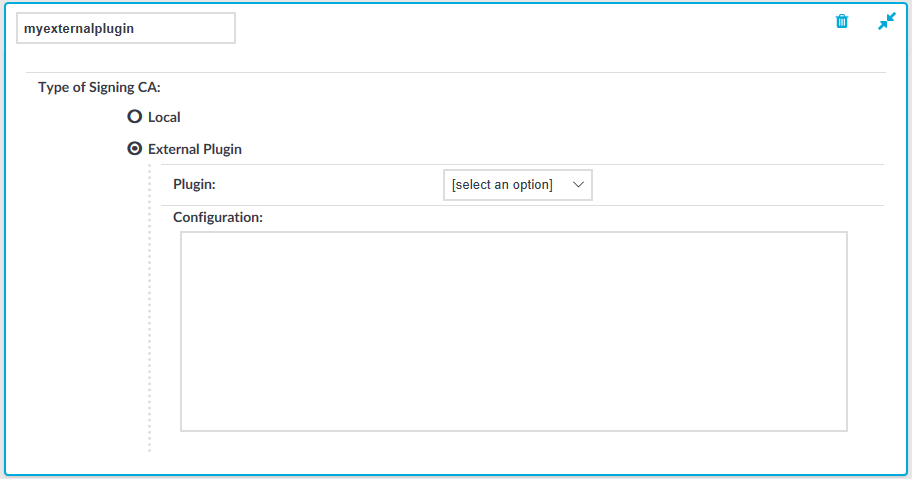
- Enter a name for the CA into the topmost field.
- External Plugin to use an external signing CA plugin, and complete the following steps:
- Enter a name for the CA into the topmost field.
Figure 157: Policies > Signing CAs — Creating Signing CAs - External Plugin
-
From the Plugin field, select an uploaded external plugin using the drop-down menu.
To be able to select from the drop-down menu, you must have an external plugin uploaded in Basic Settings > Plugins > Signing CAs.
For more information about how to create an external Signing CA plugin, see Creating an external Signing CA.
-
Optionally, fill the Configuration field as required by the uploaded plugin.
The input you enter in the Configuration field is passed down to the plugin.
- Enter a name for the CA into the topmost field.
- Local to use the built-in signing CA solution, and complete the following steps:
Creating an external Signing CA
Overview
The External Signing CA plugin's purpose is to generate certificate and private key pairs signed by a Certificate Authority. By using this type of plugin the certificate signing can be tailored to fit any custom requirement.
Details
The plugin is a ZIP file containing a MANIFEST and a main.py file.
The MANIFEST file
The MANIFEST file is a YAML file, and should conform to version 1.2 of the YAML specification. It should contain the following information about the plugin:
api: 1.0
type: signingca
name: MySigningCaPlugin
version: 1.0
description: My custom Signing CA
The type of the plugin must be signingca.
The main.py file
A Plugin class containing the following methods must be defined in the main.py file:
generate_for_addresses:generates a key/certificate pair for the given addresses (IP/DNS)generate_for_username:generates a key/certificate pair for the given usernamegenerate_for_subject:generates a key/certificate pair for the given subject values
Method arguments
Each method must take the following arguments:
generate_for_addresses:addresses:{list of str} - contains either IP or DNS addresses for which the certificate shall be issuedkeytype:{str} - contains a fixed value of 'RSA' or 'DSS' indicating the requested key type for the certificate
generate_for_username:username{str} - contains the username for which the certificate shall be issuedkeytype:{str} - contains a fixed value of 'RSA' or 'DSS' indicating the requested key type for the certificate
generate_for_subject:subject{list of (str, str)} - contains the certificate subject as type-value pairs (tuples). Valid types are the following:'C'country name'ST'state or province name'L'locality name'O'orangization name'OU'organizational unit'CN'common name'emailAddress'email address
keytype:{str} - contains a fixed value of 'RSA' or 'DSS' indicating the requested key type for the certificate
Method return values
Each method returns a {dict} that must have the following keys:
key:{str} the generated keychain:{list of str} a PEM encoded certificate chain containing the generated certificate as the first element
Example
The code below demonstrates a simple plugin that can sign certificates with a built in CA. By default it uses a pre-generated CA certificate and key to complete signing requests. To use a custom certificate, provide a certificate and a key in a python dict format in the configuration field.
Note: If you wish to try this sample code, you will need to provide a MANIFEST file (see below) and the following package dependencies in the .zip file alongside the plugin:
asn1cryptocertbuilderoscrypto
main.py:
#!/usr/bin/env pluginwrapper3

#
# Copyright (c) One Identity
# All Rights Reserved.
#

from ast import literal_eval
from certbuilder import CertificateBuilder, pem_armor_certificate
from ipaddress import ip_address
from oscrypto import asymmetric

class Plugin(object):

    plugin_root_ca = """-----BEGIN CERTIFICATE-----
MIIDhjCCAm6gAwIBAgIIW+mOlk1Cu4swDQYJKoZIhvcNAQELBQAwYTELMAkGA1UE
BhMCSFUxETAPBgNVBAgMCEJ1ZGFwZXN0MREwDwYDVQQHDAhCdWRhcGVzdDEQMA4G
A1UECgwHQmFsYWJpdDEaMBgGA1UEAwwRQmFsYWJpdCBQbHVnaW4gQ0EwHhcNMTgx
MTEyMTQzMDQ2WhcNMTkxMTEyMTQzMDQ2WjBhMQswCQYDVQQGEwJIVTERMA8GA1UE
CAwIQnVkYXBlc3QxETAPBgNVBAcMCEJ1ZGFwZXN0MRAwDgYDVQQKDAdCYWxhYml0
MRowGAYDVQQDDBFCYWxhYml0IFBsdWdpbiBDQTCCASIwDQYJKoZIhvcNAQEBBQAD
ggEPADCCAQoCggEBAO73W0ONVwIaBJas+qUe0VBZ4rtk6PtzRNenZcBkTCkITuuF
DAQ3T1qLUsCyQ4uHMo+yKZUqR3HxbWGxS2l4IaHP6Hbna2kNEyYEsg16mGVUz6tc
D6bxFu3EpB7eU/OXh8RS8URIfZbLNrql1sKe7k1hpXUDS74Ra/avUIYKIpZ5sCjs
F6MBZWz5u3tNUa53xVmqgpnQ6pozN+OQ6k74DjK4xqWqJgTWcN6rxZ9k2voQYE3s
H66jl53q+Zl0D4w/AEW5W3OYNHJtx3tsc36sD2i0doqBCAAvflcSDEs7TXhfXSkC
qCBKyx8ics5EL9h49MDPGwDTehzwvXusz8LlxeMCAwEAAaNCMEAwDwYDVR0TAQH/
BAUwAwEB/zAdBgNVHQ4EFgQUyFWUMJli0q5CtJOp25IqK2M70oAwDgYDVR0PAQH/
BAQDAgEGMA0GCSqGSIb3DQEBCwUAA4IBAQCWoQCJPqfM4Sjg0R2O42yrE2GtQsXf
Qb3Dur+CefWLcvjI28t1xuj31khDgpNTwk4IVYrvarNX33C3tjYKgcimwWRMijbA
p8kZzFajOZSWC32CQtkWL79LLkJCTJB7b/4E41oNQPHtOoNCqFY+uQogP90qZ1w1
xlFX8ie/W3cuqhfzW6+/M3iCIwdjhBquvOo6mE3t2/lUcGXE20GayFsKnEmgpDJa
nxoG1+m+s5zCwDuukX8Lr1O7maTMwNVhm5P5QWeEPbGRN7yw+CfzcvPIbFYwnZ5x
XeC9Vtoj2Jbom8RV9uus8R5LfYBJ+HZh74wbGhIC2Kf9LrJTK7r92uVA
-----END CERTIFICATE-----"""

    plugin_root_ca_key = """-----BEGIN PRIVATE KEY-----
MIIEvwIBADANBgkqhkiG9w0BAQEFAASCBKkwggSlAgEAAoIBAQDu91tDjVcCGgSW
rPqlHtFQWeK7ZOj7c0TXp2XAZEwpCE7rhQwEN09ai1LAskOLhzKPsimVKkdx8W1h
sUtpeCGhz+h252tpDRMmBLINephlVM+rXA+m8RbtxKQe3lPzl4fEUvFESH2Wyza6
pdbCnu5NYaV1A0u+EWv2r1CGCiKWebAo7BejAWVs+bt7TVGud8VZqoKZ0OqaMzfj
kOpO+A4yuMalqiYE1nDeq8WfZNr6EGBN7B+uo5ed6vmZdA+MPwBFuVtzmDRybcd7
bHN+rA9otHaKgQgAL35XEgxLO014X10pAqggSssfInLORC/YePTAzxsA03oc8L17
rM/C5cXjAgMBAAECggEBAIucxpw76naW3tFtNG7eB2pLaZUUSq4F1VWtPlxd/MUI
Tpt5OuEHs3vx5CIixCWzkk2zyGmWrvEaHU6zN5ziC7wu7ODzKaTRd7uBiMkpM/oX
x9CU06w0NLIrbbt/J0ss36xKzRyYwY8lIM+Bbmx8UDuzbehkSY89PHd+S6xUJYsF
YmOVM00wx1N6yZGKHUV9GLRnysHb+DBbjGIcjDqmlsdyuAzlB7/DAeToLFNkZvzx
Qzza6whMILXS9Qp39dzn7nJuJywfoOAX2q5LgOrPise2QY1FuAy0GTfqvBDR1eGd
NwFW5YtH89l347AIDPgklKvKaii2iIw1ZEMf1AlX7mECgYEA+0JM9sToMgLhHJDj
cUsznVn3xzjDT/4O95LdAq1fVrn10wh/SwGCBBPMHQkV1nS70d//1aGctZLWk5+F
K3aPGV9Eas70mOGNcXdU1ITpFNuVfbKK8uH5NF/oEuoD4zRabunrj/zEk0Qu/D9v
pN4qEwJoV1SD/9HpfpaUG/xuBLECgYEA83mtE34zYTY2TLBr4HvoiWrFYoEpPldN
64oD+w1/D0Wd9hxCyzO3y2SmrBmmbzoawTckxD/VKndeRdV5dLlEnAV4F35bPsQl
dRJJEAAQPqqc1z4x6c2my27WPSbm4mIcvfTc65UFu4ovm/koywc96fwvpTX6JIN1
X8zHZ/tQaNMCgYEAl3yk3I9hk22K/ecZSiBWEUPCETpW/66kpX3FhKy085wQ61iP
LtDM69pn0QW+RduBtgsAu3PCAPN0LfManlbP9jMrE96NOHOdDNEusycjRHET04JH
JiM6VeqRCH5RM7ZH4+FjJh/3APc2AN3aWSOdaHKmKCkLoLyVs73jtG/ggTECgYBp
reCf22E1yrAa7WCFmYK/UqbGMMXUF1Ts7YT4zUzfNhpwHqgnRxV5pQBrJt8E3DWM
tACzZfmCazlyGkyTi27qQb10hRXZ0o1nmT45Qa3LZYaaLpa/otHI7xzyghYpIOjU
0pmpb4+DbWFo0+cO6N/I1ftgPGOMwbqKkHnk+kJWnQKBgQDQwITXna8OVjn86AQP
m36JHXi0RNVO/x4+b8T7nurU6XCPIzE0PxfVVSXXsbKTWlq48GIw9ZNpPKPSTCQy
fnYC+Pcu+4A+bfUwFk21khnN/fP5vyFlFhTrGneZeKWhUxv5iOqASEaizfOePmtj
et/4B9LUf9KQFstlhuIR4AP2OA==
-----END PRIVATE KEY-----"""

    def __init__(self, configuration=""):
        self.cert_x509name = {
            'country_name': 'HU',
            'state_or_province_name': 'Budapest',
            'locality_name': 'Budapest',
            'organization_name': 'One Identity',
            'common_name': '',
        }
        self.cert_alt_domains = []
        self.cert_alt_ips = []

        if configuration is not "":
            try:
                configdict = literal_eval(configuration)
                self.plugin_root_ca = configdict['ca']
                self.plugin_root_ca_key = configdict['key']
            except Exception:
                pass

        self.root_ca_certificate = asymmetric.load_certificate(bytes(self.plugin_root_ca, 'utf-8'))
        self.root_ca_key = asymmetric.load_private_key(bytes(self.plugin_root_ca_key, 'utf-8'))

    def _sign_certificate(self):
        end_entity_public_key, end_entity_private_key = asymmetric.generate_pair(self.cert_keytype, bit_size=2048)
        end_entity_private_key = asymmetric.dump_private_key(end_entity_private_key, None)
        end_entity_subject = self.cert_x509name

        builder = CertificateBuilder(
            end_entity_subject,
            end_entity_public_key
        )

        builder.subject_alt_domains = self.cert_alt_domains
        builder.subject_alt_ips = self.cert_alt_ips
        builder.issuer = self.root_ca_certificate
        end_entity_certificate = builder.build(self.root_ca_key)
        end_entity_certificate = pem_armor_certificate(end_entity_certificate)
        return end_entity_certificate, end_entity_private_key

    _subject_type_mapping = {
        'C': 'country_name',
        'ST': 'state_or_province_name',
        'L': 'locality_name',
        'O': 'organization_name',
        'OU': 'organizational_unit_name',
        'CN': 'common_name',
        'emailAddress': 'email_address',
    }

    def _set_certificate_x509_name(self, x509name):
        for (t, v) in x509name:
            self.cert_x509name[self._subject_type_mapping[t]] = v

    def _set_certificate_keytype(self, keytype):
        # Certbuilder lists DSS key as DSA so we have to translate the string here
        if keytype == "dss": keytype = "dsa"
        if keytype not in ['dsa', 'rsa']:
            raise ValueError('Certificate type should be either \'rsa\' or \'dss\'')
        else:
            self.cert_keytype = keytype

    def _set_certificate_cn(self, cn):
        self.cert_x509name['common_name'] = cn

    def _set_certificate_addresses(self, addresses):
        for address in addresses:
            try:
                ip_address(address)
                self.cert_alt_ips.append(address)
            except ValueError:
                self.cert_alt_domains.append(address)

    def _build_response(self, cert, key):
        return {'key': key.decode('ascii'), 'chain': [cert.decode('ascii'), self.plugin_root_ca]}

    def generate_for_addresses(self, addresses: list, keytype: str):
        self._set_certificate_keytype(keytype)
        self._set_certificate_addresses(addresses)
        self._set_certificate_cn(addresses[0])
        return self._build_response(
            *self._sign_certificate()
        )

    def generate_for_username(self, username: str, keytype: str):
        self._set_certificate_keytype(keytype)
        self._set_certificate_cn(username)
        return self._build_response(
            *self._sign_certificate()
        )

    def generate_for_subject(self, x509name: list, keytype: str):
        self._set_certificate_keytype(keytype)
        self._set_certificate_x509_name(x509name)
        return self._build_response(
            *self._sign_certificate()
        )
Use the following snippet as the MANIFEST file:
# Name of the plugin, may contain [a-zA-Z0-9]
name: HelloSigningCaPlugin

# Version of the plugin, only for display purposes
version: 0.1

# Type of the plugin - this is a signingca plugin
type: signingca

# API version of the SCB the plugin was written for, in major.minor format
api: 1.0

# Free form description.
description: This is an example plugin used for testing.

# Entry point for the plugin (also for running with python3)
entry_point: main.py