
Creating a Local User Database
Local User Databases are available for HTTP, RDP, SSH and Telnet protocols, and can be used to authenticate the clients to credentials that are locally available on One Identity Safeguard for Privileged Sessions (SPS). Such credentials include passwords and public keys. Local User Databases are most commonly used in inband gateway authentication scenarios.
|
|
NOTE:
To store credentials on SPS and use them to authenticate on the server, use a local Credential Store. For details, see Using credential stores for server-side authentication. |

To create a Local User Database
-
Navigate to Policies > Local User Databases and click
.
-
Enter the name of the Local User Database.
-
Click
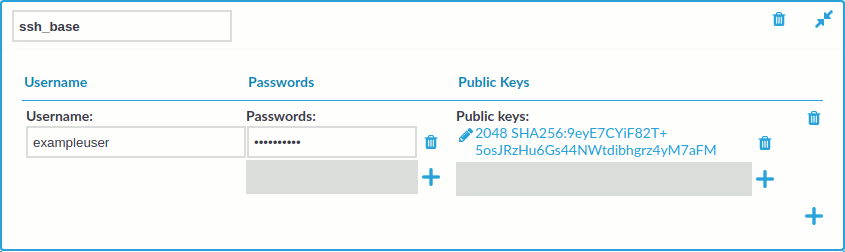
Figure 158: Policies > Local User Databases — Mapping keys
-
Enter the name of the user into the Username field.
NOTE: If you also use Usermapping policies, enter the username that the client will use on the server side. If you also use gateway authentication, the gateway username can be used as well.
-
If you use public-key based authentication on the client side, click the
SPS will verify that a client trying to use the username set in Step 3 is authenticating itself with the private key that corresponds to the uploaded public key or certificate.
One Identity recommends using 2048-bit RSA keys (or stronger).
-
Repeat the above steps to add other users as required.
-
Click
.
-
Navigate to the Authentication Policies tab of the respective protocol and select the Local User Database there.
Configuring cleanup for the One Identity Safeguard for Privileged Sessions (SPS) connection database
One Identity Safeguard for Privileged Sessions (SPS) can automatically archive audit trails older than a specified retention time. However, the metadata of the corresponding connections is not deleted from the SPS connection database. Deleting the stored data about old connections decreases the size of the database, making searches faster, and might be also required by certain policies or regulations. The period after metadata is deleted can be specified individually for the different protocols, (for example, data about SSH connections can be stored longer than other connections) and also for every connection policy.
To configure SPS to delete the metadata of old connections for a particular protocol
-
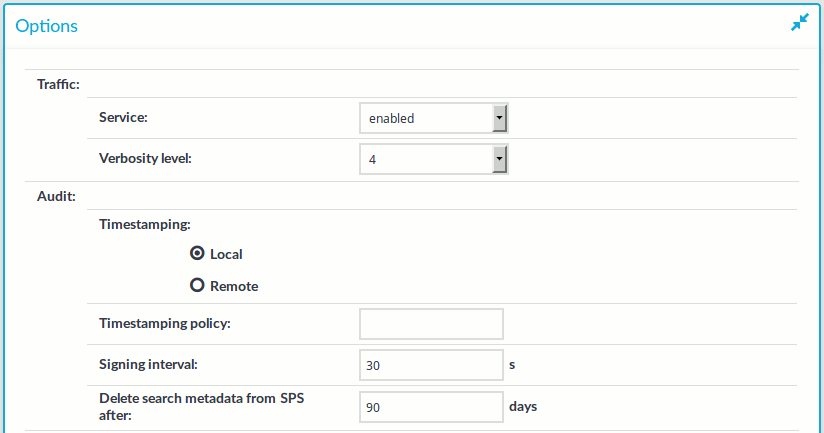
Navigate to the Global Options page of the respective protocol, for example, to SSH Control > Global Options.
-
Figure 159: <Protocol name> Control > Global Options — Configuring connection database cleanup for a protocol
Enter how long SPS (in days) should keep the metadata into the Delete search metadata from SPS after field. For example, if you specify 365, SPS will delete the data of connections older than a year. Enter zero (0) to keep the data indefinitely (this is also the default behavior of SPS).
NOTE: The database cleanup occurs once a day at 22:01 PM.
The time you specify in the Delete search metadata from SPS after field cannot be shorter than the Delete data from SPS after field set for the Archive policies used in the connections of this protocol. Note that since the database cleanup happens once a day at 22:01 PM, if you specify the same retention time, for example, 1 day in the Delete data from SPS after field, ensure that the archiving or cleanup is set to start before 22:01 PM.
The time you specify in the Delete search metadata from SPS after field cannot be shorter than the Delete search metadata from SPS after field set in the individual connection policies of this protocol.
-
Click
-
Figure 160: <Protocol name> Control > Connections — Configuring connection database cleanup for a connection
To delete the metadata of certain connections earlier than the time set in the Global Options > Delete search metadata from SPS after field of the protocol, navigate to the particular connection policy, and enter how long SPS (in days) should keep the metadata of the sessions of this connection policy into the Delete search metadata from SPS after field. Enter zero (0) to use the settings of the protocol (this is also the default behavior of SPS).
NOTE: The time you specify in the Delete search metadata from SPS after field cannot be shorter than the Delete data from SPS after field set for the Archive policies used in the connections of this protocol. Note that since the database cleanup happens once a day at 22:01 PM, if you specify the same retention time, for example, 1 day in the Delete data from SPS after field, ensure that the archiving or cleanup is set to start before 22:01 PM.
-
Click
Expected outcome:
Every day SPS deletes the metadata of connections older than the given cleanup time from the connection database.

HTTP-specific settings
The following sections describe configuration settings available only for the HTTP protocol. Use the following policies to control who, when, and how can access the HTTP connection. For details on configuring Channel Policies, see Creating and editing channel policies. For a list of supported client applications, see Supported protocols and client applications.
Auditing HTTP and HTTPS connections is possible in both transparent and non-transparent modes. SPS can also be used as an HTTP/HTTPS proxy to simplify client configuration and integration into your network environment, or it can forward HTTP traffic, behaving as a HTTP tunnel.
-
Channel Policy: The HTTP protocol has only one channel type with no special configuration options. The available channel policy options are the following: From, Target, Time policy, Record audit trail, and Remote groups. Note that the Remote groups option is used only if the user performs inband authentication using one of the supported HTTP authentication methods (see Authentication in HTTP and HTTPS). To retrieve the groups of an authenticated user from an LDAP database, you must also set an LDAP Server in the Connection Policy (for HTTP/HTTPS connections, One Identity Safeguard for Privileged Sessions (SPS) uses this server only to retrieve the group membership of authenticated users, you cannot authenticate the users to LDAP from SPS). For details on configuring these options, see Creating and editing channel policies.
When setting Target, note the following:
-
If the connection uses DNAT (NAT destination address), the target address of the original client will be compared to the Target parameter of the Channel policy, that is not necessarily equivalent with the server's address.
-
If the connection is redirected to a Fix address, the redirected address will be compared to the Target parameter of the Channel policy.
-
-
HTTP connections: For details, see Setting up HTTP connections.
-
HTTP sessions: HTTP settings determine the parameters of the connection on the protocol level, including timeout value, and so on. For details, see Session-handling in HTTP.
-
HTTP settings: HTTP settings determine the parameters of the connection on the protocol level, including timeout value, and so on. For details, see Creating and editing protocol-level HTTP settings.
Limitations in handling HTTP connections
Avoid using the IP address configured for administrator or user login on One Identity Safeguard for Privileged Sessions (SPS) when configuring HTTP or SSH connections.
The current version of SPS does not support the following features that are available for other protocols:
-
Four-eyes authorization
Forwarding HTTP connections to an HTTP proxy is not supported. If your clients use an HTTP proxy to access the target servers, place SPS behind the proxy: Clients - HTTP Proxy - SPS.
|
|
Caution:
The Clients - SPS - HTTP Proxy scenario is NOT supported. |
